ECD SYSTEM REGISTRATION

Note
-
When an injector assembly is replaced, the injector's compensation code must be input into the ECM (Proceed to step 1).
-
When the ECM is changed, all of the existing injector compensation codes must be input into the new ECM (Proceed to step 2).
-
INPUT INJECTOR COMPENSATION CODE(S) INTO ECM
Note
-
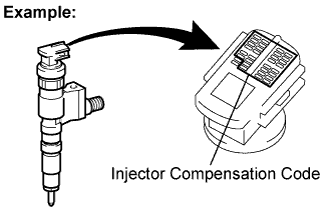
Injector compensation codes are printed on the head portion of each injector assembly. If an incorrect injector compensation code is input into the ECM, the engine may rattle or engine idling may become rough. In addition, an engine failure may occur and the life of the engine may be shortened.
-
Although some injectors are marked with a 32-digit alphanumeric value, only the first 30 digits must be input.
-
Replace the normal DLC3 cable (12 V specification) for the intelligent tester with the 24 V DLC3 cable.
Note
Be sure to use the 24 V DLC3 cable when connecting the intelligent tester to the DLC3. Using the normal DLC3 cable (12 V specification) will cause damage to the tester.
-
Connect the intelligent tester to the DLC3.
-
Turn the ignition switch to ON.
-
Turn the tester on.
Note
Do not start the engine.
Tech Tips
The injector compensation code is imprinted on the head portion of each injector assembly.
-
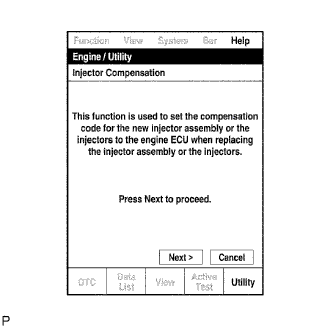
Enter the following menus: Powertrain / Engine and ECT / Utility / Injector Compensation.
-
Press "Next".
-

Press "Next" again to proceed.
-
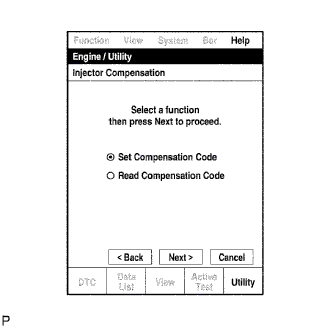
Select "Set Compensation Code".
-
Press "Next".
-
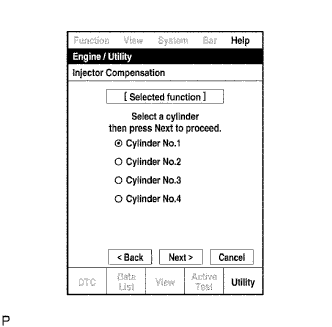
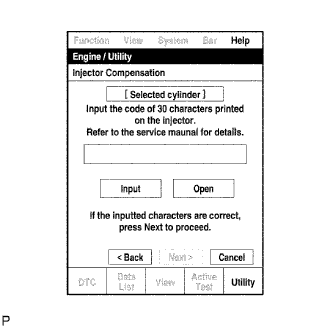
Select the number of the cylinder corresponding to the injector compensation code that you want to read.
-
Press "Next".
-
Register the compensation code.
-
Press "Input".
-
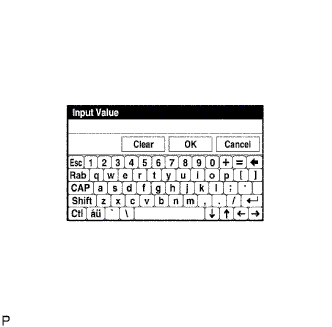
Manually input the cylinder's compensation code using the keyboard on the tester screen. The code is imprinted on the injector's head portion.
Note
Although some injectors are marked with a 32-digit alphanumeric value, only the first 30 digits must be input.
Tech Tips
Each injector compensation code is unique. The correct compensation code must be input into each cylinder selected on the tester.
-
Confirm that the compensation code is correct for the selected cylinder, and then press "OK".
-
-
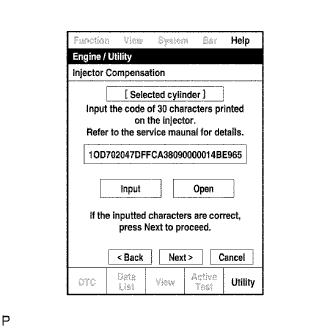
Check that the compensation code displayed on the screen is correct by comparing it with the compensation code on the head portion of the injector assembly.
Note
If an incorrect injector compensation code was input into the ECM, the engine may rattle or engine idling may become rough. In addition, an engine failure may occur and the life of the engine may be shortened.
Tech Tips
-
If a wrong compensation code was input or read, return to the "Input Value" screen by pressing "Input".
-
The saving process may fail due to a problem with the wire harness or a bad connection with the DLC3. Check the wire harness and the DLC3 connection. If no problem is found, the ECM may be malfunctioning. Check the ECM and repeat this operation.
-
-
Press "Next" to set the compensation code to the ECM.
Tech Tips
-
If the setting process fails, the compensation code may be incorrect. Check the compensation code again.
-
If the attempted compensation code is correct, a problem with the wire harness or a bad connection with the DLC3 might cause the failure. Check the wire harness and the DLC3 connection. If no problem is found, the ECM may be malfunctioning. Check the ECM and repeat this operation.
-
-
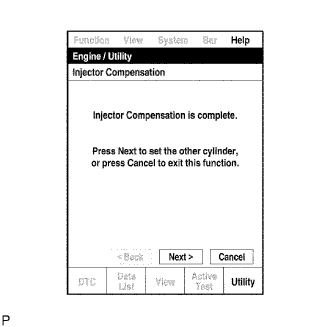
To continue with compensation code registrations for other cylinders, press "Next". To finish the registration, press "Cancel".
-
Turn the ignition switch off and then turn the tester off.
-
Wait for at least 30 seconds.
-
Turn the ignition switch to ON and then turn the tester on.
-
Clear DTC P062F stored in the ECM using the tester Click here.
-
-
READ VIN
Tech Tips
Reading the VIN (Vehicle Identification Number) stored in the ECM is necessary when comparing it to the VIN provided with the vehicle.
-
Replace the normal DLC3 cable (12 V specification) for the intelligent tester with the 24 V DLC3 cable.
Note
Be sure to use the 24 V DLC3 cable when connecting the intelligent tester to the DLC3. Using the normal DLC3 cable (12 V specification) will cause damage to the tester.
-
Connect the intelligent tester to the DLC3.
-
Turn the ignition switch to ON.
-
Turn the tester on.
-
Enter the following menus: Powertrain / Engine and ECT / Utility / VIN.
Note
Do not start the engine.
-
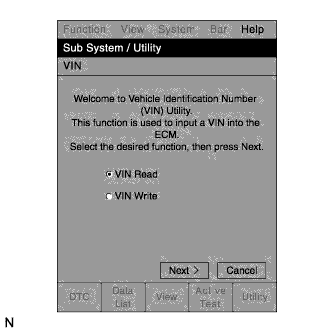
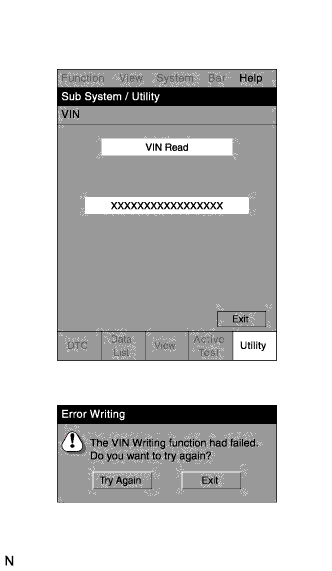
Select "VIN Read".
-
Press "Next".
-
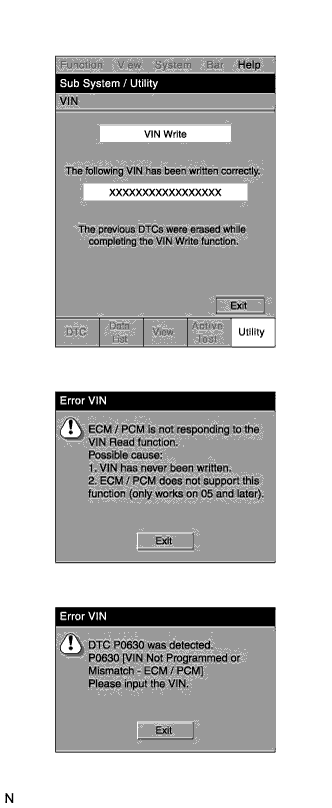
Read the VIN.
Tech Tips
If the VIN code has not been registered or the ECM does not support the VIN read function, "Error VIN" will be displayed.
-
-
WRITE VIN
Note
The Vehicle Identification Number (VIN) must be input into the replacement ECM.
Tech Tips
The VIN is a 17-digit alphanumeric vehicle identification number. The intelligent tester is required to register the VIN.
-
Replace the normal DLC3 cable (12 V specification) for the intelligent tester with the 24 V DLC3 cable.
Note
Be sure to use the 24 V DLC3 cable when connecting the intelligent tester to the DLC3. Using the normal DLC3 cable (12 V specification) will cause damage to the tester.
-
Connect the intelligent tester to the DLC3.
-
Turn the ignition switch to ON.
-
Turn the tester on.
-
Enter the following menus: Powertrain / Engine and ECT / Utility / VIN.
Note
Do not start the engine.
-
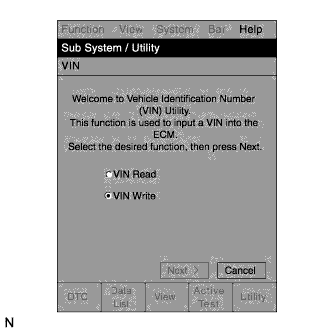
Select "VIN Write".
-
Press "Next".
-
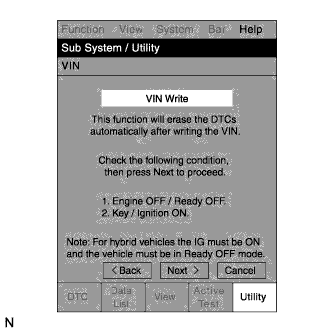
Press "Next" again.
-
Press "Exit" again to proceed.
-
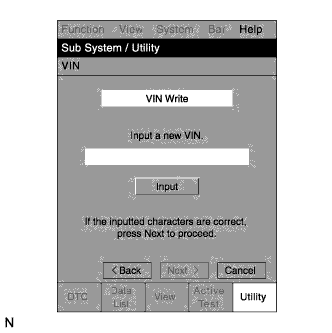
Press "Input".
-
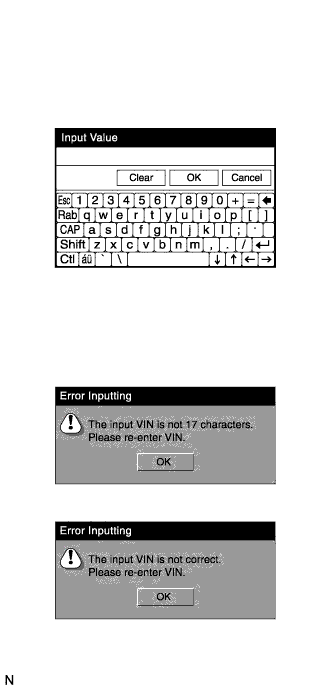
Manually input the VIN code using the keyboard on the tester screen. The code is a 17-digit, alphanumeric value imprinted.
-
Press "OK".
Tech Tips
If "Error Inputting" appears after pressing "OK", reconfirm the VIN code for the vehicle and input the correct number again.
-
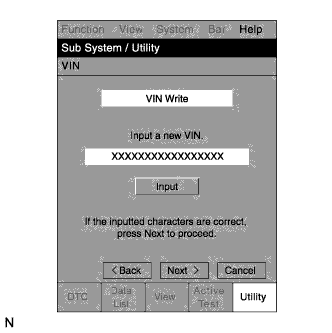
Confirm that the correct VIN has been input, and then press "NEXT".
Tech Tips
If incorrect VIN has been input, press "Input" to return to the "Input VIN" screen and input the VIN again.
-
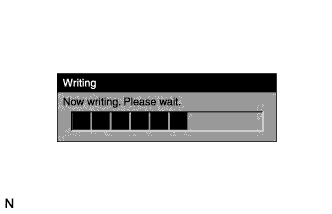
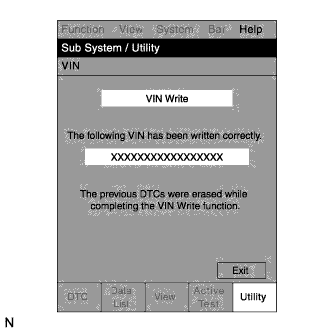
Wait while the VIN code is being written.
Note
Do not press any buttons on the tester while the VIN is being written.
-
To finish the registration, press "Exit".
Tech Tips
If "Error Writing" screen appears, check if the tester is connected properly. Perform the registration procedure again after turning the ignition switch off.
-
Clear the DTC P0630 stored in the ECM on the tester.
-
Turn the ignition switch off and then turn the tester off.
-
Wait for at least 30 seconds.
-
Turn the ignition switch to ON.
-
Turn the tester on.
-
Clear the DTC Click here.
-
-
-
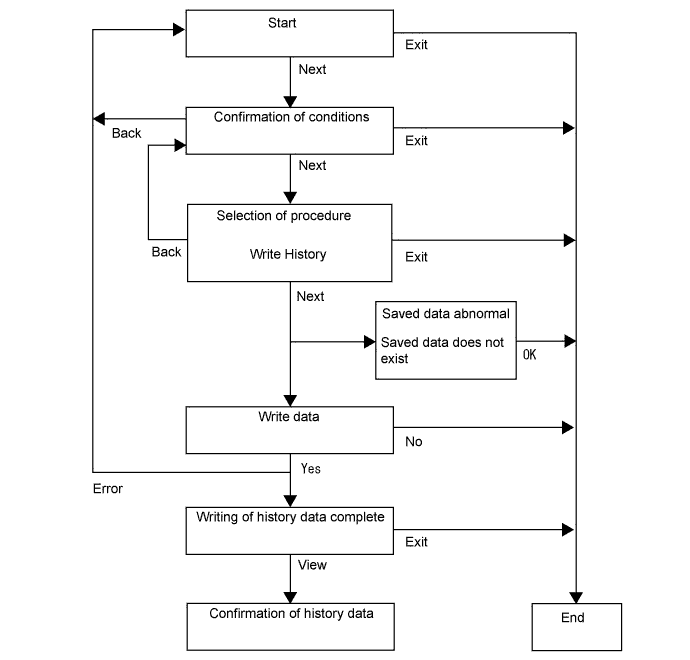
VIEW ENGINE HISTORY USING ENGINE HISTORY UTILITY
This procedure can be used to display engine-related data that was stored in the ECM on the intelligent tester (Max Engine Speed, Max Coolant Temperature, Max Fuel Temperature, Max Exhaust Temperature*, Max Vehicle Speed, Max Fuel Injection Volume, Max Rail Pressure, Max Boost Pressure, Min Boost Pressure, Engine Overrun Count and Engine Overheat Count).
This engine-related data records maximum values and can be used when engine over revving or overheating is suspected to have occurred.
Tech Tips
*: Indicates the value for Exhaust Temperature B1S1
Tech Tips
A read error may occur when there is a problem with the ECM or wire harness, or when there is a problem with the DLC3 connection. In this situation, inspect the wire harness and DLC3 connection. If the wire harness and DLC3 connection are normal, the ECM may be malfunctioning.
-
Replace the normal DLC3 cable (12 V specification) for the intelligent tester with the 24 V DLC3 cable.
Note
Be sure to use the 24 V DLC3 cable when connecting the intelligent tester to the DLC3. Using the normal DLC3 cable (12 V specification) will cause damage to the tester.
-
Connect the intelligent tester to the DLC3.
-
Turn the ignition switch to ON.
-
Turn the tester on.
Note
Do not start the engine.
-
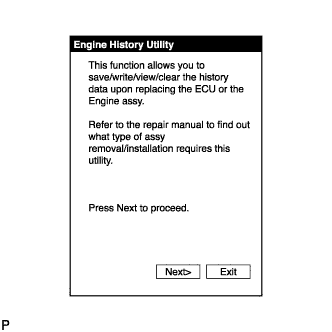
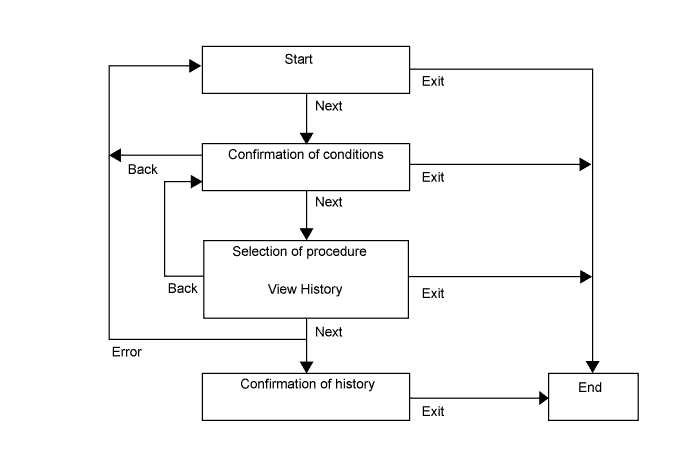
Enter the following menus: Powertrain / Engine and ECT / Utility / Engine History Utility.
-
Press "Next".
-
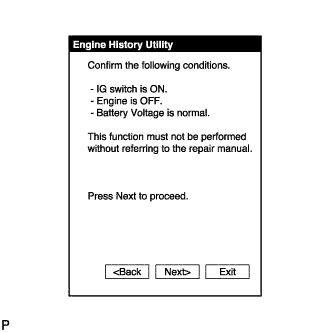
Once the condition confirmation screen appears, press "Next".
-
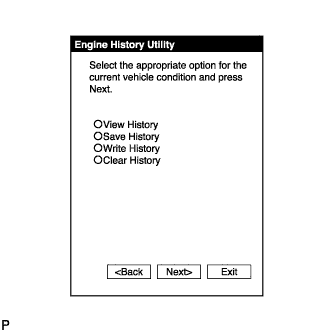
Select the option to view the engine history from the selection screen, and then press "Next".
-
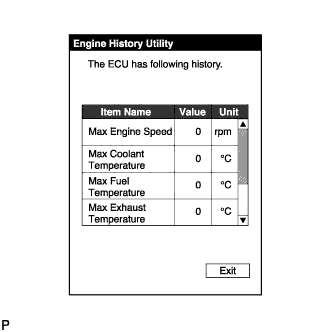
Confirm the engine history and press "Exit" when finished.
-
-
SAVE ENGINE HISTORY USING ENGINE HISTORY UTILITY
This procedure is performed before replacing the ECM.
The engine-related data from the old ECM is saved in the intelligent tester so that it can be transferred to the new ECM after replacement (Max Engine Speed, Max Coolant Temperature, Max Fuel Temperature, Max Exhaust Temperature, Max Vehicle Speed, Max Fuel Injection Volume, Max Rail Pressure, Max Boost Pressure, Min Boost Pressure, Engine Overrun Count and Engine Overheat Count).

Tech Tips
A read error may occur when there is a problem with the ECM or wire harness, or when there is a problem with the DLC3 connection. In this situation, inspect the wire harness and DLC3 connection. If the wire harness and DLC3 connection are normal, the ECM may be malfunctioning.
-
Replace the normal DLC3 cable (12 V specification) for the intelligent tester with the 24 V DLC3 cable.
Note
Be sure to use the 24 V DLC3 cable when connecting the intelligent tester to the DLC3. Using the normal DLC3 cable (12 V specification) will cause damage to the tester.
-
Connect the intelligent tester to the DLC3.
-
Turn the ignition switch to ON.
-
Turn the tester on.
Note
Do not start the engine.
-
Enter the following menus: Powertrain / Engine and ECT / Utility / Engine History Utility.
-
Once the condition confirmation screen appears, press "Next".
-
Select the option to save the engine history from the selection screen, and then press "Next".
-
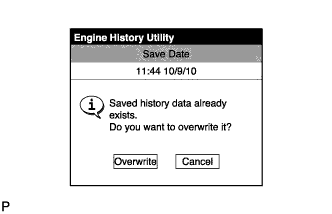
If engine history data already exists in the intelligent tester, a data overwrite confirmation message will be displayed. In this case, press "Overwrite".
Tech Tips
If engine history data does not already exist, the data overwrite confirmation message is not displayed.
-
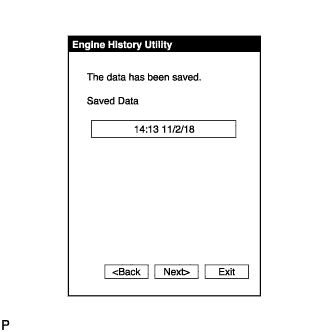
Confirm the save date and press "Exit".
-
-
WRITE ENGINE HISTORY USING ENGINE HISTORY UTILITY
This procedure is used to write the engine-related data saved in the intelligent tester with the engine history save utility to the new ECM (Max Engine Speed, Max Coolant Temperature, Max Fuel Temperature, Max Exhaust Temperature, Max Vehicle Speed, Max Fuel Injection Volume, Max Rail Pressure, Max Boost Pressure, Min Boost Pressure, Engine Overrun Count and Engine Overheat Count).
Tech Tips
A write error may occur when there is a problem with the ECM or wire harness, or when there is a problem with the DLC3 connection. In this situation, inspect the wire harness and DLC3 connection. If the wire harness and DLC3 connection are normal, the ECM may be malfunctioning.
-
Replace the normal DLC3 cable (12 V specification) for the intelligent tester with the 24 V DLC3 cable.
Note
Be sure to use the 24 V DLC3 cable when connecting the intelligent tester to the DLC3. Using the normal DLC3 cable (12 V specification) will cause damage to the tester.
-
Connect the intelligent tester to the DLC3.
-
Turn the ignition switch to ON.
-
Turn the tester on.
Note
Do not start the engine.
-
Enter the following menus: Powertrain / Engine and ECT / Utility / Engine History Utility.
-
Once the condition confirmation screen appears, press "Next".
-
Select the option to write the engine history from the selection screen, and then press "Next".
-
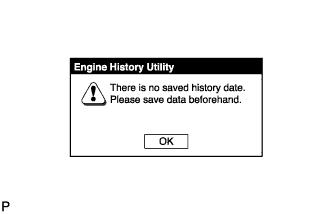
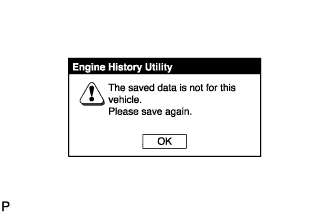
If the engine history data does not exist or the engine history data is abnormal, a message will appear. In this case, resave the engine history data.
-
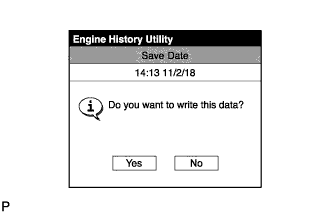
Confirm the save date and press "Yes".
-
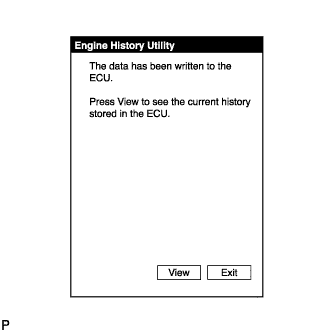
Once a message appears indicating that the write operation has been completed, press "View" to confirm the engine history data.
-
-
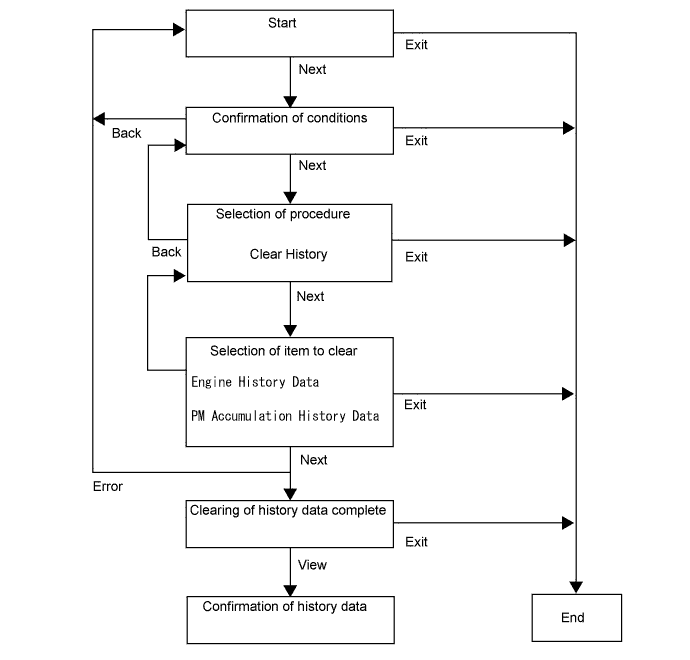
CLEAR ENGINE HISTORY DATA USING ENGINE HISTORY UTILITY
This procedure is used to clear the engine-related data saved in the ECM (Max Engine Speed, Max Coolant Temperature, Max Fuel Temperature, Max Exhaust Temperature, Max Vehicle Speed, Max Fuel Injection Volume, Max Rail Pressure, Max Boost Pressure, Min Boost Pressure, Engine Overrun Count and Engine Overheat Count).
-
When any of the following parts are replaced, the engine history data must be cleared.
-
Engine assembly
-
Center exhaust pipe assembly (DPF catalyst converter)
-
Turbocharger sub-assembly
-
Injection or supply pump assembly
-
Injection or supply pump assembly (fuel temperature sensor)
-
Injection or supply pump assembly (suction control valve)
-
Injector assembly
-
Engine coolant temperature sensor
-
Common rail assembly (fuel pressure sensor)
-
Manifold absolute pressure sensor
-
When any of the following parts are replaced, the PM accumulation history data must be cleared.
-
Center exhaust pipe assembly (DPF catalyst converter)
Tech Tips
A reset error may occur when there is a problem with the ECM or wire harness, or when there is a problem with the DLC3 connection. In this situation, inspect the wire harness and DLC3 connection. If the wire harness and DLC3 connection are normal, the ECM may be malfunctioning.
-
Replace the normal DLC3 cable (12 V specification) for the intelligent tester with the 24 V DLC3 cable.
Note
Be sure to use the 24 V DLC3 cable when connecting the intelligent tester to the DLC3. Using the normal DLC3 cable (12 V specification) will cause damage to the tester.
-
Connect the intelligent tester to the DLC3.
-
Turn the ignition switch to ON.
-
Turn the tester on.
Note
Do not start the engine.
-
Enter the following menus: Powertrain / Engine and ECT / Utility / Engine History Utility.
-
Once the condition confirmation screen appears, press "Next".
-
Select the option to clear the engine history from the selection screen, and then press "Next".
-
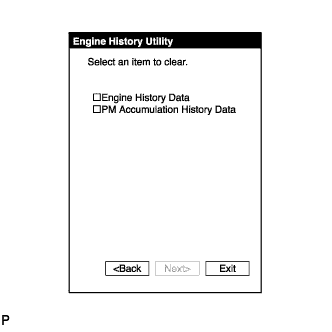
Select the item to clear from the engine history reset selection screen and press "Next".
-
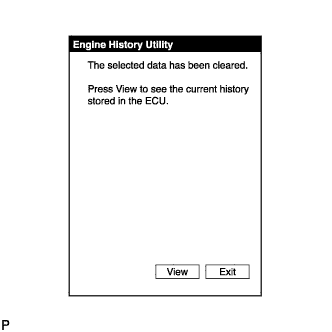
Once a message appears indicating that the data has been cleared, press "View" to confirm the engine history data.
-