BACK WINDOW GLASS INSTALLATION

-
INSTALL BACK WINDOW GLASS WEATHERSTRIP
-
Install the back window glass weatherstrip to the back window glass.
-
-
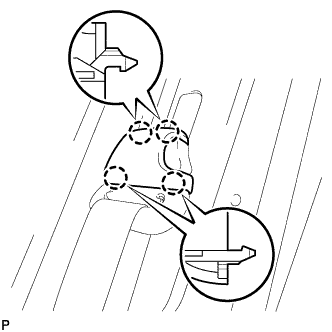
INSTALL BACK WINDOW GLASS
-
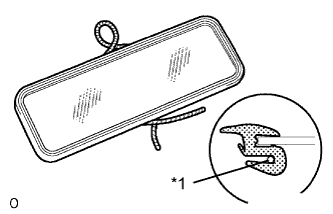
Text in Illustration *1 String Install a string to the back window glass weatherstrip as shown in the illustration.
-

Using a brush or sponge, apply Primer G to the contact surface of the back window glass weatherstrip.
Note
-
Allow the primer to dry for 3 minutes or more.
-
Throw away any leftover primer.
-
Do not apply too much primer.
-
-
Apply adhesive to the contact surface of the back window glass weatherstrip.
Text in Illustration *1 Primer *2 Adhesive -
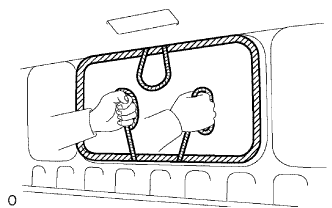
Set the bottom of the back window glass weatherstrip in place on the flange of the vehicle body.
-
While alternately pulling each end of the string hanging inside the vehicle interior at an angle so that the flange of the back window glass weatherstrip can pass over the body, firmly push on the back window glass from the outside near the back window glass weatherstrip to install the back window glass.
-
Lightly tap the outside of the back window glass with your palm to make sure the back window glass is properly installed.
-
-
CHECK FOR LEAK AND REPAIR
-
Conduct a leak test after the adhesive has completely hardened.
-
If there are any leaks, seal them with auto glass sealer.
-
-
INSTALL BACK PANEL TRIM (w/ Back Panel Trim)
-
Install the back panel trim.
-
Install the 8 clips.
-
-
INSTALL ROOF HEADLINING ASSEMBLY (w/ Back Panel Trim)
-
Install the roof headlining assembly with the 4 clips.
-
-
INSTALL COAT HOOK (w/ Back Panel Trim)
Tech Tips
Use the same procedure for the other coat hook.
-
Attach the claw to install the coat hook.
-
Install the screw.
-
-
INSTALL NO. 2 ROOM LIGHT ASSEMBLY (w/ LED Type Room Light)
-
Connect the connector.
-
Install the No. 2 room light assembly with the screw.
-
-
INSTALL NO. 1 ROOM LIGHT COVER (w/ LED Type Room Light)
-
Attach the 2 claws and 2 guides to install the No. 1 room light cover.
-
-
INSTALL FRONT DOOR OPENING TRIM LH (w/ Back Panel Trim)
-
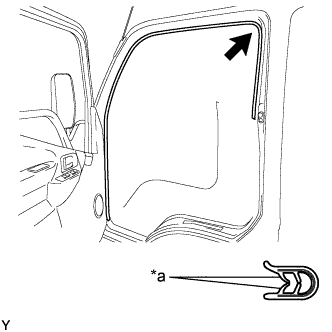
Text in Illustration *a Paint Mark (Pink) 
Mark Position Align the paint mark on the front door opening trim LH with the mark position on the vehicle and install the front door opening trim LH as shown in the illustration.
-
-
INSTALL FRONT DOOR OPENING TRIM RH (w/ Back Panel Trim)
-
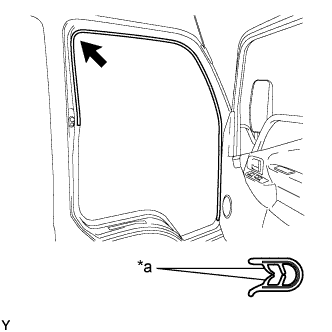
Text in Illustration *a Paint Mark (Blue) Mark Position Align the paint mark on the front door opening trim RH with the mark position on the vehicle and install the front door opening trim RH as shown in the illustration.
-
-
INSTALL FRONT QUARTER TRIM PANEL ASSEMBLY LH (for Full-trim)
Tech Tips
Use the same procedure described for the RH side.
-
INSTALL FRONT QUARTER TRIM PANEL ASSEMBLY RH (for Full-trim)
-
Attach the 5 clips to install the front quarter trim panel assembly RH.
-
-
INSTALL SEAT BELT ANCHOR COVER CAP (for Driver Side)
-
Attach the 4 claws to install the seat belt anchor cover cap.
-
-
INSTALL LOWER QUARTER TRIM PANEL ASSEMBLY LH (w/ Back Panel Trim)
Tech Tips
Use the same procedure described for the RH side.
-
INSTALL LOWER QUARTER TRIM PANEL ASSEMBLY RH (w/ Back Panel Trim)
-
Attach the 3 claws to install the lower quarter trim panel assembly RH.
-
-
INSTALL FRONT DOOR SCUFF PLATE LH (w/ Back Panel Trim)
Tech Tips
Use the same procedure described for the RH side.
-
INSTALL FRONT DOOR SCUFF PLATE RH (w/ Back Panel Trim)
-
Install the front door scuff plate RH with the 4 screws.
-