FRONT SEAT ASSEMBLY (for Front Passenger Seat with Bench Type Seatback) REASSEMBLY

CAUTION:
Wear protective gloves. Sharp areas on the parts may injure your hands.
-
INSTALL SEPARATE TYPE FRONT SEAT CUSHION COVER
-
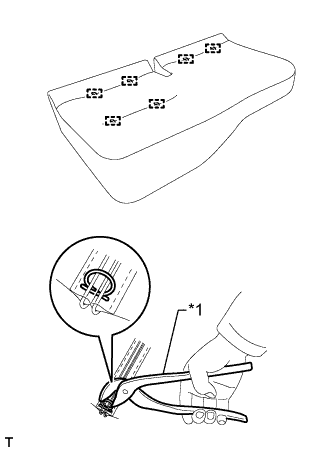
Text in Illustration *1 Hog Ring Pliers Using hog ring pliers, install the separate type front seat cushion cover to the separate type front seat cushion pad with new hog rings.
Note
-
Be careful not to damage the separate type front seat cushion cover.
-
When installing the hog rings, avoid wrinkling the separate type front seat cushion cover.
-
-
Using hog ring pliers, install new hog rings.
Note
-
Be careful not to damage the separate type front seat cushion cover.
-
When installing the hog rings, avoid wrinkling the separate type front seat cushion cover.
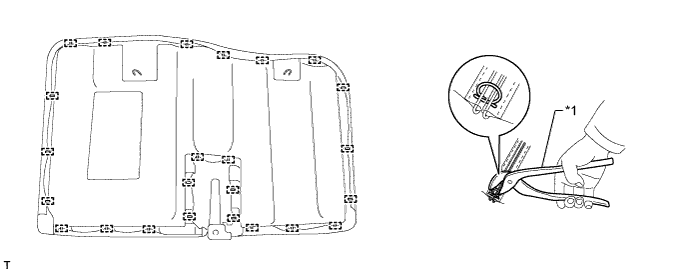
Text in Illustration *1 Hog Ring Pliers - - -
-
-
INSTALL SEPARATE TYPE FRONT SEATBACK SPRING ASSEMBLY
-
Install the separate type front seatback spring assembly to the separate type front seatback pad.
-
-
INSTALL SEPARATE TYPE FRONT SEATBACK COVER
-
Using hog ring pliers, install the separate type front seatback cover to the separate type front seatback pad with new hog rings.
Note
-
Be careful not to damage the separate type front seatback cover.
-
When installing the hog rings, avoid wrinkling the separate type front seatback cover.
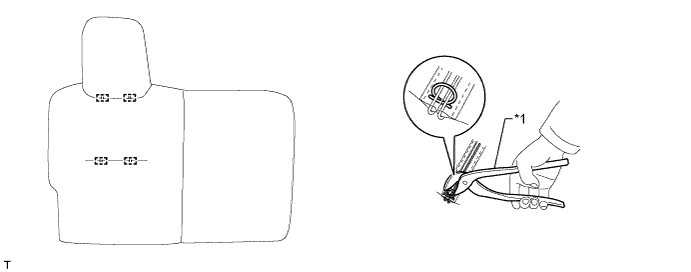
Text in Illustration *1 Hog Ring Pliers - - -
-
Using hog ring pliers, install the separate type front seatback cover to the separate type front seatback spring assembly with new hog rings.
Note
-
Be careful not to damage the separate type front seatback cover.
-
When installing the hog rings, avoid wrinkling the separate type front seatback cover.
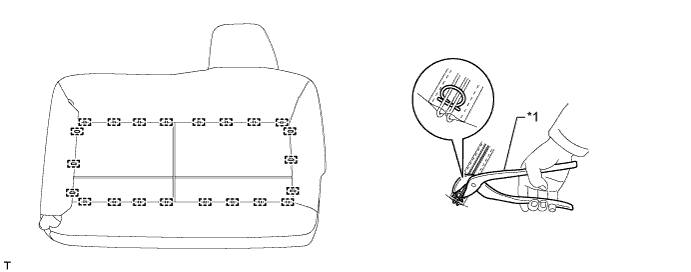
Text in Illustration *1 Hog Ring Pliers - - -
-
-
INSTALL FRONT CENTER SEAT HINGE SUB-ASSEMBLY
-
Attach the guide and install the front center seat hinge sub-assembly with the bolt.
- Torque:
- 18 N*m { 185 kgf*cm, 13 ft.*lbf }
-
-
REMOVE RECLINING SEATBACK ADJUSTER ASSEMBLY RH
-
Install the reclining seatback adjuster assembly RH with the 2 bolts.
- Torque:
- 40 N*m { 410 kgf*cm, 30 ft.*lbf }
-
-
INSTALL RECLINING ADJUSTER COVER RH
-
Attach the 2 guides and install the reclining adjuster cover RH with the screw.
-
-
INSTALL RECLINING ADJUSTER RELEASE HANDLE RH
-
Attach the claw to install the reclining adjuster release handle RH.
-