FRONT WIPER MOTOR INSTALLATION

-
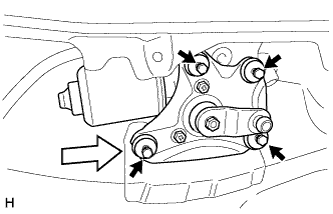
INSTALL FRONT WIPER MOTOR AND BRACKET ASSEMBLY
-
Connect the connector.
Text in Illustration 
Bolt 
Slide -
Move the front wiper motor and bracket assembly in the direction shown by the arrow in the illustration to attach the front wiper motor and bracket assembly to the body, and install the front wiper motor and bracket assembly.
-
Install the front wiper motor and bracket assembly with the 4 bolts.
- Torque:
- 5.5 N*m { 56 kgf*cm, 49 in.*lbf }
-
-
INSTALL WINDSHIELD WIPER LINK ASSEMBLY
-
Install the windshield wiper link assembly with the 6 bolts.
- Torque:
- 5.5 N*m { 56 kgf*cm, 49 in.*lbf }
-
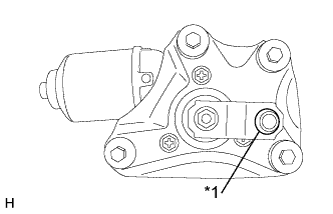
Text in Illustration *1 Crank Pivot Apply MP grease to the front wiper crank pivot of the front wiper motor and bracket assembly.
-
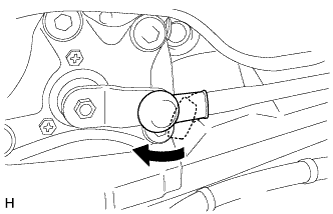
Hold the cover and install the windshield wiper link assembly the front wiper motor and bracket assembly.
-
-
INSTALL NO. 1 FRONT PANEL COVER PROTECTOR
-
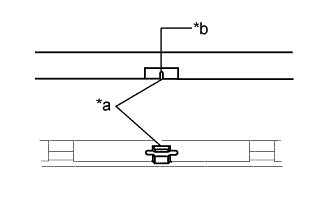
Text in Illustration *a Align *b Cutout Align the cutout of the No. 1 front panel cover protector with the protrusion of the front panel cover sub-assembly and install the No. 1 front panel cover protector.
-
-
INSTALL OUTER COWL TOP PANEL SUB-ASSEMBLY
-
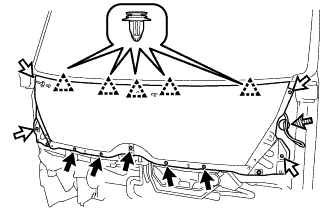
Attach the 5 clips and install the outer cowl top panel sub-assembly.
-
Install the 5 bolts and 4 screws.
- Torque:
- 8.5 N*m { 87 kgf*cm, 75 in.*lbf }
-
Connect the washer hose.
Text in Illustration Bolt Screw 
Washer hose
-
-
INSTALL HEADLIGHT ASSEMBLY LH
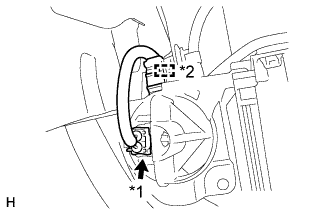
Text in Illustration *1 Front Turn Signal Light Connector *2 Clamp
-
Connect the connectors and attach the clamps.
Tech Tips
Before installing the headlight assembly LH, disconnect the front turn signal light connector and detach the clamp shown in the illustration to allow for easy installation of the headlight assembly LH. Once the headlight assembly LH is installed, reconnect the front turn signal light connector and attach the clamp shown in the illustration from the rear.
-
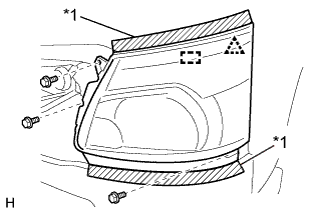
Text in Illustration *1 Protective Tape Put protective tape around the headlight assembly LH.
-
Attach the clip and guide to install the headlight assembly LH.
-
Install the 3 bolts.
- Torque:
- 5.0 N*m { 51 kgf*cm, 44 in.*lbf }
-
-
INSTALL HEADLIGHT ASSEMBLY RH
Tech Tips
Use the same procedure described for the LH side.
-
INSTALL FRONT WIPER SHAFT PACKING
-
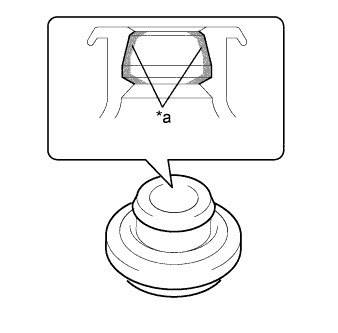
Text in Illustration *a Lip Position 
MP grease Apply MP grease to the entire surface of the front wiper shaft packing lip.
Tech Tips
Make sure that the hole does not get clogged with MP grease and the grooves on the lip are filled with MP grease.
-
for Driver Side:
-
Install the front wiper shaft packing.
-
-
Text in Illustration *a Alignment Mark for Front Passenger Side:
-
Position the alignment mark upwards and install the front wiper shaft packing.
-
-
-
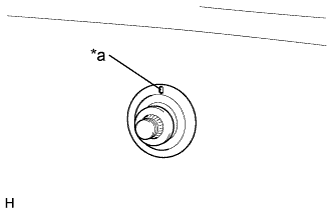
INSTALL FRONT WIPER ARM LH
-
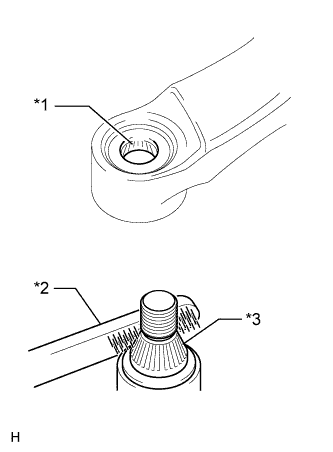
Text in Illustration *1 Wiper Arm Serrations *2 Wire Brush *3 Wiper Pivot Serrations Operate the wiper and stop the front wiper motor and bracket assembly at the automatic stop position.
-
Clean the wiper arm serrations to remove any burrs, dirt, etc.
Note
Do not grind down the wiper arm serrations.
-
When reusing the front wiper motor and bracket assembly:
-
Clean the wiper pivot serrations with a wire brush.
-
-
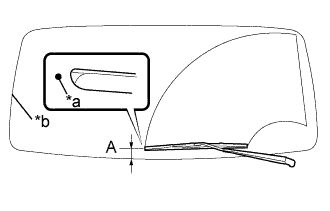
Text in Illustration *a Ceramic Dot *b Edge of lower windshield outside moulding Position the blade tip within the range shown in the illustration.
Tech Tips
The blade position is indicated by the mark on the glass.
Standard Area Standard Condition A 46.3 mm (1.82 in.) -
Install the front wiper arm LH with the nut.
- Torque:
- 25 N*m { 255 kgf*cm, 18 ft.*lbf }
Tech Tips
Hold the arm hinge by hand when tightening the nut.
-
-
INSTALL FRONT WIPER ARM RH
-
Text in Illustration *1 Wiper Arm Serrations *2 Wire Brush *3 Wiper Pivot Serrations Operate the wiper and stop the front wiper motor and bracket assembly at the automatic stop position.
-
Clean the wiper arm serrations to remove any burrs, dirt, etc.
Note
Do not grind down the wiper arm serrations.
-
When reusing the front wiper motor and bracket assembly:
-
Clean the wiper pivot serrations with a wire brush.
-
-
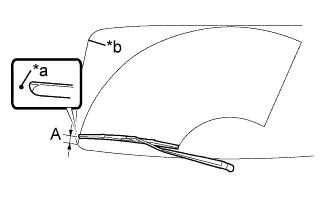
Text in Illustration *a Ceramic Dot *b Edge of lower windshield outside moulding Position the blade tip within the range shown in the illustration.
Tech Tips
The blade position is indicated by the mark on the glass.
Standard Area Standard Condition A 50.3 mm (1.98 in.) -
Install the front wiper arm RH with the nut.
- Torque:
- 25 N*m { 255 kgf*cm, 18 ft.*lbf }
Tech Tips
Hold the arm hinge by hand when tightening the nut.
-
-
INSTALL FRONT WIPER ARM HEAD CAP
-
Attach the 3 claws and install the front wiper arm head cap.
Tech Tips
Use the same procedure for both side front wiper arm head cap.
-
-
INSTALL FRONT SIDE PANEL SUB-ASSEMBLY LH
-
Attach the 5 clips to install the front side panel sub-assembly LH.
-
-
INSTALL FRONT SIDE PANEL SUB-ASSEMBLY RH
Tech Tips
Use the same procedure described for the LH side.
-
INSTALL RADIATOR GRILLE
Tech Tips
Make sure the claws of the clips are not damaged. If a claw is damaged, replace the clip with a new one.
-
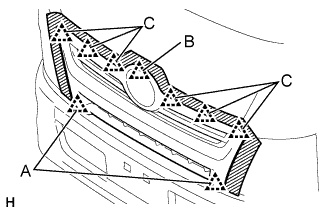
Partially attach the clips labeled A.
-
Attach the clip labeled B, and then attach the clips labeled C.
-
Fully attach the clips labeled A to install the radiator grille.
-
Install the screw.
-
-
ADJUST HEADLIGHT ASSEMBLY LH