FRONT EVAPORATOR TEMPERATURE SENSOR INSTALLATION

-
INSTALL NO. 1 COOLER THERMISTOR (FRONT EVAPORATOR TEMPERATURE SENSOR)
-
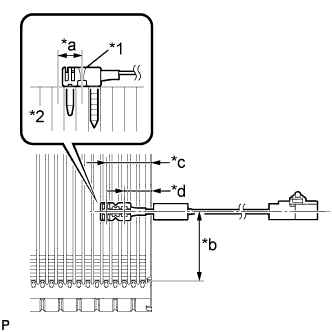
Text in Illustration *1 Plastic Case *2 Evaporator *a Next to Previous *b 42 to 48 mm (1.654 to 1.889 in.) *c 34.3 mm (1.350 in.) (Sensing Portion) *d 20.9 mm (0.823 in.) (Attaching Portion) Install the No. 1 cooler thermistor as shown in the illustration.
Note
-
Be sure to insert the sensor only once because reinserting it will not allow it to be firmly secured.
-
When reusing the evaporator, insert the sensor one row next to the one that was used previously (*a in the illustration).
-
After inserting the sensor, do not apply excessive force to the wire.
-
Directly insert the sensor until the edge of the plastic case "*1" comes into contact with the evaporator "*2".
-
-
-
INSTALL NO. 1 COOLER EVAPORATOR SUB-ASSEMBLY
-
Install the No. 1 cooler evaporator sub-assembly to the heater case.
-
Attach the guide to install the lower heater case.
-
Tighten the 8 screws.
-
Install the plate with 2 screws.
-
Attach the clamp to install the connector to the lower heater case.
-
-
INSTALL NO. 1 AIR DUCT SUB-ASSEMBLY
-
Attach the 2 claws to install the No. 1 air duct sub-assembly.
-
-
INSTALL AIR CONDITIONING UNIT ASSEMBLY