N04C-UH COMPRESSOR INSTALLATION

-
INSTALL COMPRESSOR AND MAGNETIC CLUTCH
-
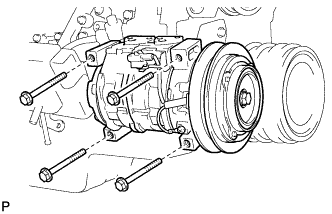
Install the compressor and magnetic clutch with the 4 bolts.
- Torque:
- 25 N*m { 255 kgf*cm, 18 ft.*lbf }
-
Connect the connector.
-
-
CONNECT NO. 1 COOLER REFRIGERANT SUCTION HOSE
-
Remove the attached vinyl tape from the hose.
-
Apply sufficient compressor oil to a new O-ring and the fitting surface of the compressor and magnetic clutch.
Compressor oil ND-OIL 8 or equivalent -
Install the O-ring onto the No. 1 cooler refrigerant suction hose.
-
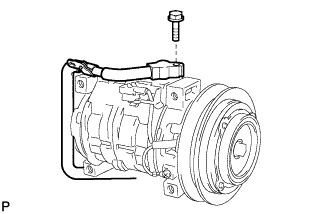
Install the No. 1 cooler refrigerant suction hose onto the compressor and magnetic clutch with the bolt.
- Torque:
- 9.8 N*m { 100 kgf*cm, 87 in.*lbf }
-
-
CONNECT NO. 1 COOLER REFRIGERANT DISCHARGE HOSE
-
Remove the attached vinyl tape from the hose.
-
Apply sufficient compressor oil to a new O-ring and the fitting surface of the compressor and magnetic clutch.
Compressor oil ND-OIL 8 or equivalent -
Install the O-ring onto the No. 1 cooler refrigerant discharge hose.
-
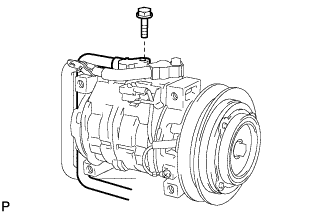
Install the No. 1 cooler refrigerant discharge hose onto the compressor and magnetic clutch with the bolt.
- Torque:
- 9.8 N*m { 100 kgf*cm, 87 in.*lbf }
-
-
INSTALL NO. 1 V (COOLER COMPRESSOR TO CRANKSHAFT PULLEY) BELT
-
Install the No. 1 V (cooler compressor to crankshaft pulley) belt.
-
-
ADJUST NO. 1 V (COOLER COMPRESSOR TO CRANKSHAFT PULLEY) BELT
-
Turn the bolt (B) to adjust the tension of the V belt.
-
Tighten the bolt (A).
- Torque:
- 44 N*m { 450 kgf*cm, 33 ft.*lbf }
-
Tighten the bolt (B).
- Torque:
- 5.9 N*m { 60 kgf*cm, 52 in.*lbf }
-
Check that the belt fits properly into the grooves.
Tech Tips
Confirm by hand that the belt has not slipped out of the grooves on the bottom of the pulley.
-
-
INSTALL FAN AND GENERATOR V BELT
-
Install the fan and generator V belt.
-
-
ADJUST FAN AND GENERATOR V BELT
-
Turn the bolt (C) to adjust the tension of the V belt.
-
Tighten the bolts (A) and (B).
- Torque:
- Bolt A
- 29 N*m { 290 kgf*cm, 18 ft.*lbf }
- Bolt B
- 55 N*m { 560 kgf*cm, 38 ft.*lbf }
-
Tighten the bolt (C).
- Torque:
- 5.9 N*m { 60 kgf*cm, 52 in.*lbf }
-
Check that the belt fits properly into the grooves.
Tech Tips
Confirm by hand that the belt has not slipped out of the grooves on the bottom of the pulley.
-
-
CHARGE WITH REFRIGERANT
See Pub. No. RM1008E.
-
WARM UP ENGINE
See Pub. No. RM1008E.
-
INSPECT FOR REFRIGERANT LEAK
See Pub. No. RM1008E.
-
INSPECT DRIVE BELT
-
Text in Illustration *1 Fan Pulley *2 Generator *3 Crankshaft Pulley Check the fan and generator V belt deflection.
Tech Tips
-
The specified deflection values per belt are shown in the following table.
-
When inspecting the V belt deflection, apply 98 N (10 kgf, 22 lbf) tensile force to it.
Deflection Item Specified Condition New belt 10.5 to 12.5 mm (0.413 to 0.492 in.) Used belt 12.5 to 16.0 mm (0.492 to 0.630 in.) Note
-
Check the V belt deflection at the specified point.
-
When inspecting a belt which has been used for over 5 minutes, apply the used belt specifications.
-
-
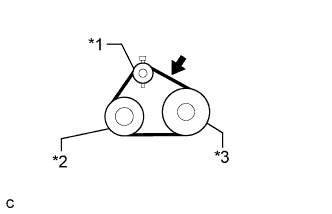
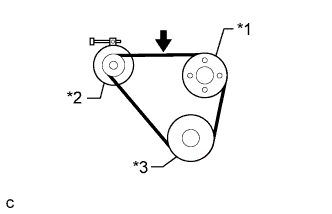
Text in Illustration *1 Idler Pulley *2 A/C Compressor *3 Crankshaft Pulley Check the No. 1 V (cooler compressor to crankshaft pulley) belt deflection (w/ Air Conditioning System).
Tech Tips
-
The specified deflection values per belt are shown in the following table.
-
When inspecting the V belt deflection, apply 98 N (10 kgf, 22 lbf) tensile force to it.
Deflection Item Specified Condition New belt 8.5 to 10.0 mm (0.335 to 0.394 in.) Used belt 10.0 to 12.0 mm (0.394 to 0.472 in.) Note
-
Check the V belt deflection at the specified point.
-
When inspecting a belt which has been used for over 5 minutes, apply the used belt specifications.
-
-