BRAKE FLUID BLEEDING

Note
Immediately wash off any brake fluid that comes into contact with any painted surfaces.
Tech Tips
If any work is done on the brake system or if air in the brake lines is suspected, bleed the air from the system.
-
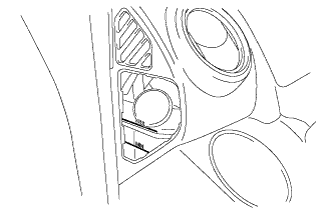
REMOVE OIL RESERVOIR TANK COVER LH
-
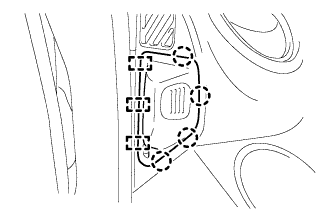
Disengage the 4 claws and 3 guides and remove the oil reservoir tank cover LH.
-
-
REMOVE LOWER INSTRUMENT PANEL FINISH PANEL SUB-ASSEMBLY RH
-
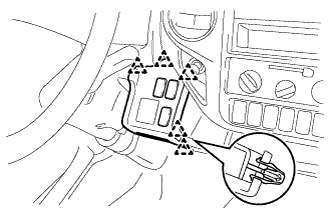
Detach the 5 clips and remove the lower instrument panel finish panel sub-assembly.
-
Disconnect each connector.
-
-
FILL RESERVOIR WITH BRAKE FLUID
-
Fill the reservoir with brake fluid.
Fluid SAE J1703 or FMVSS No. 116 DOT 3 Note
Add brake fluid to keep the level between the MIN and MAX lines of the reservoir while bleeding the brakes.
-
-
BLEED MASTER CYLINDER
Tech Tips
If the master cylinder has been disassembled or if the reservoir becomes empty, bleed the air from the master cylinder.
-

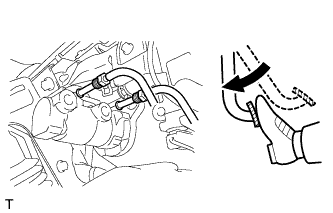
Using a 12 mm union nut wrench, disconnect the 2 brake tubes from the master cylinder.
-
Slowly depress the brake pedal and hold it there (Step A).
-

Block the outer holes with your fingers, and release the brake pedal (Step B).
-
Repeat step A and B 3 or 4 times.
-
Using a 12 mm union nut wrench, connect the 2 brake tubes to the master cylinder.
- Torque:
- 24 N*m { 245 kgf*cm, 18 ft.*lbf }
Note
Use the formula to calculate special torque values for situations where a union nut wrench is combined with a torque wrench Click here.
-
-
BLEED BRAKE LINE
Note
-
Make sure the vehicle is secured in place and cannot move.
-
Make sure the ignition switch is off before bleeding the brake system.
-
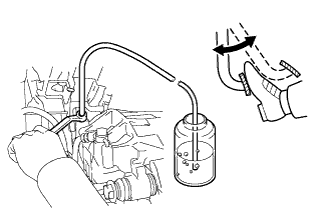
Connect the vinyl tube to the bleeder plug.
-
Depress the brake pedal 3 times, and then hold down the brake pedal. (Procedure 1)
-
Loosen the bleeder plug at least 90° so that brake fluid and air begin to come out, and then tighten the bleeder plug approximately 2 seconds after opening it. (Procedure 2)
-
Wait 3 seconds after Procedure 2, and then begin depressing the brake pedal again. Repeat Procedures 1 and 2, 10 times or more. (Procedure 3)
Note
Even if air does not come out, repeat the procedures 10 times or more.
-
Repeat Procedure 1 through Procedure 3 above, twice for each wheel, in the following order: Left Front → Left Rear → Right Rear → Right Front → Left Front → Left Rear → Right Rear → Right Front.
-
Tighten the bleeder plug.
- Torque:
- 11 N*m { 112 kgf*cm, 8 ft.*lbf }
-
-
INSPECT FOR BRAKE FLUID LEAK
-
INSPECT BRAKE PEDAL RESERVE DISTANCE
Note
If the pedal reserve is low, there may be air remaining in the brake system, so perform a driving test and bleed the brake system again.
-
CHECK FLUID LEVEL IN RESERVOIR
-
Check the fluid level and add fluid if necessary.
Fluid SAE J1703 or FMVSS No. 116 DOT 3
-
-
INSTALL LOWER INSTRUMENT PANEL FINISH PANEL SUB-ASSEMBLY RH
-
Connect each connector.
-
Attach the 5 clips to install the lower instrument panel finish panel sub-assembly.
-
-
INSTALL OIL RESERVOIR TANK COVER LH
-
Engage the 4 claws and 3 guides to install the oil reservoir tank cover LH.
-