EASY AND SMOOTH START SYSTEM REGISTRATION

-
CLUTCH PEDAL STROKE SENSOR ZERO POINT CALIBRATION (NOT USING CHECK WIRE)
Note
-
If the clutch pedal stroke sensor assembly has been replaced, perform clutch pedal stroke sensor zero point calibration.
-
Perform the check after clutch adjustment has been completed (clutch pedal play is as specified).
-
Turn the ES start timing switch assembly off.
-
Turn the ignition switch to ON.
-
Within 4 seconds after turning the ignition switch to ON, while pressing and holding the ES start timing switch assembly to the SLOW side, turn the ES start timing switch assembly ON and off 3 times to cause the buzzer to sound one short beep. Afterwards, turn the ES start timing switch assembly off.
-
Press the ES start timing switch assembly to FAST 3 times within 5 seconds.
-
Check that the clutch pedal stroke sensor zero point calibration check function activates and the ES start indicator light blinks.
-
Check the zero point calibration of the clutch pedal stroke sensor assembly based on the sound made by the buzzer when the clutch pedal is free.
OK Buzzer sounds with a long continuous beep. Note
If the buzzer sounds intermittently or does not sound at all, inspect the clutch pedal stroke sensor assembly and related circuits.
-
After pressing the ES start timing switch assembly to FAST once again, check that the ES start indicator light stops blinking.
-
-
RELEASE POSITION CALIBRATION (NOT USING CHECK WIRE)
Note
When replacing the clutch, perform release position calibration.
-
Check that the vehicle is in the following condition:
-
Ignition switch is turned to ON.
-
ES start timing switch assembly is off.
-
Clutch pedal: free position.
-
Parking brake: operating.
-
-
Start the engine and check that the idling speed is normal.
-
Within 4 seconds after starting the engine, while holding the ES start timing switch assembly to SLOW, turn the ES start timing switch assembly on and off again 3 times, and the buzzer will sound one short beep. Afterwards, turn the ES start timing switch assembly off.
Tech Tips
The procedure above is not necessary if "CLUTCH PEDAL STROKE SENSOR ZERO POINT CALIBRATION (NOT USING CHECK WIRE)" is performed and the vehicle is not driven without turning the ignition switch off.
-
Check that the idling speed is stable.
-
Press and hold the ES start timing switch assembly to FAST for 3 seconds or more.
OK Buzzer sounds intermittently with long beeps and the ES start indicator light blinks. Tech Tips
If the buzzer does not sound and the light does not blink as indicated above, inspect the following items:
-
Parking brake related circuits.
-
ES start timing switch assembly related circuits.
-
Clutch pedal adjustment.
-
Electric vehicle control ECU assembly.
-
-
Depress the clutch pedal and shift to second gear.
-
Operate the clutch pedal slowly, and gradually engage the clutch.
-
When the engine speed has fluctuated (slightly decreased and then returned to its original speed in approximately one second), once again press and hold the ES start timing switch assembly to FAST for approximately 1 second. At this time, the electric vehicle control ECU assembly memorizes the clutch stroke sensor signal. When memorization is complete, the buzzer sounds intermittently with 4 short beeps.
Tech Tips
When the electric vehicle control ECU assembly finishes memorizing, the buzzer stops sounding and the ES start indicator light goes off.
-
Perform a functional inspection and check that the release position is appropriate.
-
If the release point cannot be correctly configured, check the following items and perform configuration again.
-
Check that no DTCs are output.
-
Check parking brake related circuits.
-
Check that there are no open circuits on the FAST side of the ES start timing switch assembly.
-
Perform the clutch operation carefully.
-
-
-
CLUTCH PEDAL STROKE SENSOR ZERO POINT CALIBRATION (USING CHECK WIRE)
Note
-
If the clutch pedal stroke sensor assembly has been replaced, perform clutch pedal stroke sensor zero point calibration.
-
Perform the check after clutch adjustment has been completed (clutch pedal play is as specified).
-
Turn the ES start timing switch assembly off.
-
Turn the ignition switch to ON.
-
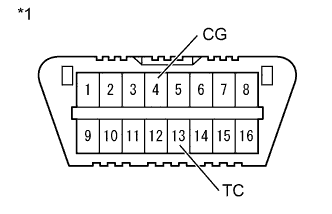
Text in Illustration *1 DLC3 Using SST, connect terminals 13 (TC) and 4 (CG) of the DLC3.
- SST
- 09843-18040
Note
Connecting the wrong terminals of the connector can damage components, so make sure not to connect the wrong terminals.
-
Press the ES start timing switch assembly to FAST 3 times within 5 seconds.
-
Check that the clutch pedal stroke sensor zero point calibration check function activates and the ES start indicator light blinks.
-
Check the zero point calibration of the clutch pedal stroke sensor assembly based on the sound made by the buzzer when the clutch pedal is free.
OK Buzzer sounds with a long continuous beep. Note
If the buzzer sounds intermittently or does not sound at all, inspect the clutch pedal stroke sensor assembly and related circuits.
-
After pressing the ES start timing switch assembly to FAST once again, check that the ES start indicator light stops blinking.
-
-
RELEASE POSITION CALIBRATION (USING CHECK WIRE)
Note
When replacing the clutch, make sure to initialize the release position.
-
Check that the vehicle is in the following condition:
-
Ignition switch is turned to ON.
-
ES start timing switch assembly is off.
-
Clutch pedal: free position.
-
Parking brake: operating.
-
-
Text in Illustration *1 DLC3 Using SST, connect terminals 13 (TC) and 4 (CG) of the DLC3.
- SST
- 09843-18040
Note
Connecting the wrong terminals of the connector can damage components, so make sure not to connect the wrong terminals.
-
Start the engine and check that the idling speed is normal.
-
Press and hold the ES start timing switch assembly to FAST for 3 seconds or more.
OK Buzzer sounds intermittent long beeps, and the ES indicator light blinks. Tech Tips
If the buzzer does not sound and the light does not blink as described above, inspect the following items:
-
Parking brake related circuits.
-
ES start timing switch assembly related circuits.
-
Clutch pedal adjustment.
-
Electric vehicle control ECU assembly.
-
Check the connected positions between terminals 13 (TC) and 4 (CG) of the DLC3, and check that there is no malfunction in the TC or CG circuits of the DLC3.
-
-
Depress the clutch pedal and shift to second gear.
-
Operate the clutch pedal slowly, and gradually engage the clutch.
-
When the engine speed has fluctuated (slightly decreased and then returned to its original speed in approximately one second), once again press and hold the ES start timing switch assembly to FAST for approximately 1 second. At this time, the electric vehicle control ECU assembly memorizes the clutch stroke sensor signal. When memorization is complete, the buzzer sounds intermittently with 4 short beeps.
Tech Tips
When the electric vehicle control ECU assembly finishes memorizing, the buzzer stops sounding and the ES start indicator light goes off.
-
Remove SST connecting terminals 13 (TC) and 4 (CG) of the DLC3.
-
Perform a functional inspection and check that the release position is appropriate.
-
If the release point cannot be correctly configured, check the following items and perform configuration again.
-
Check that no DTCs are output.
-
Check parking brake related circuits.
-
Check that there are no open circuits on the FAST side of the ES start timing switch assembly.
-
Check the connected positions between terminals 13 (TC) and 4 (CG) of the DLC3, and check that there is no malfunction in the TC or CG circuits of the DLC3.
-
Perform the clutch operation carefully.
-
-