FRONT BUMPER REASSEMBLY
PROCEDURE
-
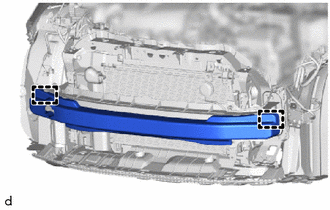
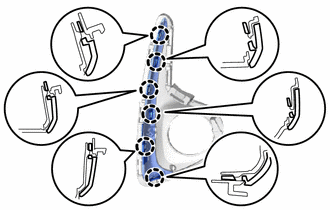
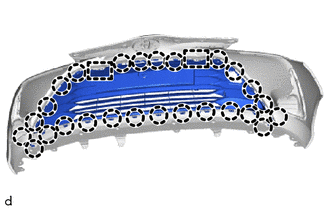
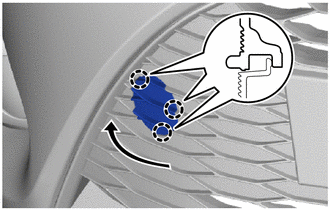
INSTALL FRONT BUMPER ENERGY ABSORBER SUB-ASSEMBLY
-
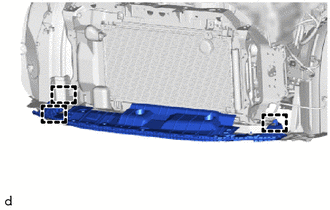
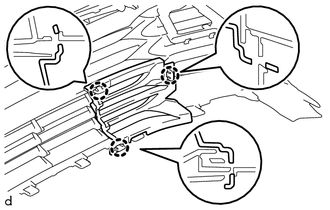
Engage the 3 hooks to install the front bumper energy absorber sub-assembly.
-
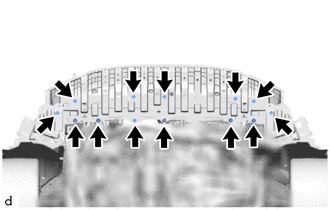
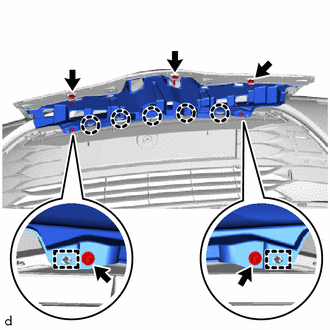
Install the 6 screws, 6 clips and grommet.
-
-
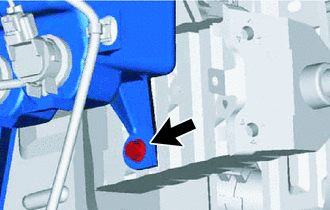
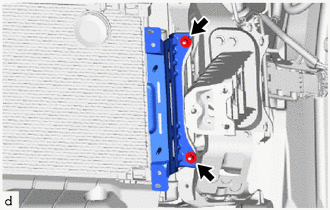
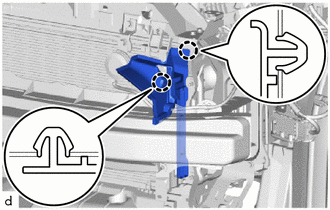
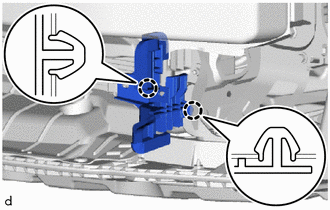
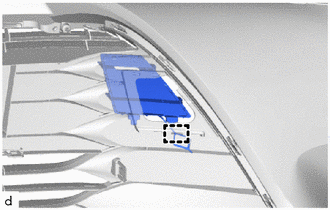
INSTALL FRONT SIDE MEMBER BRACKET SUB-ASSEMBLY LH
-
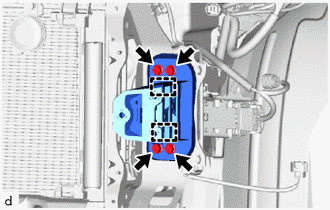
Engage the 2 guides to install the front side member bracket sub-assembly LH.
-
Install the 4 bolts.
- Torque:
- 40 N*m { 408 kgf*cm, 30 ft.*lbf }
-
-
INSTALL FRONT SIDE MEMBER BRACKET SUB-ASSEMBLY RH
Tech Tips
Use the same procedure as for the LH side.
-
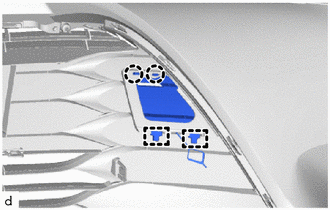
INSTALL WINDSHIELD WASHER JAR ASSEMBLY
-
Install the windshield washer jar assembly with the bolt.
- Torque:
- 5.5 N*m { 56 kgf*cm, 49 in.*lbf }
-
-
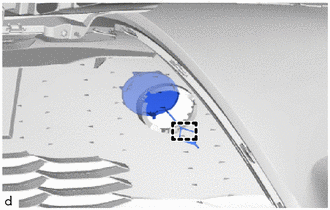
INSTALL FRONT NO. 1 BUMPER STONE DEFLECTOR BRACKET
-
Install the front No. 1 bumper stone deflector bracket with the 2 nuts.
- Torque:
- 5.5 N*m { 56 kgf*cm, 49 in.*lbf }
Tech Tips
Use the same procedure for the opposite side.
-
-
INSTALL FRONT BUMPER REINFORCEMENT
-
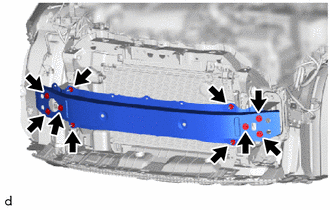
Temporarily install the front bumper reinforcement with the 4 nuts and 6 bolts.
-
Fully tighten the 4 nuts.
- Torque:
- 5.5 N*m { 56 kgf*cm, 49 in.*lbf }
-
Fully tighten the 6 bolts.
- Torque:
- 40 N*m { 408 kgf*cm, 30 ft.*lbf }
-
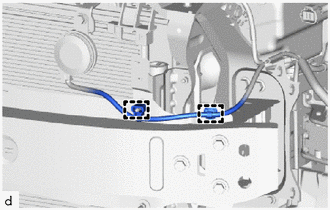
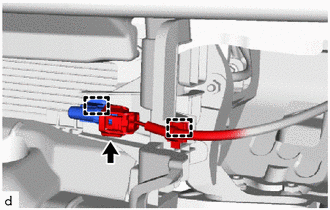
Engage the 2 clamps to install the wire harness.
-
-
INSTALL ENGINE UNDER COVER RH (for 1ND-TV)
-
INSTALL ENGINE UNDER COVER LH (for 1ND-TV)
-
INSTALL CENTER ENGINE UNDER COVER (for 1ND-TV)
-
INSTALL ENGINE UNDER COVER RH (except 1ND-TV)
-
for 1KE-FE:
-
for 2NR-FKE:
-
-
INSTALL ENGINE UNDER COVER LH (except 1ND-TV)
-
for 1KR-FE:
-
for 2NR-FKE:
-
-
INSTALL FRONT BUMPER REINFORCEMENT EXTENSION
-
Clean the attachment surface.
-
Using an infrared light, heat the adhesive remaining on the front bumper reinforcement.
CAUTION:
Do not burn yourself with the heated front bumper reinforcement or infrared light.
-
Using a piece of cloth, rub the remaining adhesive off the front bumper reinforcement.
-
Using a non-residue solvent, clean the attachment surface.
-
-
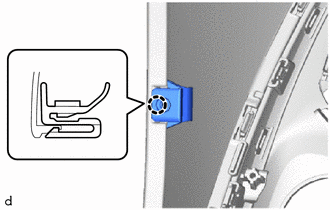
Remove the backing paper of the double-sided tape of a new front bumper reinforcement extension.
-
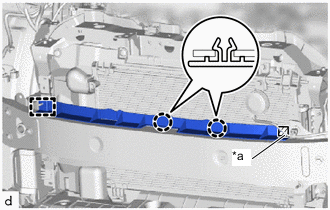
*a Double-sided Tape Engage the 2 claws and clamp to install the front bumper reinforcement extension.
Note
Thoroughly press the front bumper reinforcement extension to ensure that it adheres.
-
-
INSTALL FRONT BUMPER ENERGY ABSORBER
-
Engage the 2 guides to install the front bumper energy absorber.
-
-
INSTALL FRONT RADIATOR SIDE AIR GUIDE PLATE LH
-
Engage the 2 claws to install the front radiator side air guide plate LH.
-
-
INSTALL FRONT RADIATOR SIDE AIR GUIDE PLATE RH
Tech Tips
Use the same procedure as for the LH side.
-
INSTALL NO. 1 RADIATOR AIR GUIDE LH
-
Engage the 2 claws to install the No. 1 radiator air guide LH.
-
-
INSTALL NO. 1 RADIATOR AIR GUIDE RH
Tech Tips
Use the same procedure as for the LH side.
-
INSTALL THERMISTOR ASSEMBLY
-
Engage the clamp to install the thermistor assembly.
-
Engage the clamp to install the wire harness.
-
Connect the connector.
-
-
INSTALL FRONT BUMPER SIDE RETAINER LH
-

Engage the 2 claws to install the front bumper side retainer LH.
-
-
INSTALL FRONT BUMPER SIDE RETAINER RH
Tech Tips
Use the same procedure as for the LH side.
-
INSTALL HEADLIGHT ASSEMBLY LH
-
INSTALL HEADLIGHT ASSEMBLY RH
Tech Tips
Use the same procedure as for the LH side.
-
INSTALL FOG LIGHT MOUNTING BRACKET LH (w/ Fog Light)
-
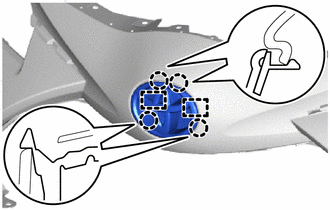
Engage the 6 claws to install the fog light mounting bracket LH.
-
-
INSTALL FOG LIGHT MOUNTING BRACKET RH (w/ Fog Light)
Tech Tips
Use the same procedure as for the LH side.
-
INSTALL FOG LIGHT COVER LH (w/ Fog Light)
-
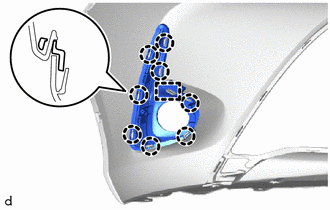
Engage the guide and 8 claws to install the fog light cover LH.
-
Install the outside moulding retainer.
-
-
INSTALL FOG LIGHT COVER RH (w/ Fog Light)
Tech Tips
Use the same procedure as for the LH side.
-
INSTALL FRONT BUMPER HOLE COVER LH (w/o Fog Light)
-
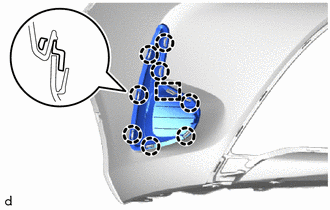
Engage the guide and 8 claws to install the front bumper hole cover LH.
-
-
INSTALL FRONT BUMPER HOLE COVER RH (w/o Fog Light)
Tech Tips
Use the same procedure as for the LH side.
-
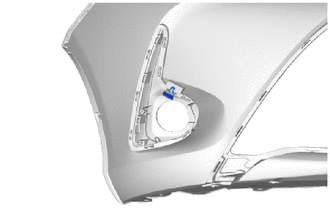
INSTALL FOG LIGHT ASSEMBLY LH (w/ Fog Light)
-
INSTALL FOG LIGHT ASSEMBLY RH (w/ Fog Light)
Tech Tips
Use the same procedure as for the LH side.
-
INSTALL FRONT FENDER LINER RETAINER
-
Engage the claw to install the front fender liner retainer.
Tech Tips
Use the same procedure for both sides.
-
-
INSTALL RADIATOR GRILLE (OR FRONT PANEL) EMBLEM
-
Engage the 2 guides and 4 claws to install the radiator grille (or front panel) emblem.
-
-
INSTALL FRONT BUMPER SIDE MOULDING LH
-
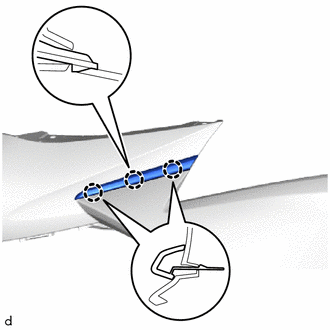
Engage the 3 claws to install the front bumper side moulding LH.
-
-
INSTALL FRONT BUMPER SIDE MOULDING RH
Tech Tips
Use the same procedure as for the LH side.
-
INSTALL FRONT BUMPER SIDE SEAL RH (for 1KR-FE)
-
Engage the 3 claws to install the front bumper side seal RH.
-
-
INSTALL LOWER RADIATOR GRILLE SUB-ASSEMBLY
-
Engage the 2 guides and 26 claws to install the lower radiator grille sub-assembly.
-
-
INSTALL FRONT BUMPER HOLE COVER (for Type A)
-
Engage the hook.
-
Engage the 2 guides and 2 claws to install the front bumper hole cover.
-
-
INSTALL FRONT BUMPER HOLE COVER (for Type B)
-
Engage the hook.
-
Turn the front bumper hole cover, and engage the 3 claws to install the front bumper hole cover.
-
-
INSTALL RADIATOR GRILLE
-
Engage the 2 guides and 5 claws to install the radiator grille.
-
Install the 3 clips.
-
Install the 2 screws.
-
-
INSTALL HOOD TO FRONT END PANEL SEAL
-
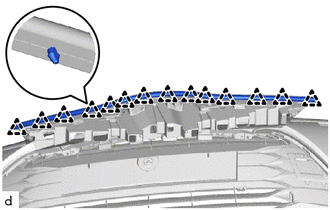
Engage the 14 clips to install the hood to front end panel seal.
-