FRONT BUMPER DISASSEMBLY
PROCEDURE
-
REMOVE HOOD TO FRONT END PANEL SEAL
-
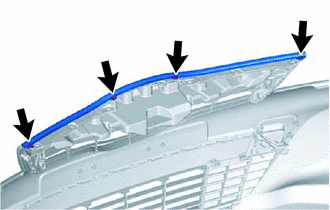
Remove the 4 clips.
-
While peeling off the double-sided adhesive tape, remove the hood to front end panel seal.
-
-
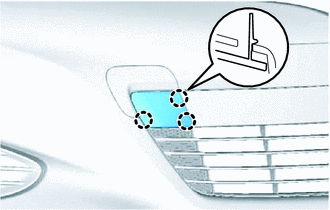
REMOVE RADIATOR GRILLE SIDE MOULDING LH
-
Disengage the 4 claws and radiator grille side moulding.
-
-
REMOVE RADIATOR GRILLE SIDE MOULDING RH
Tech Tips
Use the same procedure as for the LH side.
-
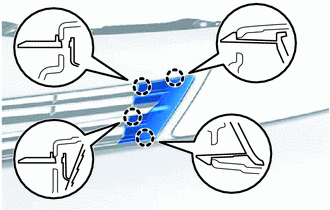
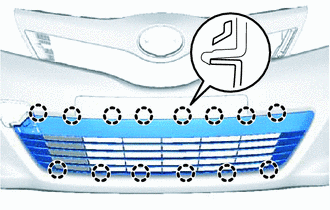
REMOVE RADIATOR GRILLE
-
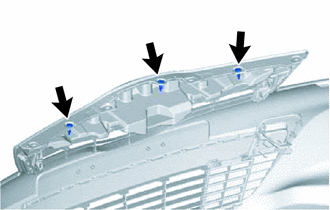
Remove the 3 clips.
-
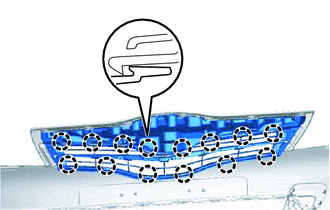
Disengage the 14 claws and the radiator grille.
-
-
REMOVE RADIATOR GRILLE MOULDING (w/ Plated Moulding)
-
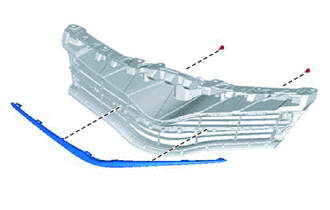
Remove the 2 screws and the radiator grille moulding.
-
-
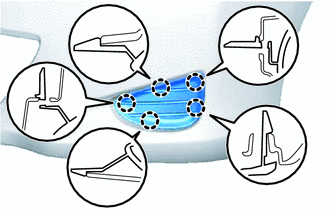
REMOVE RADIATOR GRILLE (OR FRONT PANEL) EMBLEM
-
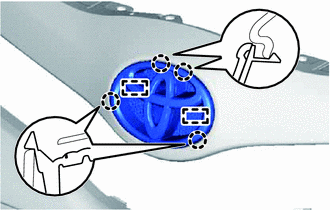
Disengage the 4 claws, 2 guides and the radiator grill (or front panel) emblem.
-
-
REMOVE FRONT BUMPER LOWER COVER
-
Disengage the 3 claws and front bumper lower cover.
-
-
REMOVE FRONT BUMPER HOLE COVER
-
Disengage the 3 claws and front bumper hole cover.
-
-
REMOVE LOWER NO. 1 RADIATOR GRILLE
-
Disengage the 14 claws and the lower No. 1 radiator grille.
-
-
REMOVE FOG LIGHT ASSEMBLY LH (w/ Fog Light)
-
REMOVE FOG LIGHT ASSEMBLY RH (w/ Fog Light)
Tech Tips
Use the same procedure as for the LH side.
-
REMOVE FOG LIGHT COVER LH
-
Disengage the 5 claws and remove the fog light cover.
-
-
REMOVE FOG LIGHT COVER RH
Tech Tips
Use the same procedure as for the LH side.
-
REMOVE HEADLIGHT ASSEMBLY LH
-
REMOVE HEADLIGHT ASSEMBLY RH
Tech Tips
Use the same procedure as for the LH side.
-
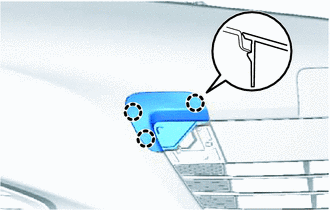
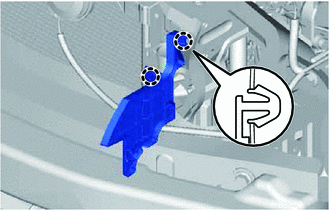
REMOVE FRONT BUMPER SIDE RETAINER LH
-
Disengage the 2 claws and front bumper side retainer.
-
-
REMOVE FRONT BUMPER SIDE RETAINER RH
Tech Tips
Use the same procedure as for the LH side.
-
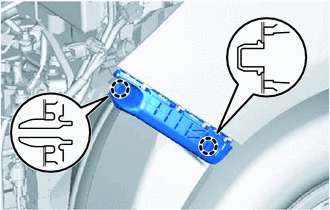
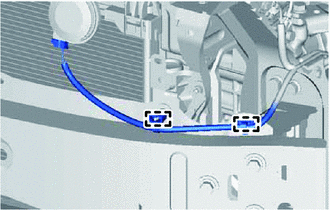
SEPARATE THERMISTOR ASSEMBLY
-
Disengage the 2 clamps and the thermistor.
-
-
REMOVE NO. 2 RADIATOR SIDE AIR SEAL (for TMC Made)
-
Disengage the 2 claws and the radiator side air seal.
-
-
REMOVE NO. 1 RADIATOR SIDE AIR SEAL (for TMC Made)
Tech Tips
Use the same procedure as for the No. 2 side.
-
REMOVE RADIATOR SUPPORT EXTENSION LH (for TMC Made)
-
Disengage the 2 claws and the radiator support extension.
-
-
REMOVE RADIATOR SUPPORT EXTENSION RH (for TMC Made)
Tech Tips
Use the same procedure as for the LH side.
-
REMOVE NO. 2 RADIATOR SIDE AIR SEAL (for TMMF Made)
-

Disengage the 2 claws and the radiator side air seal.
-
-
REMOVE NO. 1 RADIATOR SIDE AIR SEAL (for TMMF Made)
Tech Tips
Use the same procedure as for the No. 2 side.
-
REMOVE FRONT BUMPER ENERGY ABSORBER
-
Disengage the 2 guides and the front bumper energy absorber.
-
-
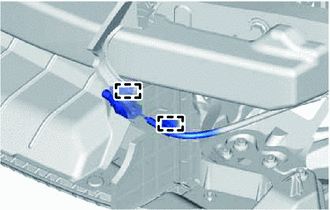
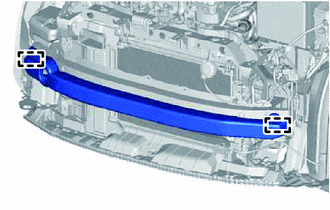
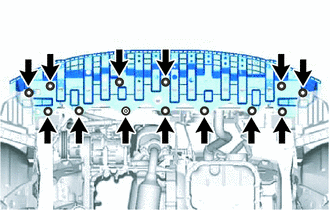
REMOVE FRONT BUMPER REINFORCEMENT
-
Disengage the 2 clamps and the disconnect the wire harness.
-
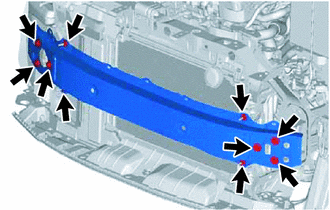
Remove the 6 bolts.
-
Remove the 4 nuts and the front bumper reinforcement.
-
-
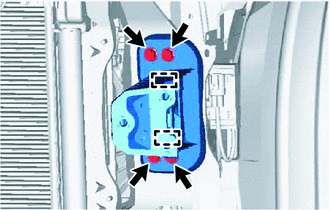
REMOVE FRONT NO. 1 BUMPER STONE DEFLECTOR BRACKET
-
Remove the 2 nuts and the front No. 1 bumper stone deflector bracket.
Tech Tips
Use the same procedure as for the opposite side.
-
-
SEPARATE WINDSHIELD WASHER JAR ASSEMBLY
-
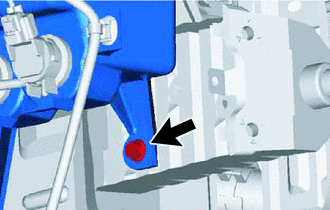
Remove the bolt and separate the windshield washer jar.
-
-
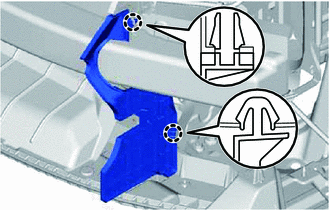
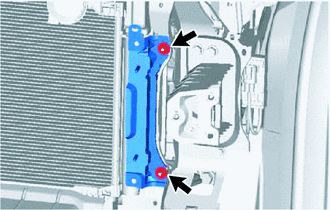
REMOVE FRONT SIDE MEMBER BRACKET SUB-ASSEMBLY LH
-
Remove the 4 bolts.
-
Disengage the 2 guides and front side member bracket.
-
-
REMOVE FRONT SIDE MEMBER BRACKET SUB-ASSEMBLY RH
Tech Tips
Use the same procedure as for the LH side.
-
REMOVE ENGINE UNDER COVER LH (except 1ND-TV)
-
REMOVE ENGINE UNDER COVER RH (except 1ND-TV)
-
REMOVE CENTER ENGINE UNDER COVER (for 1ND-TV)
-
REMOVE ENGINE UNDER COVER LH (for 1ND-TV)
-
REMOVE ENGINE UNDER COVER RH (for 1ND-TV)
-
REMOVE FRONT BUMPER ENERGY ABSORBER SUB-ASSEMBLY
-
Remove the 6 screws, 6 clips and grommet.
-
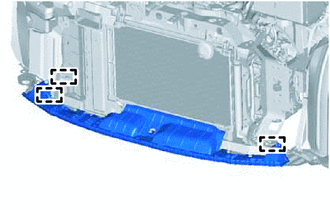
Disengage the 3 hooks and remove the front bumper energy absorber.
-