FRONT WIPER MOTOR INSTALLATION
CAUTION / NOTICE / HINT
Tech Tips
When installing the windshield wiper motor and link, operate the windshield wiper motor by itself, and install the windshield wiper link at the position where the motor automatically stops.
PROCEDURE
-
INSTALL WINDSHIELD WIPER MOTOR ASSEMBLY
-
Using a T30 "TORX" socket wrench, install the windshield wiper motor assembly to the windshield wiper link with the 2 bolts.
- Torque:
- 7.5 N*m { 76 kgf*cm, 66 in.*lbf }
-
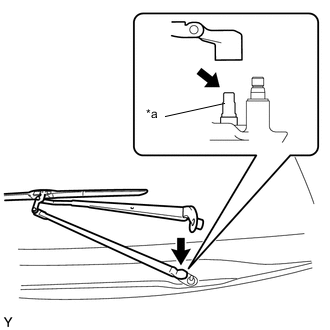
Apply MP grease to the crank arm pivot of the windshield wiper motor.
-
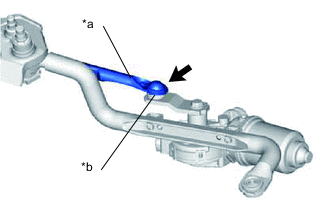
Text in Illustration *a Windshield Wiper Link Rod *b Crank Arm Pivot of the Windshield Wiper Motor Assembly Connect the windshield wiper link rod to the crank arm pivot of the windshield wiper motor.
-
-
INSTALL WINDSHIELD WIPER MOTOR AND LINK ASSEMBLY
-
Connect the connector.
-
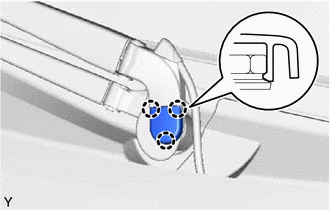
Engage the grommet as shown in the illustration.
-
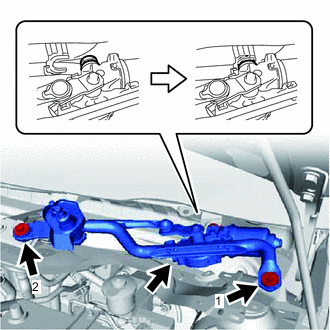
Install the windshield wiper motor and link with the 2 bolts in the order shown in the illustration.
- Torque:
- 5.5 N*m { 56 kgf*cm, 49 in.*lbf }
-
-
INSTALL COWL TOP VENTILATOR LOUVER SUB-ASSEMBLY
-
Engage the 9 rear guides.
-
Engage the 5 claws and the 3 front guides, and install the cowl top ventilator louver sub-assembly.
-
Install the 2 clips.
-
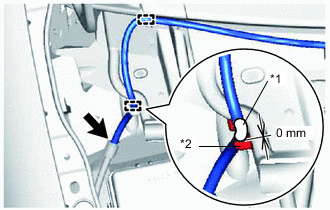
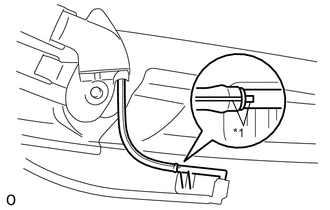
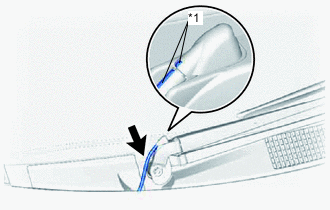
Text in Illustration *1 Tape *2 Clamp Connect the washer hose and engage the 2 clamps.
Note
Assemble the washer hose so that the tape is above the clamp.
-
-
INSTALL FRONT FENDER TO COWL SIDE SEAL LH
-
Using a piece of cloth or similar material, rub off any double-sided tape remaining on the windshield glass.
Note
Installing the front fender to cowl side seal with any double-sided tape remaining on the windshield glass may cause adhesion failure. Therefore, completely remove the double-sided tape.
-
Using a non-residue solvent, clean the attachment surface.
-
Remove the double-sided tape backing of the new front fender cowl side seal LH.
-
Engage the clip and guide.
-
Engage the claw and guide and install the front fender cowl side seal LH.
Note
Thoroughly press the front fender to cowl side seal to ensure that it adheres.
-
-
INSTALL FRONT FENDER TO COWL SIDE SEAL RH
Tech Tips
Use the same procedures for the LH side.
-
INSTALL FRONT WIPER ARM AND BLADE ASSEMBLY
-
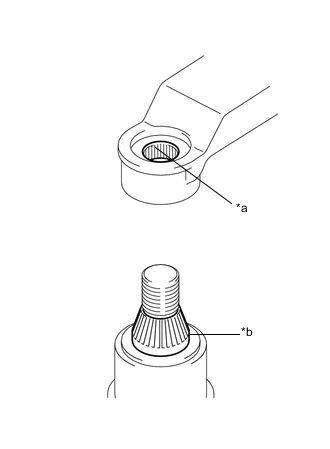
Text in Illustration *a Wiper Arm Serration *b Wiper Pivot Serration Scrape any metal powder off the serrated part of the wiper arm with a round file or the equivalent (when reinstalling).
-
Clean the wiper arm serrations to remove any burrs, dirt, etc.
Note
Do not grind down the wiper arm serrations.
-
Clean the wiper pivot serrations with a wire brush.
-
Text in Illustration *a Pivot of Front Wiper Sub Arm Install the front wiper sub arm.
Note
-
When reusing the front wiper arm and blade assembly, apply MP grease to the pivot of the front wiper sub arm.
-
Confirm that the front wiper sub arm is engaged to the pivot.
-
-
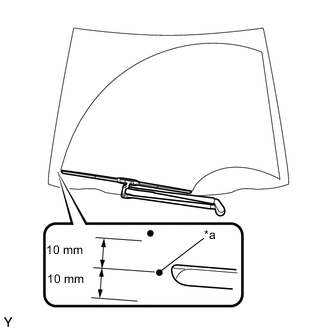
Text in Illustration *a Mark for Blade Position Install the front wiper arm and blade assembly with the nut to the position as shown in the illustration.
- Torque:
- 26 N*m { 265 kgf*cm, 19 ft.*lbf }
Tech Tips
-
There are 2 marks, so make sure to inspect using the correct mark.
-
After tightening, confirm that the wiper blade is within the area shown in the illustration.
-
for LHD:
-
Type A:
-
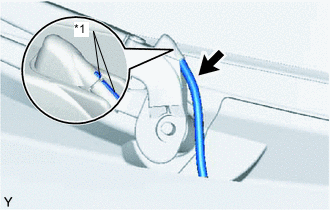
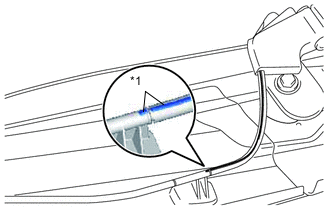
Text in Illustration *1 Rib Align the rib of the washer hose with the rib of the washer nozzle and connect them.
Note
-
Make sure that the washer hose is not twisted when installing it in order to prevent interference with the hood and cowl top ventilator louver.
-
It is possible to connect the hose even if it is twisted 360°, so check to make sure the hose is not twisted.
-
-
-
Type B:
-
Text in Illustration *1 Rib Align the rib of the washer hose with the rib of the washer hose joint and connect them.
Note
-
Make sure that the washer hose is not twisted when installing it in order to prevent interference with the hood and cowl top ventilator louver.
-
It is possible to connect the hose even if it is twisted 360°, so check to make sure the hose is not twisted.
-
-
-
-
for RHD:
-
Text in Illustration *1 Rib Type A:
Note
-
Make sure that the washer hose is not twisted when installing it in order to prevent interference with the hood and cowl top ventilator louver.
-
It is possible to connect the hose even if it is twisted 360°, so check to make sure the hose is not twisted.
-
-
Text in Illustration *1 Rib Type B:
Note
-
Make sure that the washer hose is not twisted when installing it in order to prevent interference with the hood and cowl top ventilator louver.
-
It is possible to connect the hose even if it is twisted 360°, so check to make sure the hose is not twisted.
-
-
-
Operate the front wipers while spraying washer fluid onto the windshield. Make sure that the front wipers function properly and the wipers do not come into contact with the vehicle body.
-
-
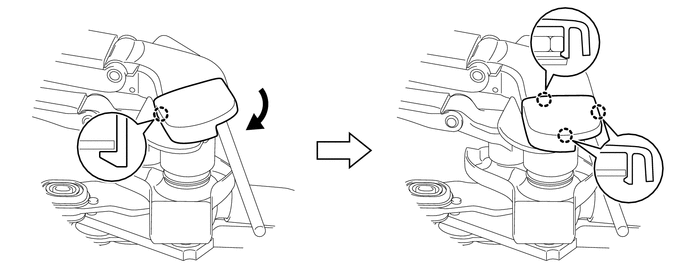
INSTALL FRONT WIPER ARM HEAD CAP
-
Type A:
-
Engage the 3 claws to install the front wiper arm head cap.
-
-
Type B:
-
Engage the claw and rotate the front wiper arm head cap.
-
Engage the 3 claws and install the front wiper arm head cap.
-
-