BACK DOOR REASSEMBLY
PROCEDURE
-
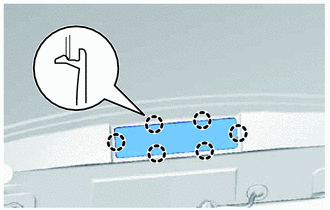
APPLY BODY GREASE
-
INSTALL NO. 2 LUGGAGE COMPARTMENT DOOR NAME PLATE
-
INSTALL NO. 6 BACK DOOR NAME PLATE
-
INSTALL SYMBOL EMBLEM
-
INSTALL PACKAGE TRAY TRIM HANGER (w/ Package Tray Trim)
-

Install the package tray trim hanger.
-
-
INSTALL BACK DOOR NO. 2 WIRE
-
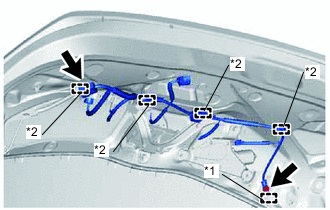
Text in Illustration *1 Hook *2 Clamp Engage the 4 clamps and connect the connector.
-
Engage the hook and install the wire harness with the bolt.
- Torque:
- 8.4 N*m { 85 kgf*cm, 74 in.*lbf }
-
-
INSTALL REAR WINDOW NO. 1 WIRE
-
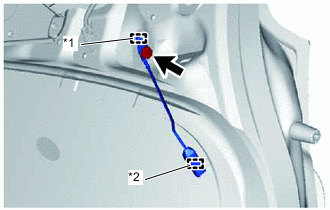
Text in Illustration *1 Hook *2 Clamp Engage the hook and install the bolt.
- Torque:
- 8.4 N*m { 85 kgf*cm, 74 in.*lbf }
-
Engage the clamp and install the wire harness.
-
-
INSTALL LICENSE PLATE LIGHT ASSEMBLY
-
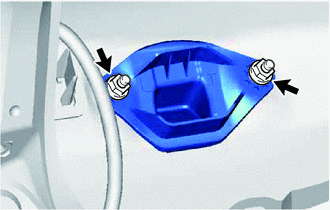
INSTALL BACK DOOR PANEL CUSHION
-
Install the new back door panel cushion.
Tech Tips
Use the same procedures for the opposite side.
-
-
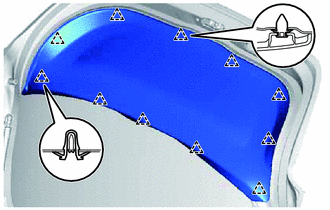
INSTALL BACK DOOR PANEL NO. 2 PROTECTOR
-
Text in Illustration *1 Double-sided Tape Using a piece of cloth or similar material, rub off any double-sided tape remaining on the back door panel.
Note
Installing the back door panel protector with any double-sided tape remaining on the back door panel may cause adhesion failure. Therefore, completely remove the double-sided tape.
-
Using a non-residue solvent, clean the attachment surface.
-
Remove the double-sided tape backing of the new back door panel protector.
-
Install the back door panel protector with 2 clips.
Note
Thoroughly press the back door panel protector to ensure that it adheres.
-
-
INSTALL BACK DOOR PANEL NO. 1 PROTECTOR
Tech Tips
Use the same procedures as for the No. 2.
-
INSTALL REAR WASHER NOZZLE
-
INSTALL CENTER STOP LIGHT ASSEMBLY
-
INSTALL REAR LIGHT COVER
-
Engage the 6 claws and install the rear lamp cover.
-
-
INSTALL BACK DOOR OPENER SWITCH ASSEMBLY
-
INSTALL BACK DOOR OUTSIDE GARNISH SUB-ASSEMBLY
-
INSTALL REAR TELEVISION CAMERA ASSEMBLY (w/ Parking Assist Monitor System)
-
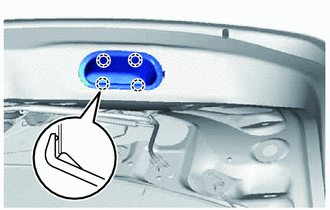
INSTALL BACK DOOR GARNISH NO. 2 RETAINER (w/ Cover)
-
Install the back door garnish No. 2 retainer with the 2 nuts.
- Torque:
- 4.9 N*m { 50 kgf*cm, 43 in.*lbf }
-
-
INSTALL BACK DOOR LOCK CYLINDER ASSEMBLY (w/ Lock Cylinder)
-
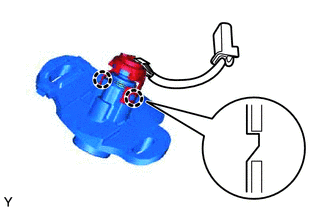
Engage the 2 claws and install the back door lock cylinder.
-

Install the back door lock cylinder with the 2 nuts.
- Torque:
- 4.9 N*m { 50 kgf*cm, 43 in.*lbf }
-
Connect the connector.
-
-
INSTALL DOOR PULL HANDLE
-
Engage the 4 claws and install the door pull handle.
-
-
INSTALL BACK DOOR WEIGHT (w/ Back Door Weight)
-
Engage the hook.
-
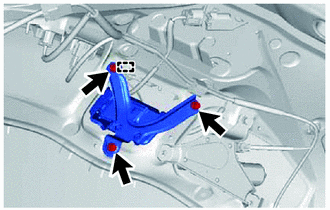
Install the back door weight with the 3 bolts.
- Torque:
- 5.5 N*m { 56 kgf*cm, 49 in.*lbf }
-
-
INSTALL BACK DOOR LOCK ASSEMBLY
-
INSTALL REAR WIPER MOTOR GROMMET
-
INSTALL REAR WIPER MOTOR ASSEMBLY
-
INSTALL REAR WIPER ARM AND BLADE ASSEMBLY
-
INSTALL REAR WIPER ARM HEAD CAP
-
INSTALL BACK DOOR TRIM BOARD
-
Engage the 11 clips and install the back door trim board.
-
-
INSTALL REAR SPOILER SUB-ASSEMBLY (w/ Rear Spoiler)
-
INSTALL REAR SPOILER COVER LH (w/ Rear Spoiler)
-
INSTALL REAR SPOILER COVER RH (w/ Rear Spoiler)
Tech Tips
Use the same procedure as for the LH side.