QUARTER WINDOW GLASS INSTALLATION
PROCEDURE
-
CLEAN QUARTER WINDOW GLASS
-
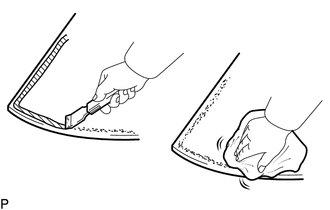
Using a scraper, remove the adhesive sticking to the quarter window glass.
Note
Be careful not to damage the quarter window glass.
-
Clean the outer edge of the quarter window glass with a non-residue solvent.
Note
-
Do not touch the glass surface after cleaning it.
-
Even if using a new glass, clean the glass with non-residue solvent.
-
-
-
INSTALL QUARTER WINDOW GLASS SPACER
-
Using a brush or sponge, coat the application area of the quarter window glass spacer with Primer G.
Note
-
Do not apply too much primer.
-
Allow the primer coating to dry for 3 minutes or more.
-
Throw away any leftover primer.
Tech Tips
If an area other than that specified is coated by accident, wipe off the primer with a clean piece of cloth before it dries.
-
-
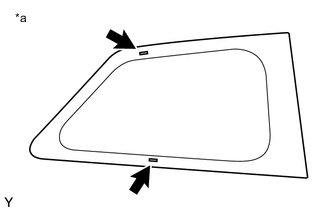
Text in Illustration *a Back Side Install 2 new quarter window glass spacers onto the glass, as shown in the illustration.
-
-
INSTALL QUARTER WINDOW CLIP
-
Using a brush or sponge, coat the application area of the quarter window clip with Primer G.
Note
-
Do not apply too much primer.
-
Allow the primer coating to dry for 3 minutes or more.
-
Throw away any leftover primer.
Tech Tips
If an area other than that specified is coated by accident, wipe off the primer with a clean piece of cloth before it dries.
-
-
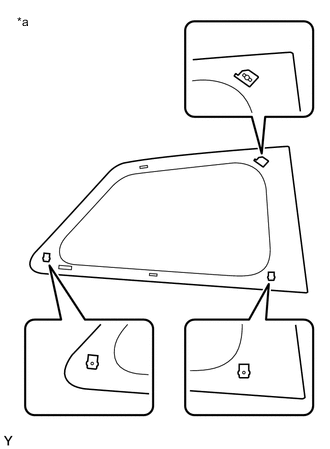
Text in Illustration *a Back Side Install 3 new quarter window clips onto the quarter window glass, as shown in the illustration.
-
-
INSTALL QUARTER WINDOW MOULDING
-
Using a brush or sponge, coat the application area of the quarter window moulding with Primer G.
Note
-
Do not apply too much primer.
-
Allow the primer coating to dry for 3 minutes or more.
-
Throw away any leftover primer.
Tech Tips
If an area other than that specified is coated by accident, wipe off the primer with a clean piece of cloth before it dries.
-
-

Text in Illustration *a 9.5 mm (0.374 in.) Install new quarter window moulding onto the quarter window glass, as shown in the illustration.
-
-
INSTALL QUARTER WINDOW GLASS
-
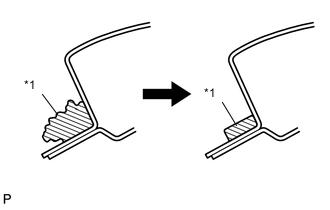
Text in Illustration *1 Adhesive Clean and shape the contact surface of the vehicle body.
-
Using a knife, cut away any rough adhesive on the contact surface of the vehicle body to ensure the appropriate surface shape.
Tech Tips
Leave as much adhesive on the vehicle body as possible.
-
Clean the contact surface of the vehicle body with a piece of cloth saturated with cleaner.
-
-

Text in Illustration *a Mark Position the quarter window glass.
-
Using suction cups, place the quarter window glass in the correct position.
-
Check that the whole contact surface of the quarter window glass rim is perfectly even.
-
Align the matchmarks on the quarter window glass and vehicle body.
Note
Check that the quarter window glass stoppers are attached to the vehicle body correctly.
-
Remove the quarter window glass.
-
-

Text in Illustration *1 Primer M *2 Adhesive *a Correct *b Incorrect Using a brush, coat the installation surface on the vehicle body with Primer M.
Note
-
Do not coat the adhesive with Primer M.
-
Do not apply too much primer.
-
Allow the primer coating to dry for 3 minutes or more.
-
Do not keep any of the opened Primer M for later use.
-
-
Using a brush or sponge, coat the application areas that still have adhesive attached with Primer G.
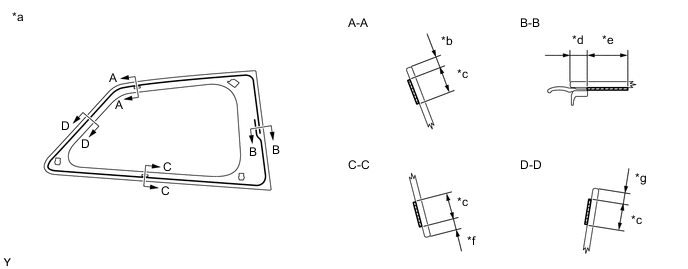
Text in Illustration *a Back Side *b 6.4 mm (0.252 in.) *c 14.0 mm (0.551 in.) *d 8.3 mm (0.327 in.) *e 22.0 mm (0.866 in.) *f 6.0 mm (0.236 in.) *g 6.5 mm (0.256 in.) - - Note
-
Do not apply too much primer.
-
Allow the primer coating to dry for 3 minutes or more.
-
Throw away any leftover primer.
Tech Tips
If an area other than that specified is coated by accident, wipe off the primer with a clean piece of cloth before it dries.
-
-
Apply adhesive to the glass.
Adhesive Toyota Genuine Windshield Glass Adhesive or equivalent
-
Cut the tip off the cartridge nozzle.
Tech Tips
After cutting off the tip, use all adhesive within the time indicated in the table below.
Usage Time Frame Temperature Usage Time Frame 35°C (95°F) 15 minutes 20°C (68°F) 1 hour 40 minutes 5°C (41°F) 8 hours -
Load the sealer gun with the cartridge.
-
-
Apply adhesive to the quarter window glass, as shown in the illustration.
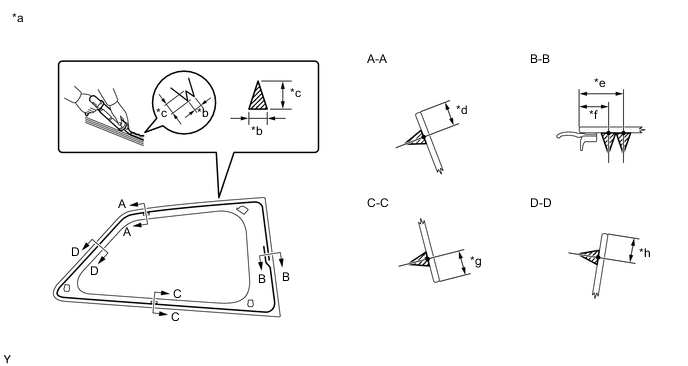
Text in Illustration *a Back Side *b 8.0 mm (0.315 in.) *c 12.0 mm (0.472 in.) *d 13.4 mm (0.528 in.) *e 23.3 mm (0.917 in.) *f 15.3 mm (0.602 in.) *g 13.0 mm (0.512 in.) *h 13.5 mm (0.531 in.) -
Install the quarter window glass.
-
Text in Illustration *a Mark Using suction cups, position the quarter window glass so that the matchmarks are aligned, and press it in gently along the rim.
Note
-
Check that the quarter window glass clips are attached to the vehicle body correctly.
-
Check the clearance between the vehicle body and quarter window glass.
-
-
Hold the quarter window glass in place securely with protective tape or the equivalent until the adhesive hardens.
-
Lightly press the front surface of the glass to ensure a close fit.
Tech Tips
Press the glass with force of 98 N (10 kgf, 22 lb) or more.
-
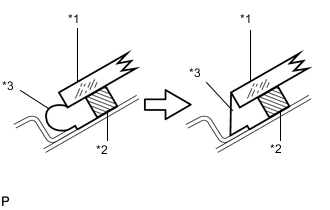
Text in Illustration *1 Windshield *2 Dam *3 Adhesive If necessary, use a scraper to correct the level or position of adhesive that has been applied.
Note
Do not drive the vehicle within the time limits described in the table below.
Minimum time Temperature Minimum Time Prior to Driving Vehicle 35°C (95°F) 1 hour and 30 minutes 20°C (68°F) 5 hours 5°C (41°F) 24 hours
-
-
-
INSPECT FOR LEAK AND REPAIR
-
After the adhesive has hardened, apply water from the outside of the vehicle. Check that no water leaks into the cabin.
-
If water leaks into the cabin, allow the water to dry and add adhesive.
-
Remove the protective tape.
-
-
INSTALL REAR ROOF SIDE RAIL GARNISH
Tech Tips
Use the same procedure as for the RH side Click here.
-
INSTALL ROOF SIDE INNER GARNISH
Tech Tips
Use the same procedure as for the RH side Click here.
-
INSTALL DECK TRIM SIDE PANEL ASSEMBLY
Tech Tips
Use the same procedure as for the RH side Click here.
-
INSTALL REAR SEAT 3 POINT TYPE OUTER BELT ASSEMBLY
Tech Tips
Use the same procedure as for the RH side Click here.
-
INSTALL REAR FLOOR FINISH PLATE
-
INSTALL JACK HANDLE (for RH Side)
-
INSTALL NO. 2 ROOM LIGHT ASSEMBLY (for LH Side)
-
INSTALL CENTER PILLAR UPPER GARNISH
Tech Tips
Use the same procedure as for the RH side Click here.
-
INSTALL FRONT QUARTER TRIM PANEL ASSEMBLY
Tech Tips
Use the same procedure as for the RH side Click here.
-
INSTALL FRONT SEAT OUTER BELT BAR SUB-ASSEMBLY
Tech Tips
Use the same procedure as for the RH side Click here.
-
INSTALL FRONT DOOR OPENING TRIM WEATHERSTRIP
Tech Tips
Use the same procedure as for the RH side Click here.
-
INSTALL FRONT DOOR SCUFF PLATE
Tech Tips
Use the same procedure as for the RH side Click here.
-
INSTALL REAR SEAT ASSEMBLY (for LH Side)
-
INSTALL REAR SEAT ASSEMBLY (for RH Side)
-
INSTALL SPARE WHEEL COVER
-
INSTALL DECK BOARD ASSEMBLY