ROOF HEADLINING(for TMMF Made 5 Door) REMOVAL
PROCEDURE
-
REMOVE DECK BOARD ASSEMBLY
-
REMOVE SPARE WHEEL COVER
-
REMOVE REAR SEAT ASSEMBLY (for 60/40 Split Seat Type RH Side)
-
REMOVE REAR SEAT ASSEMBLY (for 60/40 Split Seat Type LH Side)
-
REMOVE FRONT DOOR SCUFF PLATE RH
-
REMOVE FRONT DOOR SCUFF PLATE LH
Tech Tips
Use the same procedure as for the RH side.
-
REMOVE COWL SIDE TRIM BOARD RH
-
REMOVE COWL SIDE TRIM BOARD LH
Tech Tips
Use the same procedure as for the RH side.
-
REMOVE FRONT DOOR OPENING TRIM WEATHERSTRIP RH
-
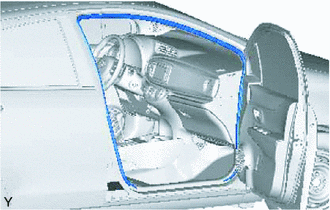
Remove the front door opening trim weatherstrip.
-
-
REMOVE FRONT DOOR OPENING TRIM WEATHERSTRIP LH
Tech Tips
Use the same procedure as for the RH side.
-
REMOVE REAR DOOR SCUFF PLATE RH
-
REMOVE REAR DOOR SCUFF PLATE LH
Tech Tips
Use the same procedure as for the RH side.
-
REMOVE REAR DOOR OPENING TRIM WEATHERSTRIP RH
-
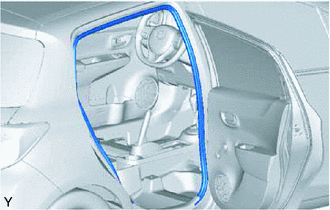
Remove the rear door opening trim weatherstrip.
-
-
REMOVE REAR DOOR OPENING TRIM WEATHERSTRIP LH
Tech Tips
Use the same procedure as for the RH side.
-
SEPARATE FRONT SEAT OUTER BELT ASSEMBLY RH
-
SEPARATE FRONT SEAT OUTER BELT ASSEMBLY LH
Tech Tips
Use the same procedure as for the RH side.
-
REMOVE CENTER PILLAR LOWER GARNISH RH
-
REMOVE CENTER PILLAR LOWER GARNISH LH
Tech Tips
Use the same procedure as for the RH side.
-
REMOVE CENTER PILLAR UPPER GARNISH RH
-
REMOVE CENTER PILLAR UPPER GARNISH LH
Tech Tips
Use the same procedure as for the RH side.
-
REMOVE FRONT PILLAR GARNISH RH (w/ Curtain Shield Airbag)
-
REMOVE FRONT PILLAR GARNISH LH (w/ Curtain Shield Airbag)
Tech Tips
Use the same procedure as for the RH side.
-
REMOVE FRONT PILLAR GARNISH RH (w/o Curtain Shield Airbag)
-
REMOVE FRONT PILLAR GARNISH LH (w/o Curtain Shield Airbag)
Tech Tips
Use the same procedure as for the RH side.
-
REMOVE NO. 2 ROOM LIGHT ASSEMBLY
-
REMOVE JACK HANDLE
-
REMOVE REAR FLOOR FINISH PLATE
-
SEPARATE REAR SEAT 3 POINT TYPE OUTER BELT ASSEMBLY RH
-
SEPARATE REAR SEAT 3 POINT TYPE OUTER BELT ASSEMBLY LH
Tech Tips
Use the same procedure as for the RH side.
-
REMOVE DECK TRIM SIDE PANEL ASSEMBLY RH
-
REMOVE DECK TRIM SIDE PANEL ASSEMBLY LH
Tech Tips
Use the same procedure as for the RH side.
-
REMOVE ROOF SIDE INNER GARNISH RH
-
REMOVE ROOF SIDE INNER GARNISH LH
Tech Tips
Use the same procedure as for the RH side.
-
REMOVE VISOR ASSEMBLY RH
-
REMOVE VISOR ASSEMBLY LH
Tech Tips
Use the same procedure as for the RH side.
-
REMOVE VISOR HOLDER
-
REMOVE ASSIST GRIP ASSEMBLY
-
REMOVE MAP LIGHT ASSEMBLY
-
REMOVE VANITY LIGHT ASSEMBLY (w/ Vanity Light)
-
REMOVE INNER REAR VIEW MIRROR STAY HOLDER COVER (w/ EC Mirror)
-
REMOVE RAIN SENSOR COVER (w/ Rain Sensor)
-
REMOVE REAR CENTER SEAT OUTER BELT ASSEMBLY
-
REMOVE ROOF HEADLINING ASSEMBLY (for Glass Roof)
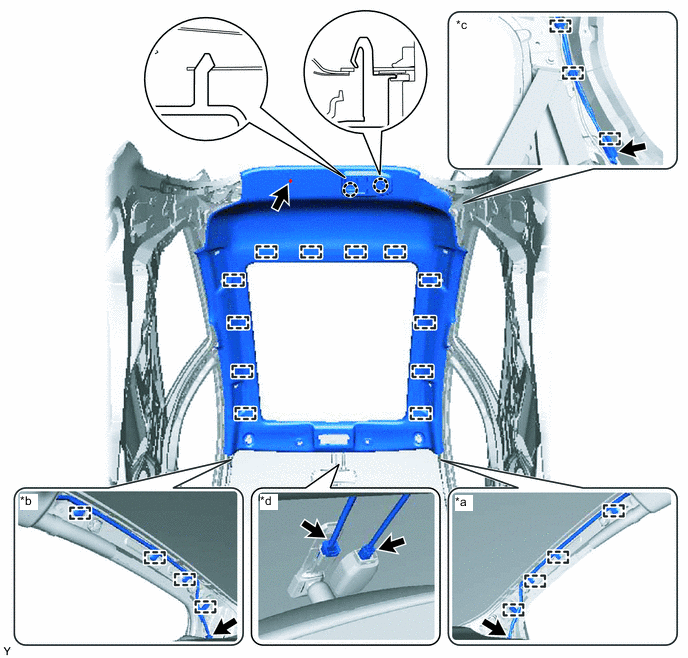
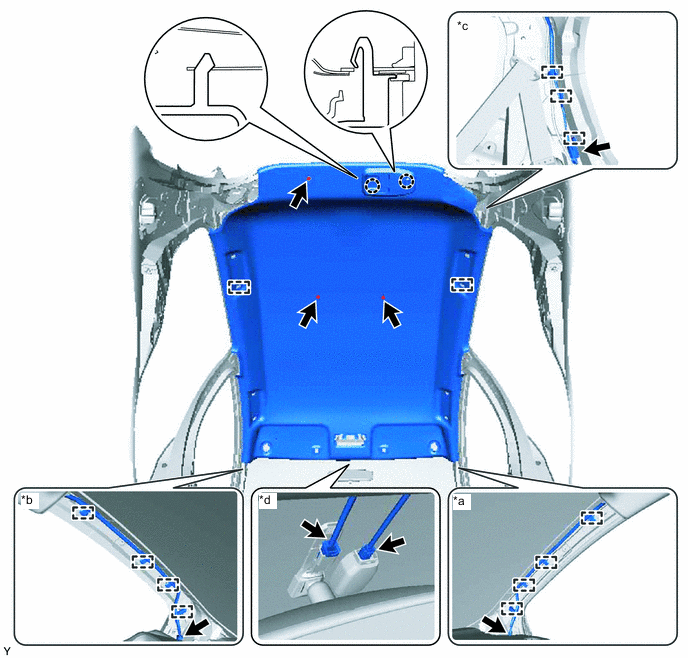
Text in Illustration *a Front Pillar RH Side *b Front Pillar LH Side *c Rear Pillar RH Side *d Windshield Glass Side
-
for front pillar RH side:
-
Disconnect the connector.
-
Using a clip remover, disengage the 4 clamps.
-
-
for front pillar LH side:
-
Disconnect the connector.
-
Using a clip remover, disengage the 4 clamps.
-
-
for rear pillar RH side:
-
Disconnect the connector.
-
Using a clip remover, disengage the 3 clamps.
-
-
for windshield glass side (w/ Rain Sensor):
-
Disconnect the 2 connectors.
-
-
Disengage the 2 claws.
-
Using a clip remover, remove the clip.
-
Disengage the 12 hook-and loop fasteners.
-
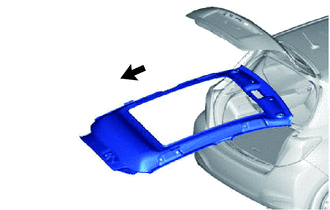
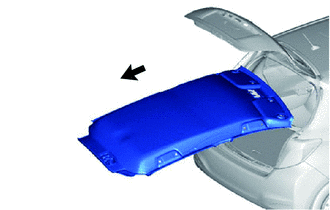
Remove the roof headlining from the vehicle through the back door as shown in the illustration.
Note
Do not damage the roof headlining assembly or body interior.
-
-
REMOVE ROOF HEADLINING ASSEMBLY (except Glass Roof)
Text in Illustration *a Front Pillar RH Side *b Front Pillar LH Side *c Rear Pillar RH Side *d Windshield Glass Side
-
for front pillar RH side:
-
Disconnect the connector.
-
Using a clip remover, disengage the 4 clamps.
-
-
for front pillar LH side:
-
Disconnect the connector.
-
Using a clip remover, disengage the 4 clamps.
-
-
for rear pillar RH side:
-
Disconnect the connector.
-
Using a clip remover, disengage the 3 clamps.
-
-
for windshield glass side (w/ Rain Sensor):
-
Disconnect the 2 connectors.
-
-
Disengage the 2 claws.
-
Using a clip remover, remove the 3 clips.
-
Disengage the 2 hooks.
-
Remove the roof headlining from the vehicle through the back door as shown in the illustration.
Note
Do not damage the roof headlining assembly or body interior.
-