UPPER INSTRUMENT PANEL INSTALLATION
PROCEDURE
-
INSTALL UPPER INSTRUMENT PANEL SUB-ASSEMBLY
-
Engage the 5 guides at the front of the upper instrument panel.
Note
Be careful not to damage the upper instrument panel and steering wheel when installing it.
-
Engage the 8 clips at the rear of the upper instrument panel.
-
Install the <B> bolt.
- Torque:
- 20 N*m { 204 kgf*cm, 15 ft.*lbf }
-
Install the upper instrument panel with the 2 clips.
-
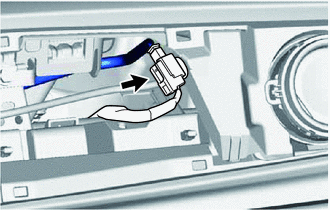
Connect the passenger airbag connector.
-
-
INSTALL COMBINATION METER ASSEMBLY
-
INSTALL NO. 1 INSTRUMENT CLUSTER FINISH PANEL
-
Engage the 5 clips and install the instrument cluster finish panel.
-
-
INSTALL INSTRUMENT CLUSTER FINISH CENTER PANEL SUB-ASSEMBLY (w/o Radio Receiver)
-
Connect the connector.
-
Engage the 7 clips and install the instrument cluster finish center panel.
-
-
INSTALL INSTRUMENT CLUSTER FINISH CENTER PANEL SUB-ASSEMBLY (w/ Radio Receiver)
-
Connect the connector.
-
Engage the 4 clips and install the instrument cluster finish center panel.
-
-
INSTALL NO. 4 INSTRUMENT PANEL REGISTER ASSEMBLY (for Front Passenger Side)
-
Engage the 3 claws and install the instrument panel register.
-
-
INSTALL INSTRUMENT CLUSTER FINISH PANEL GARNISH ASSEMBLY
-
Engage the 4 guides and 10 clips and install the instrument cluster finish panel garnish.
-
-
INSTALL FRONT PILLAR GARNISH RH (w/ Curtain Shield Airbag)
-
INSTALL FRONT PILLAR GARNISH LH (w/ Curtain Shield Airbag)
Tech Tips
Use the same procedure as for the RH side.
-
INSTALL FRONT PILLAR GARNISH RH (w/o Curtain Shield Airbag)
-
INSTALL FRONT PILLAR GARNISH LH (w/o Curtain Shield Airbag)
Tech Tips
Use the same procedure as for the RH side.
-
INSTALL FRONT DOOR OPENING TRIM WEATHERSTRIP RH
-
Install the front door opening trim weatherstrip.
-
-
INSTALL FRONT DOOR OPENING TRIM WEATHERSTRIP LH
-
Install the front door opening trim weatherstrip.
-
-
INSTALL COWL SIDE TRIM BOARD RH
-
INSTALL COWL SIDE TRIM BOARD LH
Tech Tips
Use the same procedure as for the RH side.
-
INSTALL FRONT DOOR SCUFF PLATE RH (for 3 Door)
-
INSTALL FRONT DOOR SCUFF PLATE LH (for 3 Door)
Tech Tips
Use the same procedure as for the RH side.
-
INSTALL FRONT DOOR SCUFF PLATE RH (for 5 Door)
-
INSTALL FRONT DOOR SCUFF PLATE LH (for 5 Door)
Tech Tips
Use the same procedure as for the RH side.
-
CONNECT CABLE TO NEGATIVE BATTERY TERMINAL
- Torque:
- 5.4 N*m { 55 kgf*cm, 48 in.*lbf }
-
INSPECT SRS WARNING LIGHT