CONDENSER(for 1KR-FE) INSTALLATION
PROCEDURE
-
INSTALL COOLER CONDENSER ASSEMBLY
-
Engage the 2 guides to install the cooler condenser assembly.
Note
Do not damage the cooler condenser assembly or radiator when installing the cooler condenser assembly.
Tech Tips
If a new cooler condenser assembly is installed, add compressor oil to the cooler condenser assembly as follows.
Capacity Add 40 cc (1.35 fl. oz.) Compressor oil for HFC-134a (R134a) ND-OIL 8 or equivalent for HFO-1234yf (R1234yf) ND-OIL 12 or equivalent -
Engage the 2 claws.
-
-
CONNECT LIQUID TUBE SUB-ASSEMBLY A
-
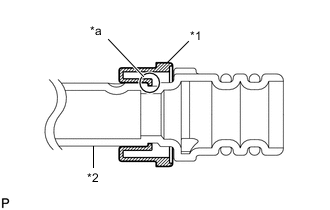
*1 Piping Clamp *2 Liquid Tube Sub-assembly A *a Groove Install a new piping clamp to the liquid tube sub-assembly A.
Note
Securely engage the inside step of the piping clamp in the liquid tube sub-assembly A groove.
-
Remove the vinyl tape from the open ends of the liquid tube sub-assembly A and cooler condenser assembly.
-
Thoroughly coat a new O-ring and contact surface of the liquid tube sub-assembly A with compressor oil.
Compressor oil for HFC-134a (R134a) ND-OIL 8 or equivalent for HFO-1234yf (R1234yf) ND-OIL 12 or equivalent -
Install the 2 O-rings to the liquid tube sub-assembly A.
Note
Do not let foreign matter adhere to the O-ring or O-ring seal.
-

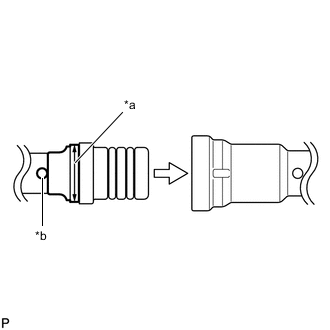
*a Large Diameter Section of Piping Clamp *b Alignment Mark Connect the liquid tube sub-assembly A and cooler condenser assembly by matching the alignment marks.
Note
Insert them by holding the pipe, not the piping clamp.
-

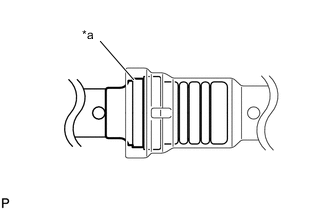
*a Large Diameter Section of Piping Clamp Securely insert the piping clamp to the point where the large diameter section of the piping clamp is covered by the liquid tube sub-assembly A.
Tech Tips
-
When inserting, make sure that a click sound is heard.
-
Check that the liquid tube sub-assembly A is securely inserted by pulling it.
-
-
-
CONNECT NO. 1 COOLER REFRIGERANT DISCHARGE HOSE
-

*1 Piping Clamp *2 No. 1 Cooler Refrigerant Discharge Hose *a Groove Install a new piping clamp to the No. 1 cooler refrigerant discharge hose.
Note
Securely engage the inside step of the piping clamp in the No. 1 cooler refrigerant discharge hose groove.
-
Remove the vinyl tape from the open ends of the No. 1 cooler refrigerant discharge hose and cooler condenser assembly.
-
Thoroughly coat a new O-ring and contact surface of the No. 1 cooler refrigerant discharge hose with compressor oil.
Compressor oil for HFC-134a (R134a) ND-OIL 8 or equivalent for HFO-1234yf (R1234yf) ND-OIL 12 or equivalent -
Install the 2 O-rings to the No. 1 cooler refrigerant discharge hose.
Note
Do not let foreign matter adhere to the O-ring or O-ring seal.
-
*a Large Diameter Section of Piping Clamp *b Alignment Mark Connect the No. 1 cooler refrigerant discharge hose and cooler condenser assembly by matching the alignment marks.
Note
Insert them by holding the pipe, not the piping clamp.
-
*a Large Diameter Section of Piping Clamp Securely insert the piping clamp to the point where the large diameter section of the piping clamp is covered by the No. 1 cooler refrigerant discharge hose.
Tech Tips
-
When inserting, make sure that a click sound is heard.
-
Check that the No. 1 cooler refrigerant discharge hose is securely inserted by pulling it.
-
-
-
INSTALL NO. 1 COOLER COVER
-
Engage the 2 guides to install the No. 1 cooler cover.
-
-
INSTALL RADIATOR UPPER SUPPORT SUB-ASSEMBLY
-
Install the radiator upper support sub-assembly with the 4 bolts.
- Torque:
- 5.5 N*m { 56 kgf*cm, 49 in.*lbf }
-
Engage the 2 clamps to install the hood lock control cable sub-assembly.
-
Engage the 2 clamps to install the wire harness.
-
Connect the connector.
-
Install the 2 clips.
-
-
INSTALL NO. 2 COOLER AIR DUCT
-
Install the No. 2 cooler air duct with the clip.
-
-
INSTALL FRONT AIRBAG SENSOR
-
INSTALL HEADLIGHT ASSEMBLY LH
-
INSTALL HEADLIGHT ASSEMBLY RH
Tech Tips
Use the same procedure as for the LH side.
-
CHARGE REFRIGERANT
-
for HFC-134a (R134a):
-
for HFO-1234yf (R1234yf):
-
-
WARM UP ENGINE
-
for HFC-134a (R134a):
-
for HFO-1234yf (R1234yf):
-
-
INSPECT FOR REFRIGERANT LEAK
-
for HFC-134a (R134a):
-
for HFO-1234yf (R1234yf):
-
-
PREPARE VEHICLE FOR HEADLIGHT AIMING ADJUSTMENT
-
PREPARE FOR HEADLIGHT AIMING
-
INSPECT HEADLIGHT AIMING
-
ADJUST HEADLIGHT AIMING