FRONT SEATBACK HEATER(for 5 Door) INSTALLATION
CAUTION / NOTICE / HINT
CAUTION:
-
Some of these service operations affect the SRS airbag system. Read the precautionary notices concerning the SRS airbag system before servicing Click here.
-
Wear protective gloves. Sharp areas on the parts may injure your hands.
Note
Always use E10 "TORX" socket wrench when removing the front seat.
Tech Tips
The procedure described below is for the driver side. Use the same procedure for both the driver and front passenger sides, unless otherwise specified.
PROCEDURE
-
INSTALL SEPARATE TYPE FRONT SEATBACK COVER (for TMMF Made)
-
Engage the 5 hooks to install the separate type front seatback cover to the separate type front seatback pad.
-
-
INSTALL SEPARATE TYPE FRONT SEATBACK COVER (for TMC Made)
-
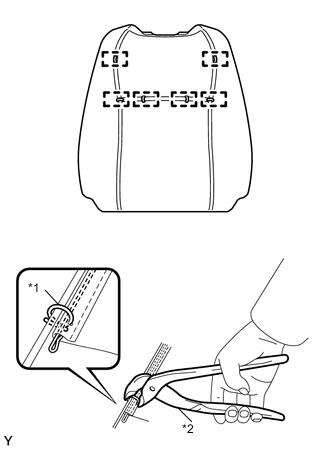
Text in Illustration *1 Hog Ring *2 Hog Ring Pliers Using hog ring pliers, install the separate type front seatback cover (front seatback heater) to the separate type front seatback pad with 6 new hog rings.
Note
-
Be careful not to damage the cover.
-
When installing the hog rings, take care to minimize wrinkles as much as possible.
-
Align the center of the hog ring installation area of the separate type front seatback cover with the center of the separate type front seatback pad so that no wrinkles appear, and securely tighten the hog rings as shown in the illustration.
-
-
-
INSTALL SEATBACK COVER WITH PAD (for TMC Made)
-
REMOVE SEATBACK COVER WITH PAD (for TMMF Made)
-
INSTALL SEAT ARMREST ASSEMBLY (w/ Armrest)
-
INSTALL SEAT ARMREST HOLE COVER (w/ Armrest)
-
INSTALL FRONT SEAT CUSHION INNER SHIELD LH
-
INSTALL FRONT SEAT INNER BELT ASSEMBLY LH (for Driver Side)
-
INSTALL FRONT SEAT INNER BELT ASSEMBLY RH (for Front Passenger Side)
-
INSTALL FRONT SEAT CUSHION COVER (for LHD)
-
INSTALL FRONT SEAT CUSHION SHIELD LH
-
INSTALL VERTICAL ADJUSTING HANDLE LH (w/ Vertical Adjuster)
-
INSTALL RECLINING ADJUSTER RELEASE HANDLE LH
-
INSTALL FRONT SEAT HEADREST ASSEMBLY
-
INSTALL FRONT SEAT ASSEMBLY LH
-
INSTALL SEAT TRACK OUTER COVER LH
-
CONNECT CABLE TO NEGATIVE BATTERY TERMINAL
- Torque:
- 5.4 N*m { 55 kgf*cm, 48 in.*lbf }
-
INSPECT SRS WARNING LIGHT