CHARGING SYSTEM, Diagnostic DTC:P1550, P1551, P1552
| DTC Code | DTC Name |
|---|---|
| P1550 | Battery Current Sensor Circuit |
| P1551 | Battery Current Sensor Circuit Low |
| P1552 | Battery Current Sensor Circuit High |
DESCRIPTION
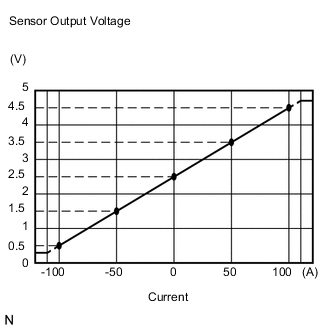
The battery current sensor assembly installed on the negative (-) battery terminal detects the amount of current supplied from the generator.
The battery current sensor assembly changes current to voltage (at the negative (-) battery terminal) and sends it to the power management control ECU. The power management control ECU controls the voltage of the generator based on the signals from the battery current sensor assembly.
| DTC No. | DTC Detection Condition | Trouble Area |
|---|---|---|
| P1550 | Difference between the maximum and minimum current values of the battery current sensor is less than 1 A for 10 seconds or more with the ignition switch ON (1-trip detection logic) |
|
| P1551 | Battery current sensor output value is less than 0.2 V for 0.5 seconds or more with the ignition switch ON (1-trip detection logic) |
|
| P1552 | Battery current sensor output value is more than 4.8 V for 0.5 seconds or more with the ignition switch ON (1-trip detection logic) |
|
WIRING DIAGRAM
Refer to DTC P0516 Click here.
PROCEDURE
-
CHECK ANY OTHER DTCS OUTPUT (IN ADDITION TO P1550, P1551, P1552)
-
Connect the intelligent tester to the DLC3.
-
Turn the ignition switch to ON.
-
Turn the intelligent tester on.
-
Enter the following menus: Body / Charging Control / DTC.
-
Read the DTC.
Result Result Proceed to DTC P1550, P1551 and P1552 are output A DTC P1550, P1551, P1552 and other DTCs are output B Tech Tips
If any DTCs other than P1550, P1551 and P1552 are output, troubleshoot those DTCs first.
B 
GO TO DTC CHART Click here
A 
-
-
READ VALUE USING INTELLIGENT TESTER (BATTERY CURRENT)
-
Turn all of the electrical systems (headlights, blower motor, rear defogger, etc.) off.
-
Connect the intelligent tester to the DLC3.
-
Turn the ignition switch to ON.
-
Turn the intelligent tester on.
-
Enter the following menus: Body / Charging Control / Data List / Battery Current.
Result Result Proceed to Battery current is fixed at 0 A, or fluctuates by +/- 1 A or less between -100 and 100 A A Battery current fluctuates between -20 and 0 A B
B
USE SIMULATION METHOD TO CHECK Click here
A
-
-
INSPECT BATTERY CURRENT SENSOR ASSEMBLY
-
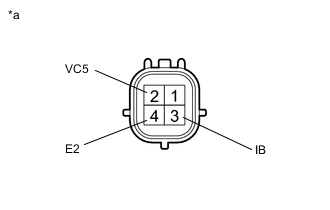
Text in Illustration *a Component without harness connected
(Battery Current Sensor Assembly)
Disconnect the cable from the negative (-) battery terminal.
-
Disconnect the A31 battery current sensor assembly connector.
-
Measure the resistance according to the value(s) in the table below.
Standard Resistance Tester Connection Condition Specified Condition 2 (VC5) - 4 (E2) Always 0.1 to 10 kΩ 2 (VC5) - 3 (IB) Always Below 0.5 kΩ 3 (IB) - 4 (E2) Always 0.05 to 10 kΩ -
Reconnect the cable to the negative (-) battery terminal.
NG
REPLACE BATTERY CURRENT SENSOR ASSEMBLY Click here
OK
-
-
SYSTEM CHECK
-
Check the vehicle specifications.
Result Result Proceed to w/o Stop and Start System A w/ Stop and Start System B
B 
CHECK HARNESS AND CONNECTOR (BATTERY CURRENT SENSOR - POWERMANAGEMENT CONTROL ECU) Click here
A
-
-
CHECK HARNESS AND CONNECTOR (BATTERY CURRENT SENSOR - POWER MANAGEMENT CONTROL ECU)
-
Disconnect the A52 power management control ECU connector.
-
Measure the resistance according to the value(s) in the table below.
Standard Resistance Tester Connection Condition Specified Condition A52-12 (VC) - A31-2 (VC5) Always Below 1 Ω A52-13 (IB) - A31-3 (IB) Always Below 1 Ω A52-18 (E2) - A31-4 (E2) Always Below 1 Ω A52-12 (VC) or A31-2 (VC5) - Body ground Always 10 kΩ or higher A52-13 (IB) or A31-3 (IB) - Body ground Always 10 kΩ or higher A52-18 (E2) or A31-4 (E2) - Body ground Always 10 kΩ or higher
OK
REPLACE POWER MANAGEMENT CONTROL ECU Click here
NG
REPAIR OR REPLACE HARNESS OR CONNECTOR
-
-
CHECK HARNESS AND CONNECTOR (BATTERY CURRENT SENSOR - POWERMANAGEMENT CONTROL ECU)
-
Disconnect the A90 power management control ECU connector.
-
Measure the resistance according to the value(s) in the table below.
Standard Resistance Tester Connection Condition Specified Condition A90-12 (VC) - A31-2 (VC5) Always Below 1 Ω A90-13 (IB) - A31-3 (IB) Always Below 1 Ω A90-18 (E2) - A31-4 (E2) Always Below 1 Ω A90-12 (VC) or A31-2 (VC5) - Body ground Always 10 kΩ or higher A90-13 (IB) or A31-3 (IB) - Body ground Always 10 kΩ or higher A90-18 (E2) or A31-4 (E2) - Body ground Always 10 kΩ or higher
OK
REPLACE POWER MANAGEMENT CONTROL ECU Click here
NG
REPAIR OR REPLACE HARNESS OR CONNECTOR
-