REAR DOOR BELT MOULDING REMOVAL
CAUTION / NOTICE / HINT
Tech Tips
-
Use the same procedure for both the RH and LH side.
-
The procedure described below is for the LH side.
PROCEDURE
-
REMOVE REAR DOOR FRAME GARNISH
Tech Tips
Use the same procedure as for the RH side Click here.
-
REMOVE REAR DOOR WINDOW REGULATOR HANDLE ASSEMBLY (w/o Power Window)
Tech Tips
Use the same procedure as for the RH side Click here.
-
REMOVE REAR DOOR ARMREST BASE UPPER PANEL (w/o Power Window)
Tech Tips
Use the same procedure as for the RH side Click here.
-
REMOVE REAR DOOR ARMREST BASE UPPER PANEL (w/ Power Window)
Tech Tips
Use the same procedure as for the RH side Click here.
-
REMOVE REAR DOOR TRIM BOARD SUB-ASSEMBLY
Tech Tips
Use the same procedure as for the RH side Click here.
-
REMOVE REAR DOOR SERVICE HOLE COVER
Tech Tips
Use the same procedure as for the RH side Click here.
-
REMOVE REAR DOOR WINDOW DIVISION BAR SUB-ASSEMBLY
Tech Tips
Use the same procedure as for the RH side Click here.
-
REMOVE REAR DOOR GLASS SUB-ASSEMBLY
Tech Tips
Use the same procedure as for the RH side Click here.
-
REMOVE REAR DOOR GLASS RUN
Tech Tips
Use the same procedure as for the RH side Click here.
-
REMOVE REAR DOOR GLASS OUTER WEATHERSTRIP ASSEMBLY
-
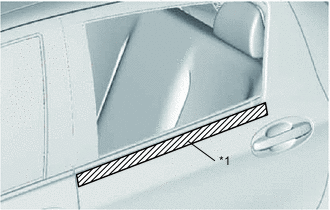
Text in Illustration *1 Protective Tape Apply protective tape to the door panel in the area around the rear door glass outer weatherstrip.
-
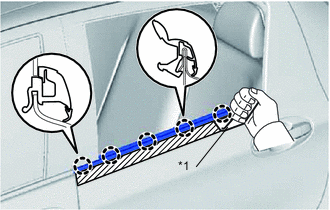
Text in Illustration *1 Moulding Remover Using a moulding remover, disengage the 5 claws and remove the rear door glass outer weatherstrip.
-