REAR SPOILER(except GRMN) INSTALLATION
PROCEDURE
-
INSTALL NO. 4 MOULDING TAPE
Tech Tips
When installing the No. 4 moulding tape, heat the rear spoiler sub-assembly using a heat light.
CAUTION:
-
Do not touch the heat light and heated parts, touching the heat light may result in burns.
-
Touching heated parts for a long time may result in burns.
Standard: Item Temperature Rear spoiler sub-assembly 20 to 30°C (68 to 86°F) Note
Do not heat the rear spoiler sub-assembly excessively.
-
Clean the No. 4 moulding tape installation surface with a non-residue solvent.
-
Apply primer to the No. 4 moulding tape installation area on the rear spoiler sub-assembly.
Note
Apply primer evenly so that there are no uncoated areas.
-
Remove the peeling paper on a new No. 4 moulding tape while making sure not to touch the adhesive surface.
-
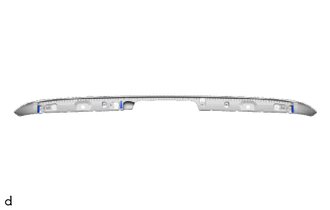
Install the No. 4 moulding tape as shown in the illustration.
Note
-
Press the double-sided tape on the No. 4 moulding tape firmly to attach it.
-
After the primer dries (3 minutes or more), install the No. 4 moulding tape.
-
After applying primer, reapply primer after 24 hours elapse.
-
-
-
INSTALL NO. 3 MOULDING TAPE
Tech Tips
When installing the No. 3 moulding tape, heat the rear spoiler sub-assembly using a heat light.
CAUTION:
-
Do not touch the heat light and heated parts, touching the heat light may result in burns.
-
Touching heated parts for a long time may result in burns.
Standard: Item Temperature Rear spoiler sub-assembly 20 to 30°C (68 to 86°F) Note
Do not heat the rear spoiler sub-assembly excessively.
-
Clean the No. 3 moulding tape installation surface with a non-residue solvent.
-
Apply primer to the No. 3 moulding tape installation area on the rear spoiler sub-assembly.
Note
Apply primer evenly so that there are no uncoated areas.
-
Remove the peeling paper on a new No. 3 moulding tape while making sure not to touch the adhesive surface.
-
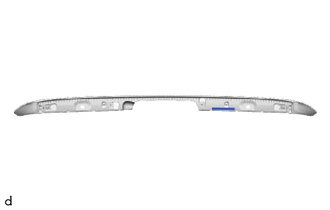
Install the No. 3 moulding tape as shown in the illustration.
Note
-
Press the double-sided tape on the No. 3 moulding tape firmly to attach it.
-
After the primer dries (3 minutes or more), install the No. 3 moulding tape.
-
After applying primer, reapply primer after 24 hours elapse.
-
-
-
INSTALL NO. 2 MOULDING TAPE
Tech Tips
When installing the No. 2 moulding tape, heat the rear spoiler sub-assembly using a heat light.
CAUTION:
-
Do not touch the heat light and heated parts, touching the heat light may result in burns.
-
Touching heated parts for a long time may result in burns.
Standard: Item Temperature Rear spoiler sub-assembly 20 to 30°C (68 to 86°F) Note
Do not heat the rear spoiler sub-assembly excessively.
-
Clean the No. 2 moulding tape installation surface with a non-residue solvent.
-
Apply primer to the No. 2 moulding tape installation area on the rear spoiler sub-assembly.
Note
Apply primer evenly so that there are no uncoated areas.
-
Remove the peeling paper on a new No. 2 moulding tape while making sure not to touch the adhesive surface.
-
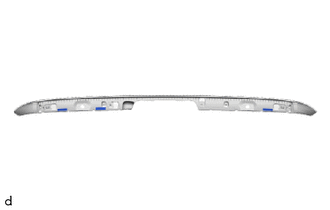
Install the No. 2 moulding tape as shown in the illustration.
Note
-
Press the double-sided tape on the No. 2 moulding tape firmly to attach it.
-
After the primer dries (3 minutes or more), install the No. 2 moulding tape.
-
After applying primer, reapply primer after 24 hours elapse.
-
-
-
INSTALL NO. 1 MOULDING TAPE
Tech Tips
When installing the No. 1 moulding tape, heat the rear spoiler sub-assembly using a heat light.
CAUTION:
-
Do not touch the heat light and heated parts, touching the heat light may result in burns.
-
Touching heated parts for a long time may result in burns.
Standard: Item Temperature Rear spoiler sub-assembly 20 to 30°C (68 to 86°F) Note
Do not heat the rear spoiler sub-assembly excessively.
-
Clean the No. 1 moulding tape installation surface with a non-residue solvent.
-
Apply primer to the No. 1 moulding tape installation area on the rear spoiler sub-assembly.
Note
Apply primer evenly so that there are no uncoated areas.
-
Remove the peeling paper on a new No. 1 moulding tape while making sure not to touch the adhesive surface.
-
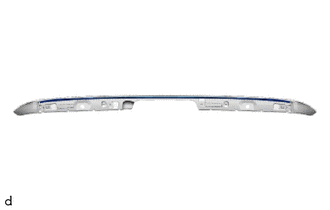
Install the No. 2 moulding tape as shown in the illustration.
Note
-
Press the double-sided tape on the No. 1 moulding tape firmly to attach it.
-
After the primer dries (3 minutes or more), install the No. 1 moulding tape.
-
After applying primer, reapply primer after 24 hours elapse.
-
-
-
INSTALL REAR SPOILER SUB-ASSEMBLY
-
Clean the attachment surface.
-
Using an infrared light, heat the double-sided adhesive tape remaining on the back door panel.
Heating Temperature Item Temperature Vehicle Body 40 to 60°C (104 to 140°F) CAUTION:
Do not burn yourself on the hot back door panel or with the infrared light.
Note
Do not heat the back door panel excessively.
-
Using a piece of cloth, rub the remaining double-sided tape off the back door panel while it is hot from the infrared light.
Note
Installing the rear spoiler while any double-sided tape remains on the back door panel may cause adhesion failure. Therefore, completely remove the double-sided adhesive tape.
-
Using a non-residue solvent, clean the attachment surface.
-
-
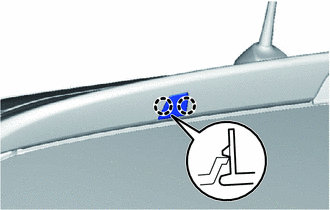
Engage the 4 clips and install the rear spoiler.
-
Tighten the 2 screws.
-
-
INSTALL REAR SPOILER COVER LH
-
Engage the 2 claws and install the rear spoiler cover LH.
-
-
INSTALL REAR SPOILER COVER RH
Tech Tips
Use the same procedure as for the LH side.