BACK DOOR OUTSIDE GARNISH INSTALLATION
PROCEDURE
-
INSTALL NO. 1 BACK DOOR OUTSIDE GARNISH PROTECTOR
-
Clean the attachment surface.
-
Using a piece of cloth, rub the double-sided tape off the back door outside garnish sub-assembly.
Note
-
Installing the No. 1 back door outside garnish protector while old double-sided tape remains can cause adhesion failure.
-
Using a screwdriver or similar tool to remove the old tape can damage the surface and cause adhesion failure.
-
-
Using a non-residue solvent, clean the attachment surface.
-
-
Remove the peeling paper on a new No. 1 back door outside garnish protector.
Note
After removing the release paper, keep the exposed adhesive free from foreign matter.
-
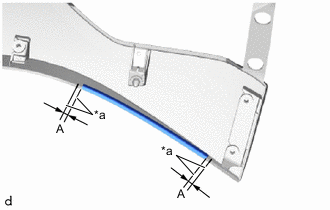
*a Mark-off Line Install the No. 1 back door outside garnish protector as shown in the illustration.
Note
Press the double-sided tape on the No. 1 back door outside garnish protector firmly to attach.
Tech Tips
-
Align the No. 1 back door outside garnish protector with the mark-off line of the back door outside garnish sub-assembly.
-
Use the same procedure for both sides.
Standard Measurement Area Measurement A 3.0 mm (0.118 in.) -
-
-
INSTALL BACK DOOR GARNISH MOULDING UPPER PROTECTOR
-
Clean the attachment surface.
-
Using a piece of cloth, rub the double-sided tape off the back door outside garnish sub-assembly.
Note
-
Installing the No. 1 back door outside garnish protector while old double-sided tape remains can cause adhesion failure.
-
Using a screwdriver or similar tool to remove the old tape can damage the surface and cause adhesion failure.
-
-
Using a non-residue solvent, clean the attachment surface.
-
-
Remove the peeling paper on a new back door garnish moulding upper protector.
Note
After removing the release paper, keep the exposed adhesive free from foreign matter.
-
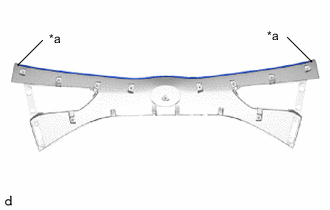
*a Mark-off Line Install the back door garnish moulding upper protector as shown in the illustration.
Note
Press the double-sided tape on the back door garnish moulding upper protector firmly to attach.
-
-
INSTALL SYMBOL EMBLEM
-
Engage the guide and 3 claws to install the symbol emblem.
-
-
INSTALL NO.2 BACK DOOR OUTSIDE GARNISH (w/o Rear View Monitor System)
-
Engage the 2 claw to install the No. 2 back door outside garnish.
-
-
INSTALL BACK DOOR OUTSIDE GARNISH
-
Engage the 11 clips and install the back door outside garnish.
-
w/ Lock Cylinder:
-
Install the 7 bolts.
- Torque:
- 4.9 N*m { 50 kgf*cm, 43 in.*lbf }
-
Install the back door lock cylinder assembly with door unlock switch sub-assembly with the 2 bolts.
- Torque:
- 4.9 N*m { 50 kgf*cm, 43 in.*lbf }
-
Connect the connector.
-
-
w/o Lock Cylinder:
-
Install the 8 bolts.
- Torque:
- 4.9 N*m { 50 kgf*cm, 43 in.*lbf }
-
-
-
INSTALL REAR LIGHT ASSEMBLY LH
-
for Bulb Type Stop Light:
-
for LED Type Stop Light:
-
-
INSTALL REAR LIGHT ASSEMBLY RH
Tech Tips
Use the same procedure as for the LH side.