REAR AXLE BEAM REMOVAL

PROCEDURE
-
REMOVE REAR WHEEL
-
DRAIN BRAKE FLUID
Note
Immediately wash off any brake fluid that comes into contact with any painted surfaces.
-
SEPARATE SKID CONTROL SENSOR WIRE LH
-
SEPARATE SKID CONTROL SENSOR WIRE RH
Tech Tips
Use the same procedure for the RH side as for the LH side.
-
SEPARATE NO. 4 REAR BRAKE TUBE (for Rear Drum Brake)
-
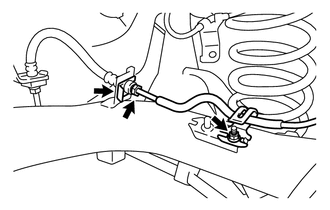
Using a union nut wrench (10 mm), separate the No. 4 rear brake tube while holding the rear flexible hose LH with a wrench.
-
Remove the clip and disconnect the rear flexible hose LH from the rear axle beam assembly.
-
Remove the nut and separate the No. 4 rear brake tube.
-
-
SEPARATE NO. 3 REAR BRAKE TUBE (for Rear Drum Brake)
Tech Tips
Use the same procedure for the RH side as for the LH side.
-
SEPARATE NO. 4 REAR BRAKE TUBE (for Rear Disc Brake)
-
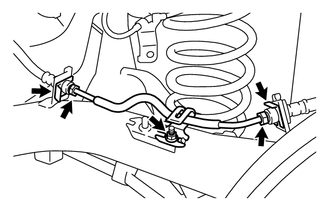
Using a union nut wrench (10 mm), separate the No. 4 rear brake tube while holding the rear flexible hose LH with a wrench.
-
Remove the 2 clips and disconnect the 2 rear flexible hose LH from the rear axle beam assembly.
-
Remove the nut and separate the No. 4 rear brake tube.
-
-
SEPARATE NO. 3 REAR BRAKE TUBE (for Rear Disc Brake)
Tech Tips
Use the same procedure for the RH side as for the LH side.
-
SEPARATE NO. 3 PARKING BRAKE CABLE ASSEMBLY
-

Remove the cable clamp from the rear axle beam assembly.
-
Remove the bolt and separate the No. 3 parking brake cable assembly.
-
Remove the cable clamp from the No. 3 parking brake cable assembly.
Tech Tips
Replace the clamp with a new one when installing the No. 3 parking brake cable assembly.
-
-
SEPARATE NO. 2 PARKING BRAKE CABLE ASSEMBLY
Tech Tips
Use the same procedure for the RH side as for the LH side.
-
REMOVE REAR BRAKE DRUM SUB-ASSEMBLY (for Rear Drum Brake)
-
for TMC Made Click here
-
for TMMF Made Click here
-
-
SEPARATE REAR DISC BRAKE CALIPER ASSEMBLY LH (for Rear Disc Brake)
-
SEPARATE REAR DISC BRAKE CALIPER ASSEMBLY RH (for Rear Disc Brake)
Tech Tips
Use the same procedure for the RH side as for the LH side.
-
REMOVE REAR DISC (for Rear Disc Brake)
-
REMOVE REAR AXLE HUB AND BEARING ASSEMBLY (for Rear Drum Brake)
-
REMOVE REAR AXLE HUB AND BEARING ASSEMBLY (for Rear Disc Brake)
-
REMOVE REAR AXLE BEAM DYNAMIC DAMPER LH (w/ Dynamic Damper)
-
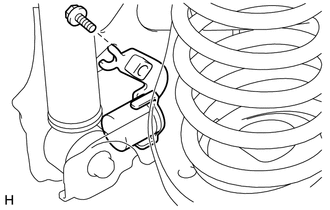
Remove the bolt and rear axle beam dynamic damper LH from the rear axle beam assembly.
-
-
REMOVE REAR AXLE BEAM DYNAMIC DAMPER RH (w/ Dynamic Damper)
Use the same procedure for the RH side as for the LH side.
-
LOOSEN REAR AXLE BEAM ASSEMBLY
-
SEPARATE REAR SHOCK ABSORBER ASSEMBLY LH
-
SEPARATE REAR SHOCK ABSORBER ASSEMBLY RH
Tech Tips
Use the same procedure for the RH side as for the LH side.
-
REMOVE REAR COIL SPRING LH
-
REMOVE REAR COIL SPRING RH
Tech Tips
Use the same procedure for the RH side as for the LH side.
-
REMOVE REAR AXLE BEAM ASSEMBLY
-
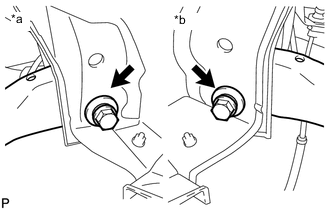
Text in Illustration *a RH Side *b LH Side Remove the 2 bolts and rear axle beam assembly.
-
-
REMOVE REAR AXLE CARRIER BUSH LH (for TMMF Made)
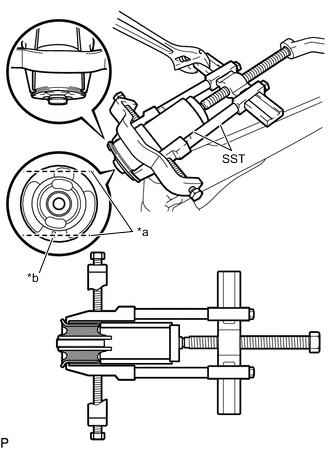
Text in Illustration *a Bend Portions *b Bush Mark
-
Place a matchmark on the rear axle beam assembly with it aligned with the bush mark.
-
Using a chisel and hammer, bend the 2 portions of the bush rib.
Note
Bend the bush rib until the claw of SST can be suspended.
-
Using SST, remove the rear axle carrier bush LH from the rear axle beam assembly.
- SST
- 09950-40011 ( 09951-04020, 09952-04010, 09953-04030, 09954-04020, 09955-04011, 09957-04010, 09958-04011 )
- 09612-30012
- 09950-60010 ( 09951-00590 )
Note
Apply paint to any scratches on the rear axle beam assembly.
-
-
REMOVE REAR AXLE CARRIER BUSH RH (for TMMF Made)
Tech Tips
Use the same procedure for the RH side as for the LH side.