FRONT LOWER SUSPENSION ARM INSTALLATION

CAUTION / NOTICE / HINT
Tech Tips
-
Use the same procedure for the RH side as for the LH side.
-
The procedure listed below is for the LH side.
PROCEDURE
-
TEMPORARILY TIGHTEN FRONT LOWER SUSPENSION ARM SUB-ASSEMBLY
-
Provisionally tighten the front lower suspension arm sub-assembly with the 2 bolts.
-
Install the front lower suspension arm sub-assembly onto the steering knuckle with a new castle nut.
- Torque:
- 98 N*m { 999 kgf*cm, 72 ft.*lbf }
Note
If the holes for the clip are not aligned, tighten the nut by a further turn of up to 60°.
-
Install a new clip.
-
-
INSTALL FRONT WHEEL
- Torque:
- 103 N*m { 1050 kgf*cm, 76 ft.*lbf }
-
STABILIZE SUSPENSION
-
Lower the vehicle from the jack.
-
Bounce the vehicle up and down several times to stabilize the suspension.
-
-
FULLY TIGHTEN FRONT LOWER SUSPENSION ARM SUB-ASSEMBLY
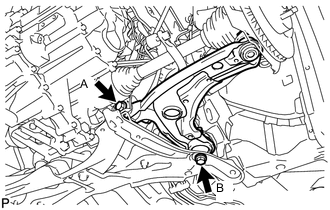
-
Fully tighten the 2 bolts.
- Torque:
- Bolt A
- 137 N*m { 1397 kgf*cm, 101 ft.*lbf }
- Bolt B
- 151 N*m { 1540 kgf*cm, 111 ft.*lbf }
-
-
INSTALL CENTER ENGINE UNDER COVER (for 1ND-TV)
- Torque:
- 5.0 N*m { 51 kgf*cm, 44 in.*lbf }
-
INSPECT AND ADJUST FRONT WHEEL ALIGNMENT