TRANSMISSION CONTROL CABLE INSTALLATION
PROCEDURE
-
INSTALL TRANSMISSION CONTROL CABLE ASSEMBLY
-
for TMC Made:
-
Pass the transmission control cable into the vehicle and install the transmission control cable assembly to the body using the 3 nuts.
- Torque:
- 5.0 N*m { 51 kgf*cm, 44 in.*lbf }
-
-
for TMMF Made:
-
Pass the transmission control cable into the vehicle and install the transmission control cable assembly to the body using the 4 nuts.
- Torque:
- 5.0 N*m { 51 kgf*cm, 44 in.*lbf }
-
-
Install the transmission control cable assembly onto the No. 1 transmission control cable bracket with a new clip.
-
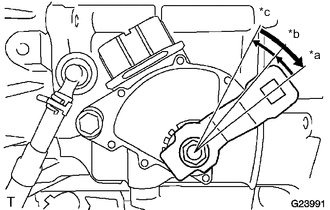
Text in Illustration *a P Position *b R Position *c N Position Rotate the control shaft lever clockwise until it stops, and then from that position rotate it counterclockwise by 2 notches to set it to the N position.
-
Install the transmission control cable assembly onto the transmission control shaft lever with the nut.
- Torque:
- 12 N*m { 122 kgf*cm, 9 ft.*lbf }
-
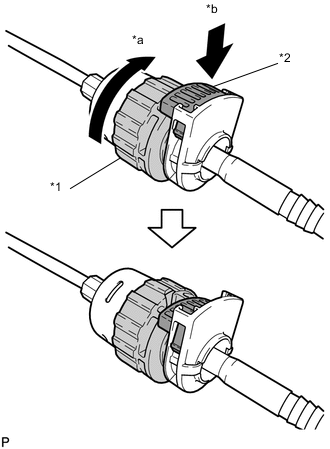
Text in Illustration *1 Nut *2 Lock *a Rotate Approximately 180° *b Push In Rotate the nut of the transmission control cable assembly approximately 180° in the direction shown in the illustration, and while holding the nut, push in the lock.
-
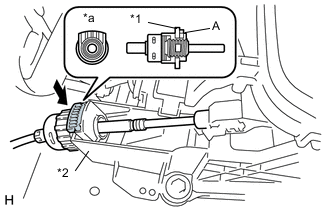
Text in Illustration *1 Lock *2 Shift Lever Plate *a Tab Install the transmission control cable to the shift lever plate.
Note
-
Install the cable outer with the tab facing upwards.
-
After installation, check that the cable outer lock extends past section A as shown in the diagram.
-
-
Confirm that the shift lever is in N, and then install the cable end to the shift lever assembly.
Note
-
Securely install the cable end to the shift lever assembly.
-
Install the cable end so that its adjustment lock section is on the driver side.
-
-
-
ADJUST SHIFT LEVER POSITION
-
INSTALL FRONT NO. 2 FLOOR HEAT INSULATOR
-
Install the No. 2 floor heat insulator with the 2 bolts and nut.
- Torque:
- 5.5 N*m { 56 kgf*cm, 49 in.*lbf }
-
-
INSTALL FRONT EXHAUST PIPE ASSEMBLY
-
INSTALL BATTERY CARRIER
-
INSTALL BATTERY TRAY
-
INSTALL BATTERY
-
INSTALL REAR CONSOLE BOX
-
INSPECT FOR EXHAUST GAS LEAK