OIL PAN INSTALLATION
PROCEDURE
-
INSTALL OIL STRAINER ASSEMBLY
-
Apply Toyota Genuine CVT fluid FE to a new O-ring and install it to the oil strainer assembly.
-
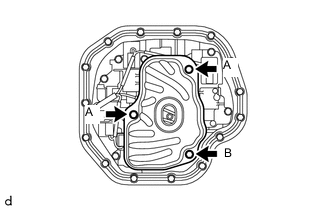
Install the oil strainer assembly to the continuously variable transaxle with the 3 bolts.
- Torque:
- 11 N*m { 112 kgf*cm, 8 ft.*lbf }
Bolt Length Bolt Length A 16 mm (0.630 in.) B 40 mm (1.57 in.)
-
-
INSTALL OIL CLEANER MAGNET
-
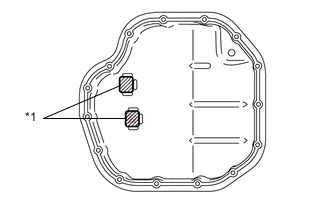
Text in Illustration *1 Oil Cleaner Magnet Install the 2 oil cleaner magnets to the transaxle oil pan sub-assembly in the positions shown in the illustration.
-
-
INSTALL TRANSAXLE OIL PAN SUB-ASSEMBLY
-
Clean and degrease the installation surfaces of the transaxle oil pan sub-assembly and the continuously variable transaxle.
-
Install a new transaxle oil pan gasket and install the transaxle oil pan sub-assembly to the continuously variable transaxle with the 15 bolts.
- Torque:
- 7.0 N*m { 71 kgf*cm, 62 in.*lbf }
-
Using a 6 mm socket hexagon wrench, remove the overflow plug and gasket from the continuously variable transaxle.
-
Using a 6 mm socket hexagon wrench, install the No. 1 transmission oil filler tube to the oil pan.
- Torque:
- 0.8 N*m { 8.2 kgf*cm, 7 in.*lbf }
-
Temporarily install the gasket and the overflow plug.
Note
Replace the gasket and perform final tightening after adjusting the fluid level.
-
-
ADJUST CVT FLUID
-
INSTALL ENGINE UNDER COVER LH