PARK / NEUTRAL POSITION SWITCH INSTALLATION
PROCEDURE
-
INSTALL PARK/NEUTRAL POSITION SWITCH
-
Temporarily install the park/neutral position switch to the continuously variable transaxle assembly with the 2 bolts.
-
Install the lock nut and lock plate to the park/neutral position switch.
- Torque:
- 6.9 N*m { 70 kgf*cm, 61 in.*lbf }
-
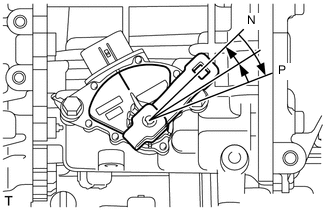
Temporarily install the control shaft lever.
-
Turn the control shaft lever clockwise until it stops, and then from that position turn it counterclockwise by 2 notches to set it to the N position.
-
Remove the control shaft lever.
-
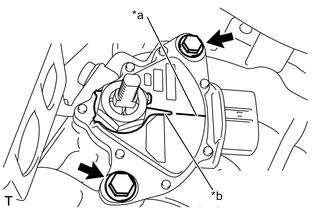
*a Neutral Basic Line *b Protrusion Align the protrusion with the neutral basic line.
-
Hold the park/neutral position switch in that position and tighten the 2 bolts.
- Torque:
- 5.4 N*m { 55 kgf*cm, 48 in.*lbf }
-

Using a screwdriver, bend down the tabs of the lock plate.
-
Install the control shaft lever to the continuously variable transaxle assembly with the nut and washer.
- Torque:
- 12.7 N*m { 130 kgf*cm, 9 ft.*lbf }
-
Connect the park/neutral position switch connector.
-
-
CONNECT TRANSMISSION CONTROL CABLE ASSEMBLY
Note
To prevent damage to the transmission control cable assembly and shift lever assembly, connect the continuously variable transaxle assembly side of the transmission control cable assembly before connecting the shift lever assembly side.
-
Connect the transmission control cable assembly to the No. 1 transmission control cable bracket with a new clip.
-
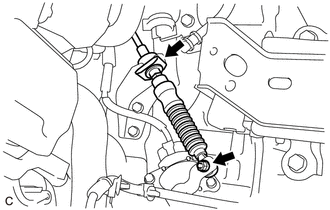
Connect the transmission control cable assembly to the control shaft lever with the nut.
- Torque:
- 12 N*m { 122 kgf*cm, 9 ft.*lbf }
Note
Before connecting the transmission control cable assembly, check that the park/neutral position switch and shift lever are in neutral.
-
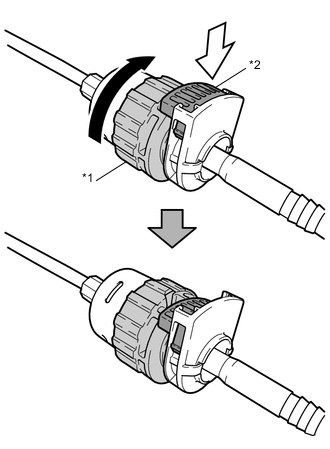
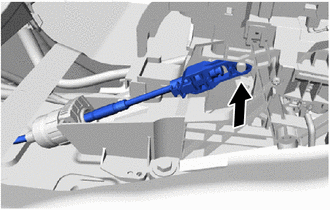
*1 Nut *2 Lock 
Rotate approximately 180° 
Push in Rotate the nut of the transmission control cable assembly approximately 180° in the direction shown in the illustration, and while holding the nut, push in the lock.
Note
Rotating the nut too much will damage the internal spring, and the transmission control cable assembly will not be reusable. Do not turn the nut too far.
-
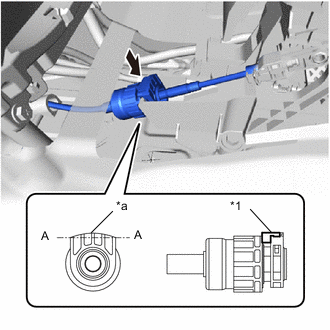
*1 Lock *2 Protrusion Push in Install the transmission control cable assembly to the shift lever assembly.
Note
-
Install the transmission control cable assembly with the protrusion facing upwards.
-
After installation, make sure that the lock is projecting from A as shown in the illustration.
-
Make sure that the transmission control cable assembly is securely locked.
-
-
Confirm that the shift lever is in N, and then connect the end of the transmission control cable assembly to the shift lever assembly.
Note
-
Securely install the end of the transmission control cable assembly to the shift lever assembly.
-
Install the end of the transmission control cable assembly so that its adjustment lock section is on the driver side.
-
-
-
INSTALL BATTERY CARRIER
-
INSTALL BATTERY TRAY
-
INSTALL BATTERY
-
INSTALL AIR CLEANER CASE SUB-ASSEMBLY
-
INSTALL AIR CLEANER FILTER ELEMENT SUB-ASSEMBLY
-
INSTALL AIR CLEANER CAP SUB-ASSEMBLY
-
INSTALL AIR CLEANER HOSE ASSEMBLY
-
CONNECT NO. 1 AIR HOSE
-
INSTALL NO. 2 VACUUM SWITCHING VALVE ASSEMBLY
-
CONNECT NO. 2 VENTILATION HOSE
-
INSTALL NO. 1 ENGINE COVER
-
CONNECT CABLE TO NEGATIVE BATTERY TERMINAL
- Torque:
- 5.4 N*m { 55 kgf*cm, 48 in.*lbf }
Note
When disconnecting the cable, some systems need to be initialized after the cable is reconnected.
-
INSPECT SHIFT LEVER POSITION
-
ADJUST SHIFT LEVER POSITION
-
INSTALL REAR CONSOLE BOX ASSEMBLY
-
INSPECT PARK/NEUTRAL POSITION SWITCH
-
ADJUST PARK/NEUTRAL POSITION SWITCH