TRANSMISSION CONTROL CABLE INSTALLATION
PROCEDURE
-
INSTALL TRANSMISSION CONTROL CABLE SUPPORT
Tech Tips
Perform this procedure only when replacement of the transmission control cable support is necessary.
-
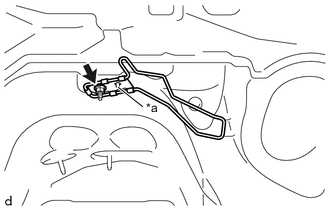
Text in Illustration *a Arrow Mark Install the transmission control cable support to the vehicle body with the nut.
- Torque:
- 5.0 N*m { 51 kgf*cm, 44 in.*lbf }
Note
-
Install the transmission control cable support so that its arrow mark points to the front of the vehicle.
-
Make sure that the detent of the transmission control cable support is pushing against the dash silencer.
-
-
INSTALL TRANSMISSION CONTROL CABLE ASSEMBLY
-
Install the transmission control cable assembly to the vehicle body with the 4 nuts.
- Torque:
- 5.0 N*m { 51 kgf*cm, 44 in.*lbf }
-
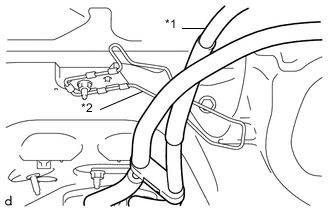
Text in Illustration *1 Transmission Control Cable Assembly *2 Transmission Control Cable Support Pass the transmission control cable assembly under the transmission control cable support.
Note
Do not pass the transmission control cable assembly between the transmission control cable support and vehicle body.
-
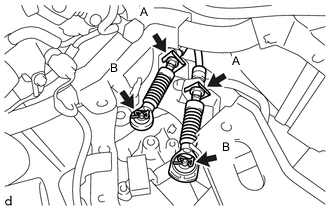
Install the transmission control cable assembly to the control cable bracket with 2 new A clips.
-
Connect the transmission control cable assembly to the manual transaxle assembly with the 2 B clips.
-
-
CONNECT TRANSMISSION CONTROL CABLE ASSEMBLY
-
ADJUST TRANSMISSION CONTROL SELECT CABLE
-
INSTALL REAR CONSOLE BOX
-
INSTALL EXHAUST PIPE
-
INSTALL NO. 1 AIR TUBE
-
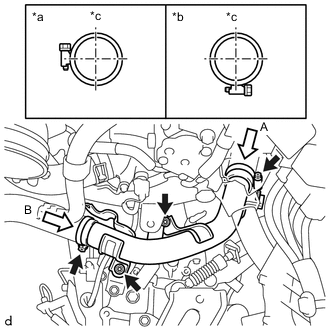
Text in Illustration *a View A *b View B *c Upper Side Install the No. 1 air tube to the manual transaxle assembly with the 2 nuts.
- Torque:
- 20 N*m { 199 kgf*cm, 14 ft.*lbf }
-
Connect the No. 1 air hose to the No. 1 air tube and tighten the hose clamp.
- Torque:
- 6.0 N*m { 61 kgf*cm, 53 in.*lbf }
-
Connect the No. 2 air hose to the No. 1 air tube and tighten the hose clamp.
- Torque:
- 6.0 N*m { 61 kgf*cm, 53 in.*lbf }
-
Engage the clamp to install the wire harness to the No. 1 air tube.
-
Install the wire harness to the No. 1 air tube with the bolt and nut.
- Torque:
- 8.4 N*m { 86 kgf*cm, 74 in.*lbf }
-
-
INSTALL BATTERY CARRIER (for LHD)
-
INSTALL BATTERY CARRIER (for RHD)
-
INSTALL BATTERY TRAY
-
INSTALL BATTERY
-
INSTALL AIR CLEANER BRACKET
-
INSTALL AIR CLEANER CASE SUB-ASSEMBLY
-
INSTALL AIR CLEANER FILTER ELEMENT SUB-ASSEMBLY
-
INSTALL AIR CLEANER CAP SUB-ASSEMBLY
-
CONNECT CABLE TO NEGATIVE BATTERY TERMINAL
- Torque:
- 5.4 N*m { 55 kgf*cm, 48 in.*lbf }
-
INSPECT FOR EXHAUST GAS LEAK