CLUTCH PEDAL(for LHD) ADJUSTMENT
PROCEDURE
-
INSPECT AND ADJUST CLUTCH PEDAL HEIGHT
-
Turn back the floor carpet.
-
Check that the pedal height is correct.
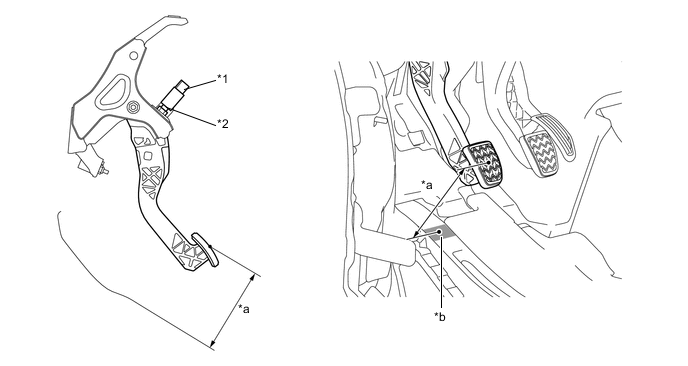
Text in Illustration *1 No. 2 Clutch Start Switch Assembly *2 Lock Nut (Pedal Height Adjust Point) *a Pedal Height from Floor Panel *b Measuring Plane of Floor Panel Pedal height from floor panel except 1ND-TV 125.2 to 135.2 mm (4.93 to 5.32 in.) for 1ND-TV 139.4 to 149.4 mm (5.49 to 5.88 in.) -
If the pedal height is not as specified, adjust it as follows.
-
Disconnect the No. 2 clutch start switch connector.
-
Loosen the lock nut and turn the No. 2 clutch start switch assembly until the correct height is obtained.
-
Tighten the lock nut.
- Torque:
- 16 N*m { 160 kgf*cm, 12 ft.*lbf }
-
Connect the No. 2 clutch start switch connector.
-
-
-
INSPECT AND ADJUST PEDAL FREE PLAY AND PUSH ROD PLAY
-
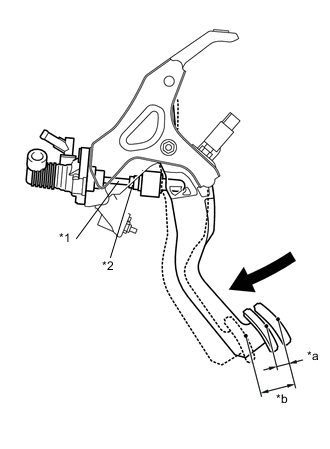
Text in Illustration *1 Push Rod *2 Lock Nut (Push Rod Play and Free Play Adjust Point) *a Push Rod Play *b Pedal Free Play Check that the pedal free play and push rod play are correct.
Tech Tips
Pay close attention to the change in resistance to distinguish between pedal free play and push rod play while performing the inspection.
-
Depress the pedal until clutch resistance begins to be felt.
Pedal free play 5.0 to 15.0 mm (0.197 to 0.591 in.) -
Gently depress the pedal until resistance begins to increase a little.
Push rod play at pedal top 1.0 to 5.0 mm (0.0394 to 0.197 in.)
-
-
If necessary, adjust the pedal free play and push rod play.
Tech Tips
The push rod play can be adjusted by changing the length of the push rod. Pedal free play changes together with push rod play.
-
Loosen the lock nut and turn the push rod until the correct free play and push rod play are obtained.
Note
-
When loosening the lock nut, be sure to hold the clevis in place by its square or hexagonal portion.
-
If pedal free play and push rod play are not within the standard range even after adjustment, inspect the related parts.
-
-
Tighten the lock nut.
- Torque:
- 12 N*m { 120 kgf*cm, 9 ft.*lbf }
Note
When tightening the lock nut, be sure to hold the clevis in place by its square or hexagonal portion.
-
After adjusting the pedal free play and push rod play, check the pedal height.
-
-
-
INSPECT CLUTCH RELEASE POINT
-
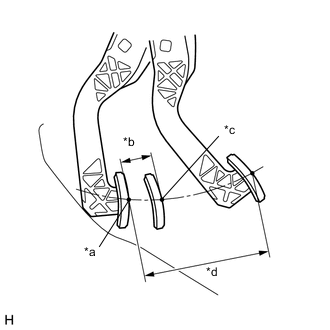
Text in Illustration *a Full Stroke End Position *b from Pedal Stroke End Position to Release Point *c Release Point *d Pedal Stroke Check the clutch release point.
-
Pull the parking brake lever and install wheel stoppers.
-
Start the engine and run it at idle.
-
Without depressing the clutch pedal, slowly move the shift lever into reverse until the gears come into contact.
-
Gradually depress the clutch pedal and measure the stroke distance from the point that the gear noise stops (release point) up to the full stroke end position.
Standard distance 25 mm (0.984 in.) or more (from pedal stroke end position to release point) Pedal stroke (Reference) except 1ND-TV 125 to 135 mm (4.92 to 5.31 in.) for 1ND-TV 140 to 150 mm (5.51 to 5.91 in.) If the distance is not as specified, perform the following procedure:
-
Check the pedal height.
-
Check the push rod play and pedal free play.
-
Bleed the clutch line.
-
Check the clutch cover and clutch disc.
-
-
-
Install the floor carpet.
-