CLUTCH MASTER CYLINDER(for RHD) REMOVAL
PROCEDURE
-
REMOVE NO. 1 INSTRUMENT PANEL UNDER COVER SUB-ASSEMBLY
Tech Tips
Use the same procedure as for LHD models Click here.
-
REMOVE LOWER INSTRUMENT PANEL FINISH PANEL (w/o Knee Airbag)
-
REMOVE LOWER NO. 1 INSTRUMENT PANEL AIRBAG ASSEMBLY (w/ Knee Airbag)
Use the same procedure as for LHD models Click here.
-
REMOVE WINDSHIELD WIPER MOTOR AND LINK ASSEMBLY
Tech Tips
Use the same procedure as for LHD models Click here.
-
REMOVE FRONT NO. 1 VENTILATOR SEAL
-
REMOVE FRONT AIR SHUTTER SEAL RH
-
REMOVE INNER COWL TOP TO COWL BRACE
-
REMOVE OUTER COWL TOP PANEL
-
DRAIN BRAKE FLUID
-
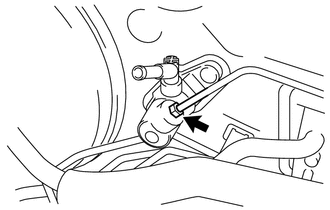
DISCONNECT CLUTCH RESERVOIR TUBE
-
Slide the clip and disconnect the clutch reservoir tube from the clutch master cylinder assembly.
Tech Tips
Use container to collect the fluid.
-
-
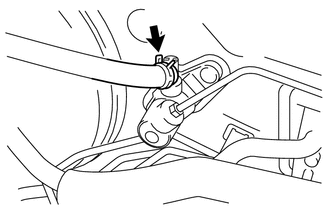
DISCONNECT CLUTCH MASTER CYLINDER TO FLEXIBLE HOSE TUBE
-
Using a union nut wrench (10 mm), disconnect the clutch master cylinder to flexible hose tube from the clutch master cylinder assembly.
Tech Tips
Use container to collect the fluid.
-
-
REMOVE CLUTCH MASTER CYLINDER ASSEMBLY
-
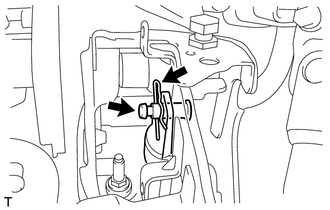
for 1KR-FE, 2NR-FKE:
-
Remove the clip and the clevis pin, and separate the clutch master cylinder push rod clevis from the clutch pedal sub-assembly.
-
-
for 1ND-TV, 2ZR-FE:
-
Remove the clip and the clevis pin, and separate the clutch master cylinder push rod clevis from the clutch pedal sub-assembly.
-
-
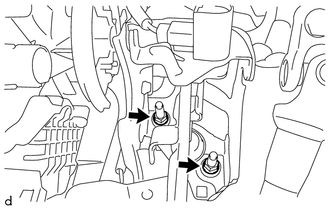
Remove the 2 nuts and the clutch master cylinder assembly.
-
-
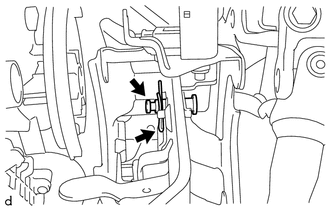
REMOVE CLUTCH MASTER CYLINDER PUSH ROD CLEVIS
-
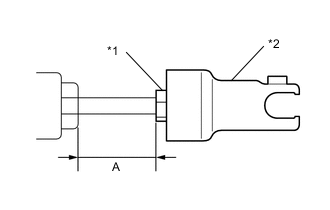
*1 Lock Nut *2 Clutch Master Cylinder Push Rod Clevis Measure the dimension A as shown in the illustration before loosening the lock nut.
-
Loosen the lock nut and remove the clutch master cylinder push rod clevis from the push rod.
Note
When loosening the lock nut, be sure to hold the clevis in place by its square or hexagonal portion.
-
Remove the lock nut from the push rod.
-