PROCEDURE
- Click here
DRAIN COOLANT (for Intercooler)
CAUTION:
-
When coolant is hot, do not remove the reserve tank cap (for Intercooler) or the bleeder plug.
-
Fluid and steam may spray out due to high pressure, possibly resulting in burns.
Note:Collect the drained coolant and measure its volume to establish a benchmark. When adding coolant, make sure to add more coolant than the measured amount.
-
Remove the engine under cover LH.
-
Remove the reserve tank cap (for Intercooler).
-
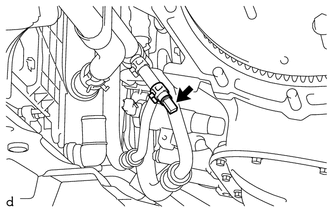
Slide the hose clip, remove the drain cock and drain the coolant (for intercooler)
-
Install the drain cock and secure it with the hose clip.
-
Install the reserve tank cap (for Intercooler).
-
Measure the amount of removed coolant.
-
- Click here
ADD COOLANT (for Intercooler)
-
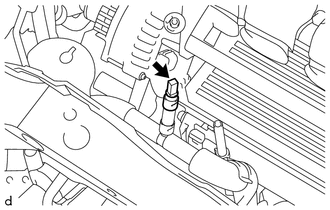
Slide the hose clip and remove the bleeder plug.
-
Remove the reserve tank cap (for Intercooler).
-
Add coolant at the specified concentration into the filler port of the intercooler reserve tank assembly until coolant overflows from the bleeder plug installation portion.
Standard Capacity 1.7 liters (1.8 US qts, 1.5 Imp. qts) Note:Do not substitute plain water for coolant.
Tip:
-
As coolant will overflow from the bleeder plug installation portion, protect it with a piece of cloth, etc. to prevent coolant from splattering.
-
TOYOTA vehicles are filled with TOYOTA SLLC at the factory. In order to avoid damaging the cooling system and other technical problems, only use TOYOTA SLLC or similar high quality ethylene glycol based non-silicate, non-amine, non-nitrite, non-borate coolant with long-life hybrid organic acid technology (coolant with long-life hybrid organic acid technology is a combination of low phosphates and organic acids).
-
-
Confirm that coolant has overflowed from the bleeder plug installation portion.
Tip:Clean away the overflowed coolant.
-
Install the bleeder plug and secure it with the hose clip.
-
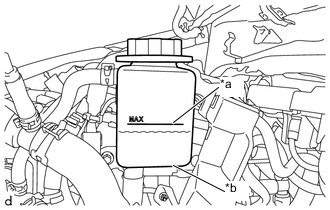
*a MAX Line *b Bottom Line Adjust the coolant amount until the fluid level in the intercooler reserve tank assembly is between the MAX line and the bottom line.
-
Install the reserve tank cap (for Intercooler). [*1]
-
Start the engine. [*2]
-
In order to make the charge water cooler pump operate, leave the engine idling in the N position for 1 minute, then stop it for 1 minute. Repeat this process approximately 3 times until the fluid level in the intercooler reserve tank assembly stabilizes. [*3]
Note:
-
While idling, make sure that the coolant level in the intercooler reserve tank assembly does not go below the bottom line.
-
If the coolant in the intercooler reserve tank assembly disappears soon after starting the engine, immediately stop the engine and wait for the coolant to cool down, then add coolant until the level is between the MAX line and the bottom line of the intercooler reserve tank assembly.
Tip:If the engine is running but coolant is not being expelled from the return path of the intercooler reserve tank assembly, there may be air inside the coolant pathway.
-
-
Stop the engine and wait for the coolant to cool down, then check that the fluid level is between the MAX line and the bottom line of the intercooler reserve tank assembly. [*4]
Note:
-
Check that the amount of coolant added is equal to or greater than the amount of recovered coolant.
-
If the fluid level is lower than the bottom line of the intercooler reserve tank assembly, add coolant at the specified concentration until the fluid level is between the MAX line and the bottom line, then repeat steps [*1] through [*4].
-
If the fluid level is higher than the MAX line, drain coolant to adjust the level to between the MAX line and the bottom line of the intercooler reserve tank assembly.
-
-
- Click here
INSPECT FOR COOLANT LEAK (for Intercooler)