INTERCOOLER INSTALLATION
PROCEDURE
-
INSTALL GROMMET
-
Install the 2 grommets onto the intercooler assembly.
-
-
INSTALL RADIATOR SUPPORT CUSHION
-
Install the radiator support cushion onto the intercooler assembly.
-
-
INSTALL INTERCOOLER ASSEMBLY
-
Install the intercooler assembly.
-
Engage the 2 clamps and connect the wire harness.
-
-
INSTALL UPPER RADIATOR SUPPORT SUB-ASSEMBLY
-
Install the upper radiator support sub-assembly with the 4 bolts.
- Torque:
- 5.5 N*m { 56 kgf*cm, 49 in.*lbf }
-
Connect the connector of the low pitched horn assembly.
-
Engage the 2 clamps and connect the wire harness to the upper radiator support sub-assembly.
-
Connect the connector of the front airbag sensor Click here.
-
-
INSTALL AIRBAG SENSOR BRACKET
-
INSTALL HOOD LOCK ASSEMBLY
-
Install the hood lock assembly to the upper radiator support sub-assembly with the 3 bolts.
- Torque:
- 7.5 N*m { 76 kgf*cm, 66 in.*lbf }
-
Engage the 2 clamps and connect the hood lock control cable assembly to the upper radiator support sub-assembly.
-
-
INSTALL RADIATOR RESERVE TANK ASSEMBLY
-
Install the radiator reserve tank assembly to the upper radiator support sub-assembly with the bolt.
- Torque:
- 13 N*m { 127 kgf*cm, 9 ft.*lbf }
-
-
CONNECT NO. 2 AIR HOSE
-
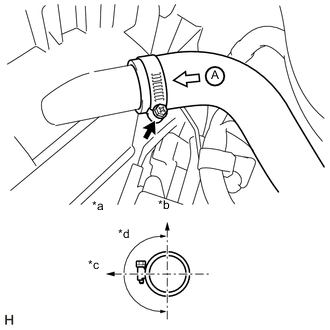
Text in Illustration *a View A *b Upper Side *c Rear Side *d Clamp installation range Connect the No. 2 air hose to the intercooler assembly with the hose clamp.
- Torque:
- 6.0 N*m { 61 kgf*cm, 53 in.*lbf }
-
Engage the 2 clamps and connect the wire harness to the intercooler assembly.
-
-
CONNECT NO. 3 AIR HOSE
-
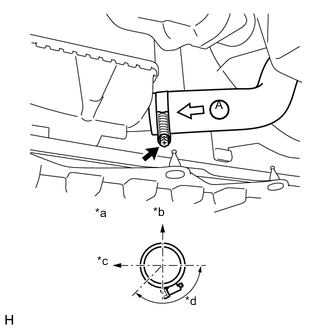
Text in Illustration *a View A *b Upper Side *c Rear Side *d Clamp installation range Connect the No. 3 air hose to the intercooler assembly with the hose clamp.
- Torque:
- 6.0 N*m { 61 kgf*cm, 53 in.*lbf }
-
-
INSTALL AIR CLEANER CASE SUB-ASSEMBLY
-
Install the air cleaner case sub-assembly onto the air cleaner bracket with the 3 bolts.
- Torque:
- 7.8 N*m { 80 kgf*cm, 69 in.*lbf }
-
-
INSTALL AIR CLEANER FILTER ELEMENT SUB-ASSEMBLY
-
Install the air cleaner filter element onto the air cleaner case sub-assembly.
-
-
INSTALL AIR CLEANER CAP SUB-ASSEMBLY
-
Engage the 2 lock clamps and install the air cleaner cap sub-assembly onto the air cleaner case sub-assembly.
-
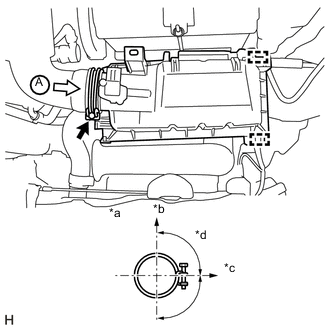
Text in Illustration *a View A *b Upper Side *c Front Side *d Clamp installation range Connect the No. 1 air cleaner hose to the air cleaner cap sub-assembly with hose clamp.
- Torque:
- 3.0 N*m { 31 kgf*cm, 27 in.*lbf }
-
Engage the 4 clamps and connect the wire harness to the air cleaner cap sub-assembly.
-
Connect the connector of the mass air flow meter.
-
-
INSTALL CENTER ENGINE UNDER COVER
-
INSTALL HEADLIGHT ASSEMBLY