FUEL INJECTOR REMOVAL

PROCEDURE
-
DISCHARGE FUEL SYSTEM PRESSURE
CAUTION:
-
Perform the following procedure to prevent fuel from spilling out before removing any fuel system parts.
-
Even after discharging the fuel pressure, when disconnecting a fuel line, cover it with a piece of cloth to prevent fuel from spraying or coming out.
-
Remove the rear seat cushion with cover pad sub-assembly Click here.
-

Text in Illustration *1 Clip Remover *2 Protective Tape *3 Butyl Tape Remove the rear floor service hole cover.
-
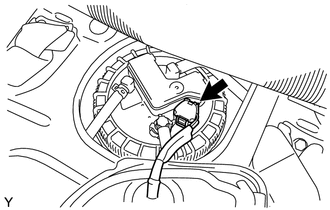
Disconnect the connector from the fuel pump assembly.
-
Start the engine. After the engine stops naturally, turn the ignition switch off.
Note
Do not increase the engine speed or drive the vehicle while waiting for the engine to stop naturally.
Tech Tips
DTC P0171/25 may be set.
-
Crank the engine again and make sure that the engine does not start.
-
Remove the fuel tank cap and discharge the pressure from the fuel tank.
-
Disconnect the cable from the negative battery terminal.
-
Connect the connector of the fuel pump assembly.
-
-
REMOVE NO. 1 ENGINE COVER
-
REMOVE AIR CLEANER CAP SUB-ASSEMBLY
-
REMOVE AIR CLEANER FILTER ELEMENT SUB-ASSEMBLY
-
Remove the air cleaner filter element sub-assembly from the air cleaner case.
-
-
REMOVE NO. 1 AIR CLEANER HOSE
-
REMOVE INLET NO. 1 AIR CLEANER
-
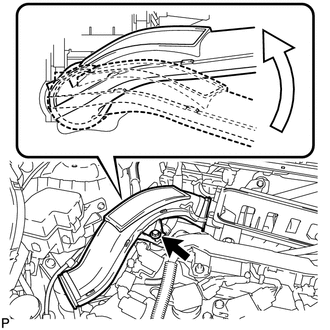
Remove the bolt and the No. 1 inlet air cleaner as shown in the illustration.
Text in Illustration 
Turn
-
-
REMOVE AIR CLEANER CASE SUB-ASSEMBLY
-

Remove the 2 bolts and the air cleaner case sub-assembly.
-
-
REMOVE EFI FUEL PIPE CLAMP
-
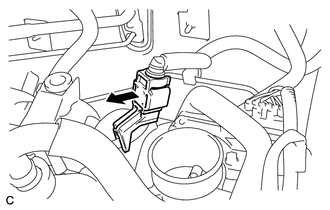
Remove the EFI fuel pipe clamp.
-
-
DISCONNECT FUEL TUBE SUB-ASSEMBLY
-
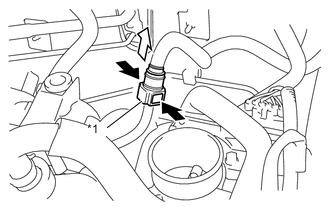
Text in Illustration *1 Retainer 
Pinch Pull Pinch the tube connector and pull out the fuel pipe Click here.
Note
-
Check for dirt or other foreign matter on the parts to be disconnected and clean them if necessary.
-
The fuel tube connector seals with an O-ring. Ensure that there is no damage or foreign matter on the contact surface.
-
If the connector and the pipe are stuck, push and pull on the connector to release them while pinching the retainer. Pull the connector out of the pipe carefully.
-
Do not use any tools.
-
Do not bend or twist the tubes.
-
Protect the contact surface by covering it with a plastic bag.
-
Do not damage any of the clips. If a clip is damaged, replace it.
-
-
-
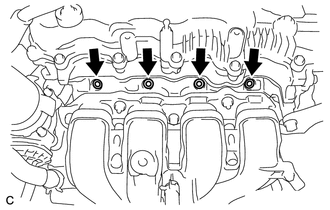
REMOVE FUEL DELIVERY PIPE
-
Make sure that there are no deposits such as sand or grit near the fuel injector assembly, and if there are any deposits, clean them away.
Note
Do not allow foreign matter to enter any other components.
-
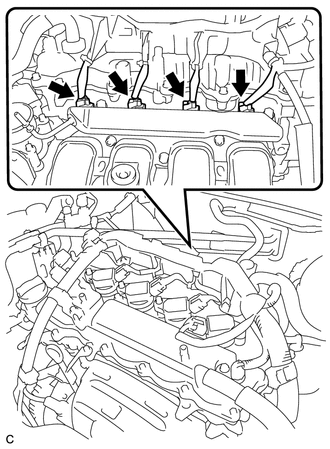
Disconnect the 4 fuel injector assembly connectors.
-
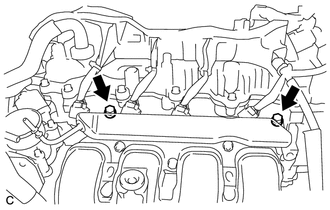
Remove the 2 bolts and delivery pipe together with the 4 injectors.
Note
-
Do not allow foreign matter to enter the cylinder head.
-
Do not drop the fuel injectors when removing the fuel delivery pipe.
-
-
-
REMOVE FUEL INJECTOR ASSEMBLY
-
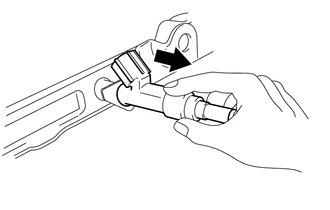
Pull the 4 fuel injector assemblies out of the fuel delivery pipe sub-assembly.
Note
Do not allow foreign matter to enter the fuel delivery pipe.
-
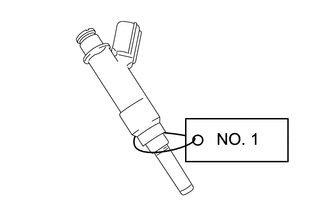
For reinstallation, attach a tag or label to each injector shaft.
Note
Prevent entry of foreign objects by covering the fuel injectors with plastic bags.
-
-
REMOVE NO. 1 DELIVERY PIPE SPACER
-
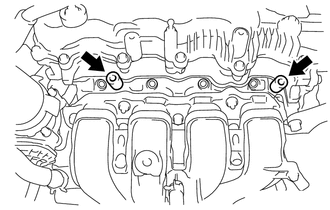
Remove the 2 No. 1 delivery pipe spacers from the cylinder head.
-
-
REMOVE INJECTOR VIBRATION INSULATOR
-
Remove the 4 injector vibration insulators.
-