CAMSHAFT INSTALLATION

PROCEDURE
-
INSTALL CAMSHAFT TIMING SPROCKET ASSEMBLY
-
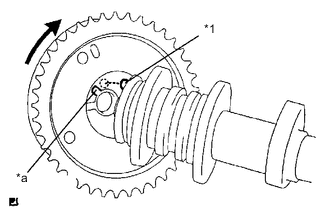
Text in Illustration *1 Straight Pin *a Key Groove Put the camshaft timing sprocket and camshaft together with the straight pin of the groove.
-
Turn the camshaft timing sprocket clockwise while pushing it gently toward the camshaft. Push further at the position where the pin fits into the groove.
-
Temporarily install the camshaft timing sprocket with the bolt.
-
-
INSTALL CAMSHAFT
-
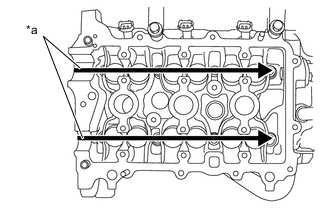
Text in Illustration *a Apply Engine Oil Apply engine oil to the cam of each camshaft, the journals of the cylinder head and the top of each valve lifter.
-
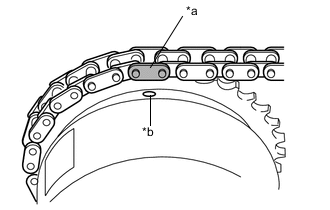
Text in Illustration *a Paint Mark *b Timing Mark Align the matchmarks on the timing chain plates with the timing mark of the camshaft timing sprocket and the paint mark of the timing chain respectively and install the timing chain.
-
-
INSTALL NO. 2 CAMSHAFT
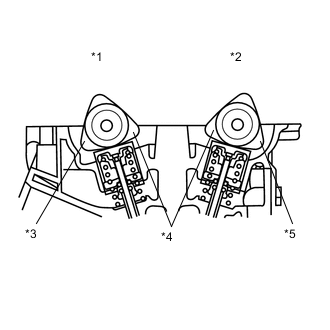
Text in Illustration *1 No. 1 Camshaft *2 No. 2 Camshaft *3 No. 3 Cylinder *4 No. 1 Cylinder *5 No. 2 Cylinder
-
Set the No. 2 camshaft onto the cylinder head as shown in the illustration.
Tech Tips
Make sure that the timing marks of the camshaft timing sprocket and camshaft timing sprocket face upward.
-
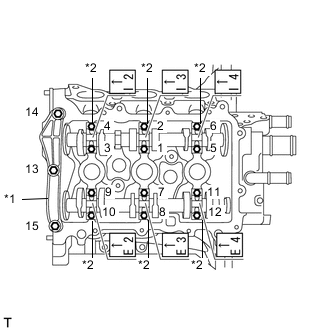
Text in Illustration *1 No. 1 Camshaft Bearing Cap *2 No. 2 Camshaft Bearing Cap Place the No. 1 camshaft bearing cap and No. 2 camshaft bearing caps and tighten the bolts to the specified torque in the order shown in the illustration.
- Torque:
- No. 1 camshaft bearing cap
- 15 N*m { 153 kgf*cm, 11 ft.*lbf }
- No. 2 camshaft bearing cap
- 13 N*m { 127 kgf*cm, 9 ft.*lbf }
Note
Install No. 1 camshaft bearing cap and No. 2 camshaft bearing caps with the front marks facing engine front.
-
-
INSTALL CAMSHAFT TIMING GEAR
-
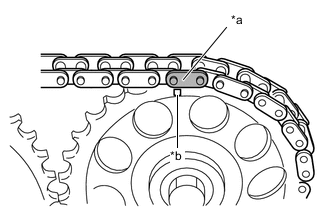
Text in Illustration *a Paint Mark *b Timing Mark Align the matchmarks on the timing chain plates with the timing mark of the camshaft timing gear and the paint mark of the timing chain respectively and install the timing chain.
-
Install the No. 2 camshaft with the knock pin aligned with the gear groove.
-
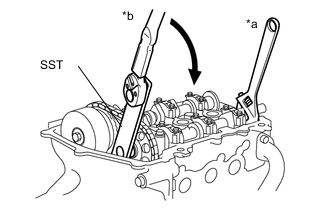
Text in Illustration *a Hold *b Turn Using SST, tighten the bolts onto the camshaft timing gear while holding the hexagonal portion of the No. 2 camshaft.
- SST
- 09249-37010
- Torque:
- without SST
- 47 N*m { 479 kgf*cm, 35 ft.*lbf }
- with SST
- 37 N*m { 347 kgf*cm, 25 ft.*lbf }
Tech Tips
-
This torque value is effective when SST is parallel to the torque wrench.
-
The "with SST" torque value is effective when using SST with a fulcrum length of 100 mm (3.94 in.).
-
The "with SST" torque value is effective when using a torque wrench with a fulcrum length of 260 mm (10.24 in.).
-
If using a torque wrench with a different length, or connecting the torque wrench and SST at an angle, refer to the alternate torque values Click here.
-
-
TIGHTEN CAMSHAFT TIMING SPROCKET ASSEMBLY
-
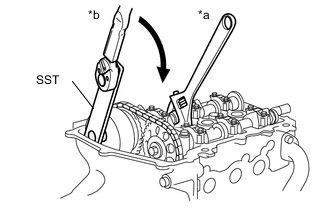
Text in Illustration *a Hold *b Turn Using SST, tighten the bolts onto the camshaft timing sprocket while holding the hexagonal portion of the camshaft.
- SST
- 09249-37010
- Torque:
- without SST
- 47 N*m { 479 kgf*cm, 35 ft.*lbf }
- with SST
- 37 N*m { 347 kgf*cm, 25 ft.*lbf }
Tech Tips
-
This torque value is effective when SST is parallel to the torque wrench.
-
The "with SST" torque value is effective when using SST with a fulcrum length of 100 mm (3.94 in.).
-
The "with SST" torque value is effective when using a torque wrench with a fulcrum length of 260 mm (10.24 in.).
-
If using a torque wrench with a different length, or connecting the torque wrench and SST at an angle, refer to the alternate torque values Click here.
-
Make sure that the camshaft timing sprocket gear is locked.
-
-
INSTALL TIGHT PLUG
-
Remove the hexagon wrench from the timing chain tensioner.
-
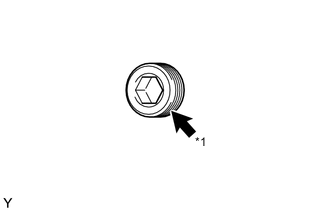
Text in Illustration *1 Adhesive Clean the plug and the bolt holes of the timing chain cover and apply adhesive to the threads of the plug.
Adhesive Toyota Genuine Adhesive 1324, Three Bond 1324 or equivalent -
Using an 8 mm socket hexagon wrench, install the tight plug.
- Torque:
- 15 N*m { 153 kgf*cm, 11 ft.*lbf }
Note
Do not start the engine for at least 1 hour after installing.
-
-
INSPECT VALVE CLEARANCE
-
ADJUST VALVE CLEARANCE
-
INSTALL CYLINDER HEAD COVER SUB-ASSEMBLY
-
INSTALL WIRE HARNESS CLAMP BRACKET
-
Install the wire harness clamp bracket with the bolt.
- Torque:
- 13 N*m { 127 kgf*cm, 9 ft.*lbf }
-
-
CONNECT WIRE HARNESS
-
Connect the wire harness to the cylinder head cover.
-
-
CONNECT VENTILATION HOSE
-
Connect the ventilation hose to the ventilation hose.
-
-
INSTALL DUTY VACUUM SWITCHING VALVE
-
Install the duty vacuum switching valve with the bolt.
- Torque:
- 8.8 N*m { 90 kgf*cm, 78 in.*lbf }
-
-
INSTALL NO. 1 IGNITION COIL
-
INSTALL AIR CLEANER FILTER ELEMENT SUB-ASSEMBLY
-
Install the air cleaner filter element.
-
-
INSTALL AIR CLEANER CAP SUB-ASSEMBLY
-
INSPECT ENGINE OIL LEVEL
-
INSPECT FOR OIL LEAK