PROCEDURE
- Click here
INSTALL HEATED OXYGEN SENSOR (Sensor 2)
Tip:Perform "Inspection After Repairs" after replacing the heated oxygen sensor (sensor 2).
-
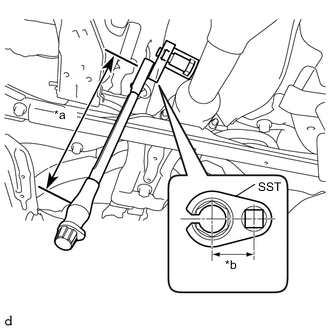
*a Torque Wrench Fulcrum Length *b SST Fulcrum Length Using SST, install the heated oxygen sensor (sensor 2) to the front exhaust pipe assembly.
09224-00012 Specified tightening torque 44 N*m 449 kgf*cm 32 ft.*lbf Note:If a component has been dropped or subjected to a strong impact, replace the heated oxygen sensor (sensor 2).
Tip:
-
Calculate the torque wrench reading when changing the fulcrum length of the torque wrench.
-
When using SST (fulcrum length of 30 mm (1.18 in.)) + torque wrench (fulcrum length of 255 mm (10.0 in.)): 39 N*m (398 kgf*cm, 29 ft.*lbf)
-
-
Pass the connector through the hole to the inside of the vehicle and install the grommet of the heated oxygen sensor (sensor 2).
-
Connect the heated oxygen sensor (sensor 2) connector.
-
Return the front floor carpet assembly.
-
- Click here
INSTALL REAR CONSOLE BOX ASSEMBLY
- Click here
INSPECT FOR EXHAUST GAS LEAK
- Click here
PERFORM INITIALIZATION
-
Perform "Inspection After Repairs" after replacing the heated oxygen sensor (sensor 1).
-