ECM INSTALLATION
PROCEDURE
-
INSTALL NO. 2 ECM BRACKET (for LHD)
-
Install the No. 2 ECM bracket to the ECM with the 2 screws.
- Torque:
- 3.0 N*m { 31 kgf*cm, 27 in.*lbf }
-
-
INSTALL NO. 2 ECM BRACKET (for RHD)
-
Install the No. 2 ECM bracket to the ECM with the 2 screws.
- Torque:
- 3.0 N*m { 31 kgf*cm, 27 in.*lbf }
-
-
INSTALL NO. 1 ECM BRACKET (for LHD)
-
Install the No. 1 ECM bracket to the ECM with the 2 screws.
- Torque:
- 3.0 N*m { 31 kgf*cm, 27 in.*lbf }
-
-
INSTALL NO. 1 ECM BRACKET (for RHD)
-
Install the No. 1 ECM bracket to the ECM with the 2 screws.
- Torque:
- 3.0 N*m { 31 kgf*cm, 27 in.*lbf }
-
-
INSTALL ECM (for LHD)
Tech Tips
-
Perform "reset memory", "deceleration sensor 0 point calibration", "CVT oil pressure calibration" after replacing the ECM.
-
Perform "Vehicle Identification Number (VIN) or frame number registration" after replacing the ECM.
-
Install the ECM to the vehicle with the bolt and nut.
- Torque:
- 8.0 N*m { 82 kgf*cm, 71 in.*lbf }
Note
If the ECM has been struck or dropped, replace it.
-
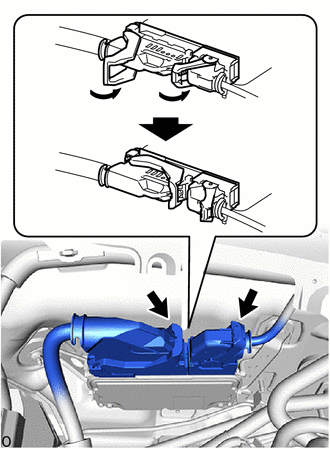
Connect the 2 ECM connectors and lock with the lever.
Note
-
When connecting connectors, make sure that foreign substances such as mud or water droplets do not adhere to them.
-
Securely lock with the lever.
-
-
-
INSTALL ECM (for RHD)
Tech Tips
-
Perform "reset memory", "deceleration sensor 0 point calibration", "CVT oil pressure calibration" after replacing the ECM.
-
Perform "Vehicle Identification Number (VIN) or frame number registration" after replacing the ECM.
-
Install the ECM to the vehicle with the bolt and nut.
- Torque:
- 8.0 N*m { 82 kgf*cm, 71 in.*lbf }
Note
If the ECM has been struck or dropped, replace it.
-
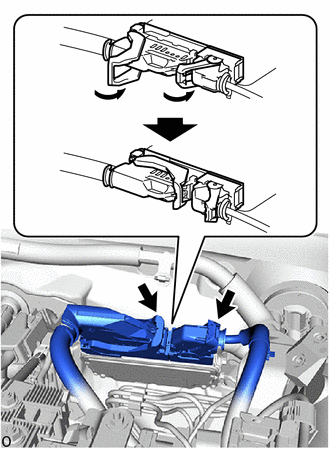
Connect the 2 ECM connectors and lock with the lever.
Note
-
When connecting connectors, make sure that foreign substances such as mud or water droplets do not adhere to them.
-
Securely lock with the lever.
-
-
-
INSTALL OUTER COWL TOP PANEL
-
for LHD:
-
for RHD:
-
-
INSTALL INNER COWL TOP TO COWL BRACE
-
for LHD:
-
for RHD:
-
-
INSTALL FRONT NO. 1 VENTILATOR SEAL
-
for LHD:
-
for RHD:
-
-
INSTALL FRONT AIR SHUTTER SEAL RH
-
for LHD:
-
for RHD:
-
-
INSTALL WINDSHIELD WIPER MOTOR AND LINK
-
CONNECT CABLE TO NEGATIVE BATTERY TERMINAL
- Torque:
- 5.4 N*m { 55 kgf*cm, 48 in.*lbf }
Note
When disconnecting the cable, some systems need to be initialized after the cable is reconnected.
-
PERFORM INITIALIZATION
-
Perform "reset memory", "deceleration sensor 0 point calibration", "CVT oil pressure calibration" after replacing the ECM.
-
Perform "Vehicle Identification Number (VIN) or frame number registration" after replacing the ECM.
-