ECM INSTALLATION
PROCEDURE
-
INSTALL NO. 1 ECM BRACKET
-
Using "TORX" socket wrench T25, install the No. 1 ECM bracket onto the ECM with the 2 screws.
- Torque:
- 6.0 N*m { 61 kgf*cm, 53 in.*lbf }
-
-
INSTALL NO. 2 ECM BRACKET
-
Using "TORX" socket wrench T25, install the No. 2 ECM bracket onto the ECM with the 2 screws.
- Torque:
- 6.0 N*m { 61 kgf*cm, 53 in.*lbf }
-
-
INSTALL ECM
-
Install the ECM with the bolt and 2 nuts.
- Torque:
- 8.0 N*m { 82 kgf*cm, 71 in.*lbf }
-
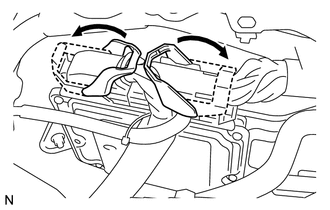
Pull down the lever to engage the lock and connect the 2 connectors to the ECM.
Note
Make sure that the levers are securely locked.
-
-
INSTALL WATER PIPE SUB-ASSEMBLY (w/ Combustion Type Power Heater)
-
Install the water pipe sub-assembly with the 2 nuts.
- Torque:
- 9.8 N*m { 100 kgf*cm, 87 in.*lbf }
-
-
INSTALL NO. 1 HOSE TO HOSE TUBE (w/ Combustion Type Power Heater)
-
Install the No. 1 hose to hose tube with the 2 bolts. (w/ Combustion Type Power Heater)
- Torque:
- 9.8 N*m { 100 kgf*cm, 87 in.*lbf }
-
-
INSTALL OUTER COWL TOP PANEL
-
INSTALL INNER COWL TOP TO COWL BRACE
-
INSTALL FRONT NO. 1 VENTILATOR SEAL
-
INSTALL FRONT AIR SHUTTER SEAL RH
-
INSTALL WINDSHIELD WIPER MOTOR AND LINK ASSEMBLY
-
PERFORM INITIALIZATION