SFI SYSTEM, Diagnostic DTC:P0403
| DTC Code | DTC Name |
|---|---|
| P0403 | Exhaust Gas Recirculation Control Circuit |
DESCRIPTION
Refer to DTC P0400 Click here.
| DTC No. | DTC Detection Condition | Trouble Area |
|---|---|---|
| P0403 | Open or short in EGR valve circuit (3 trip detection logic). |
|
Tech Tips
-
DTC P0403 is stored while the engine is in fuel cut condition for 4 seconds or more and the brake pedal is pressed for approximately 2 seconds.
-
If DTC P0403 has already been stored, P0400 is not stored.
WIRING DIAGRAM
Refer to DTC P0400 Click here.
CAUTION / NOTICE / HINT
Note
-
Perform idle learning after replacing the ECM Click here.
-
Inspect the fuses for circuits related to this system before performing the following inspection procedure.
Tech Tips
Read freeze frame data using the GTS. Freeze frame data records the engine condition when malfunctions are detected. When troubleshooting, freeze frame data can help determine if the vehicle was moving or stationary, if the engine was warmed up or not, if the air fuel ratio was lean or rich, and other data from the time the malfunction occurred.
PROCEDURE
-
PERFORM ACTIVE TEST USING GTS (CONTROL THE EGR STEP POSITION)
-
Connect the GTS to the DLC3.
-
Turn the ignition switch to ON.
-
Turn the GTS on.
-
Start the engine and warm it up until the engine coolant temperature reaches 75°C (167°F) or more.
Tech Tips
The A/C switch and all accessory switches should be off.
-
Enter the following menus: Powertrain / Engine and ECT / Active Test / Control the EGR Step Position.
-
Check the engine idling condition and MAP values in the Data List while performing the Active Test.
OK MAP and idling condition change in response to EGR step position as follows. Standard EGR Step Position (Active Test) - 0 Step 0 to 20 Steps Idling condition Steady idling Idling changes from steady to rough idling MAP
(Data List)
MAP value is 29 to 37 kPa
(218 to 278 mmHg)
(EGR valve is fully closed)
MAP value is at least +10 kPa (75 mmHg) higher than when EGR valve is fully closed Tech Tips
-
Do not leave the EGR valve open for 10 seconds or more during the Active Test.
-
Be sure to return the EGR valve to step 0 when the Active Test is completed.
-
During Active Test, if the idling condition does not change in response to EGR step position, then there is probably a malfunction in the EGR valve.
-
OK 
CHECK FOR INTERMITTENT PROBLEMS Click here
NG 
-
-
INSPECT EGR VALVE ASSEMBLY
-
Inspect the EGR valve assembly Click here.
NG
REPLACE EGR VALVE ASSEMBLY Click here
OK
-
-
CHECK TERMINAL VOLTAGE (EGR VALVE ASSEMBLY)
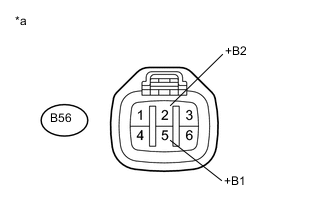
Text in Illustration *a Front view of wire harness connector
(to EGR Valve Assembly))
-
Disconnect the EGR valve assembly connector.
-
Turn the ignition switch to ON.
-
Measure the voltage according to the value(s) in the table below.
Standard Voltage Tester Connection Switch Condition Specified Condition B56-5 (+B1) - Body ground Ignition switch ON 11 to 14 V B56-2 (+B2) - Body ground Ignition switch ON 11 to 14 V
NG 
CHECK HARNESS AND CONNECTOR (EGR VALVE ASSEMBLY - NO. 1 INTEGRATION RELAY) Click here
OK
-
-
CHECK HARNESS AND CONNECTOR (ECM - EGR VALVE ASSEMBLY)
-
Disconnect the B97 ECM connector (for LHD).
-
Disconnect the B101 ECM connector (for RHD).
-
Disconnect the B56 EGR valve assembly connector.
-
Measure the resistance according to the value(s) in the table below.
Standard Resistance for LHD Tester Connection Condition Specified Condition B97-29 (EGR1) - B56-4 (EGR1) Always Below 1 Ω B97-28 (EGR2) - B56-3 (EGR2) Always Below 1 Ω B97-59 (EGR3) - B56-6 (EGR3) Always Below 1 Ω B97-58 (EGR4) - B56-1 (EGR4) Always Below 1 Ω B97-29 (EGR1) or B56-4 (EGR1) - Body ground Always 10 kΩ or higher B97-28 (EGR2) or B56-3 (EGR2) - Body ground Always 10 kΩ or higher B97-59 (EGR3) or B56-6 (EGR3) - Body ground Always 10 kΩ or higher B97-58 (EGR4) or B56-1 (EGR4) - Body ground Always 10 kΩ or higher for RHD Tester Connection Condition Specified Condition B101-29 (EGR1) - B56-4 (EGR1) Always Below 1 Ω B101-28 (EGR2) - B56-3 (EGR2) Always Below 1 Ω B101-59 (EGR3) - B56-6 (EGR3) Always Below 1 Ω B101-58 (EGR4) - B56-1 (EGR4) Always Below 1 Ω B101-29 (EGR1) or B56-4 (EGR1) - Body ground Always 10 kΩ or higher B101-28 (EGR2) or B56-3 (EGR2) - Body ground Always 10 kΩ or higher B101-59 (EGR3) or B56-6 (EGR3) - Body ground Always 10 kΩ or higher B101-58 (EGR4) or B56-1 (EGR4) - Body ground Always 10 kΩ or higher
OK
REPLACE ECM Click here
NG
REPAIR OR REPLACE HARNESS OR CONNECTOR
-
-
CHECK HARNESS AND CONNECTOR (EGR VALVE ASSEMBLY - NO. 1 INTEGRATION RELAY)
-
Disconnect the B56 EGR valve assembly connector.
-
Remove the No. 1 integration relay from the engine room relay block.
-
Measure the resistance according to the value(s) in the table below.
Standard Resistance Tester Connection Condition Specified Condition B56-5 (+B1) - 1E-4 Always Below 1 Ω B56-2 (+B2) - 1E-4 Always Below 1 Ω B56-5 (+B1) or 1E-4 - Body ground Always 10 kΩ or higher B56-2 (+B2) or 1E-4 - Body ground Always 10 kΩ or higher
OK
CHECK ECM POWER SOURCE CIRCUIT Click here
NG
REPAIR OR REPLACE HARNESS OR CONNECTOR
-