ECD SYSTEM(w/ DPF) REGISTRATION
CAUTION / NOTICE / HINT
Note
The Vehicle Identification Number (VIN) must be input into a replacement ECM.
Tech Tips
-
When the ECM must be replaced, before replacing the ECM, perform the "Learning Values Save" function using the GTS. Then after installing the new ECM, perform all of the initialization/registrations for the "Learning Values Write" function by following the instructions shown on the GTS display.
-
After replacing any of the injector assemblies, perform both the "Injector Compensation" and the "Pilot Quantity Learning Values Reset" functions using the GTS. If any of the injector assemblies and the ECM are replaced at the same time, perform the same initialization/registrations as when replacing the ECM.
-
After replacing the air fuel ratio sensor, perform the "A/F Sensor Compensation Reset" function using the GTS. If the air fuel ratio sensor and the ECM are replaced at the same time, perform the same initialization/registrations as when replacing the ECM.
-
After replacing the exhaust manifold assembly, perform the "DPF Deterioration Record Clear" function using the GTS. If the exhaust manifold assembly and the ECM are replaced at the same time, perform the same initialization/registrations as when replacing the ECM.
-
After replacing the engine assembly, perform both the "Injector Compensation" and the "Pilot Quantity Learning Values Reset" functions using the GTS. If the engine assembly and the ECM are replaced at the same time, perform the same initialization/registrations as when replacing the ECM.
-
If the "Learning Values Save" or "Learning Values Write" function has failed, manually input the injector compensation codes and the vehicle mileage using the "Injector Compensation" and "Vehicle Mileage Write" functions by following the instructions shown on the GTS display.
PROCEDURE
-
DESCRIPTION
Tech Tips
This registration section consists of 2 parts: Read VIN and Write VIN.
-
Read VIN: This process allows the VIN stored in the ECM to be read in order to confirm that the 2 VINs, provided with the vehicle and stored in the vehicle ECM, are the same.
-
Write VIN: This process allows the VIN to be input into the ECM. If the ECM is replaced, or the ECM VIN and vehicle VIN do not match, the VIN can be registered, or overwritten in the ECM by following this procedure.
-
-
READ VIN
-
Confirm the vehicle VIN.
-
Connect the GTS to the DLC3.
-
Turn the ignition switch to ON.
-
Turn the GTS on.
-
Enter the following menus: Powertrain / Engine and ECT / Utility / VIN / VIN Read.
-
-
WRITE VIN
-
Confirm the vehicle VIN.
-
Connect the GTS to the DLC3.
-
Turn the ignition switch to ON.
-
Turn the GTS on.
-
Enter the following menus: Powertrain / Engine and ECT / Utility / VIN / VIN Write.
-
-
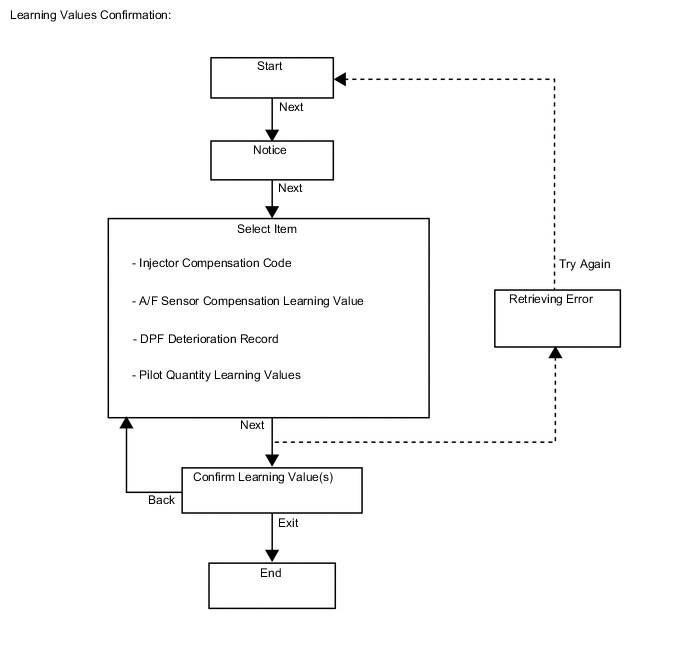
LEARNING VALUES CONFIRMATION
Tech Tips
This function is used for reading a learning value(s) that is input correctly.
Tech Tips
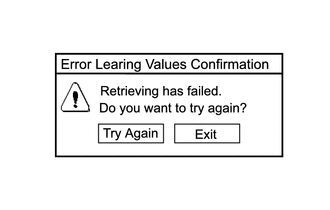
This process may fail due to a problem with the wire harness or a bad connection with the DLC3. Check the wire harness and DLC3 connection. If no problem is found with either, the ECM may be malfunctioning.
-
Connect the GTS to the DLC3.
-
Turn the ignition switch to ON.
-
Turn the GTS on.
-
Enter the following menus: Powertrain / Engine and ECT / Utility / Learning Values Confirmation.
-
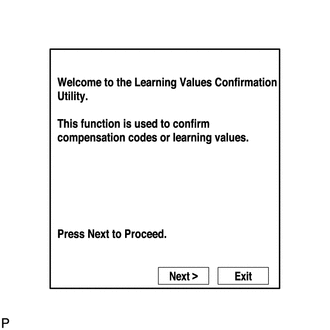
Press "Next".
-
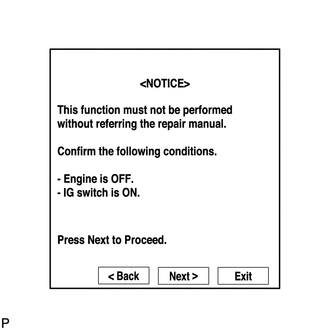
Press "Next".
Tech Tips
Confirm that the ignition switch is ON and the engine is stopped.
-
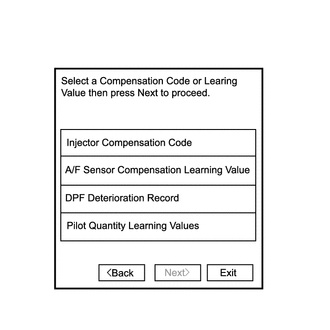
Select an item and press "Next".
-
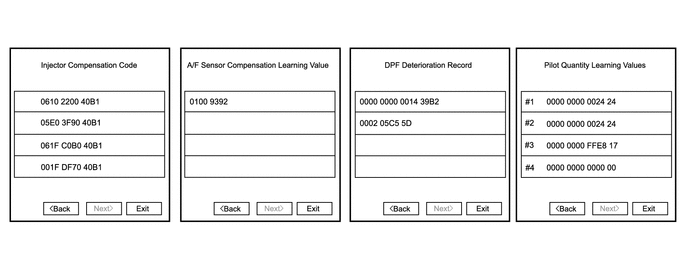
Confirm the compensation code or the learning value(s) that is selected.
Tech Tips
-
If you want to confirm other items continuously, press "Back" to return to the previous display.
-
To finish this function, press "Exit".
-
-
-
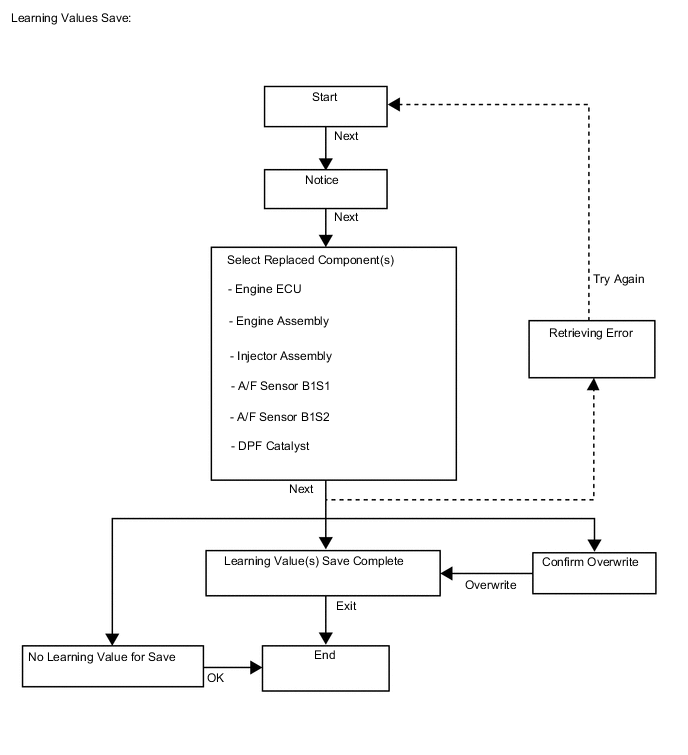
LEARNING VALUES SAVE
Tech Tips
This function is used for saving data from the ECM to the GTS depending on the replaced parts.
Tech Tips
This process may fail due to a problem with the wire harness or a bad connection with the DLC3. Check the wire harness and DLC3 connection. If no problem is found with either, the ECM may be malfunctioning.

Tech Tips
If the ECM data cannot be read for some reason, input the vehicle mileage to a new ECM using the "Vehicle Mileage Write" function.

-
Connect the GTS to the DLC3.
-
Turn the ignition switch to ON.
-
Turn the GTS on.
-
Enter the following menus: Powertrain / Engine and ECT / Utility / Learning Values Save.
-
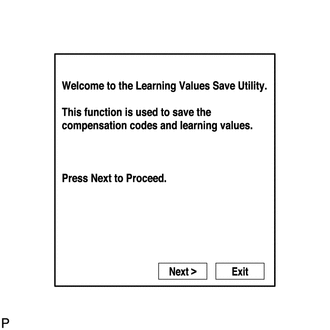
Press "Next".
-

Press "Next".
Tech Tips
Confirm that the ignition switch is ON and the engine is stopped.
-
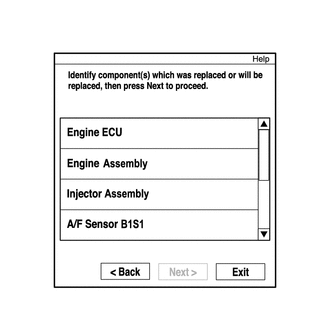

Select item(s) for the replaced parts and press "Next".
Tech Tips
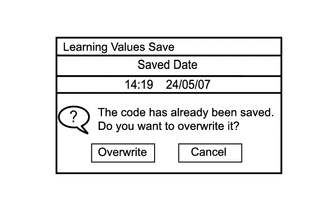
If the message appears for asking the data overwrite, press "Overwrite" to proceed to next step.
-
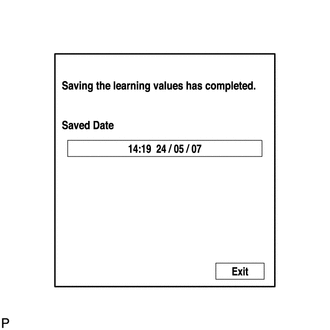
Confirm the "Saved Date", and press "Exit" to finish this operation.
-
-
LEARNING VALUES WRITE
Tech Tips
This function is used for writing the saved data from the GTS to the ECM.
Tech Tips
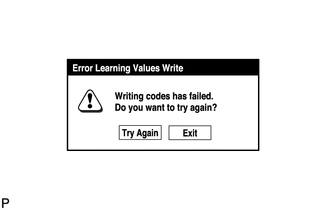
This process may fail due to a problem with the wire harness or a bad connection with the DLC3. Check the wire harness and DLC3 connection. If no problem is found with either, the ECM may be malfunctioning.

Tech Tips
If the saved data cannot be written into a new ECM for some reason, input the vehicle mileage to the ECM using the "Vehicle Mileage Write" function.
-
Connect the GTS to the DLC3.
-
Turn the ignition switch to ON.
-
Turn the GTS on.
-
Enter the following menus: Powertrain / Engine and ECT / Utility / Learning Values Write.
-
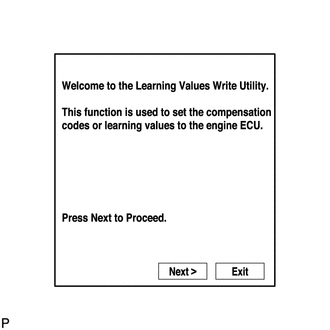
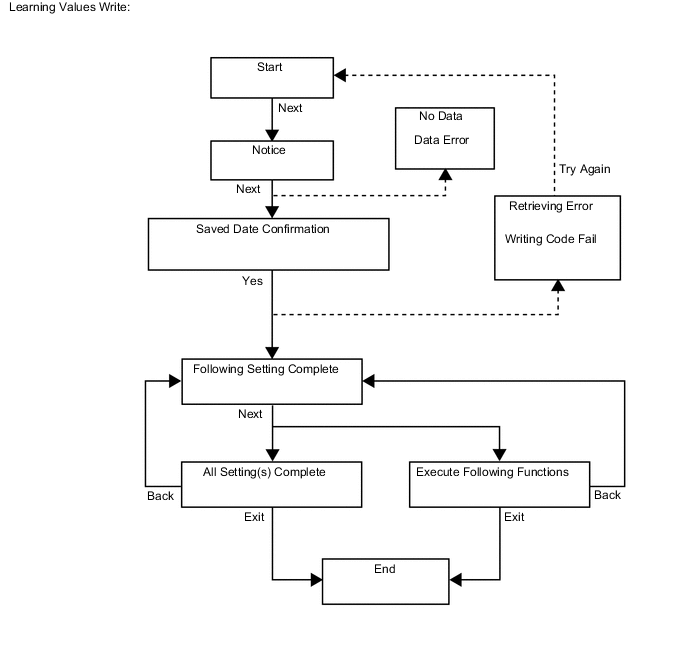
Press "Next".
Tech Tips
Confirm that the ignition switch is ON and the engine is stopped.
-
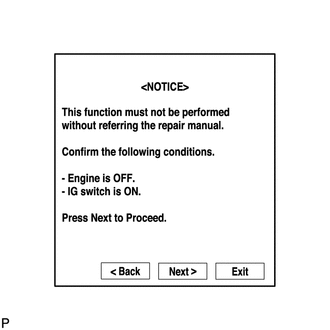
Press "Next".
-
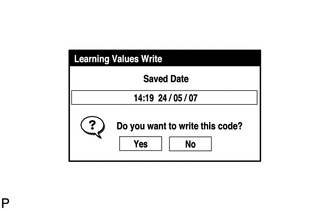
Confirm the "Saved Date", and press "Yes".
-
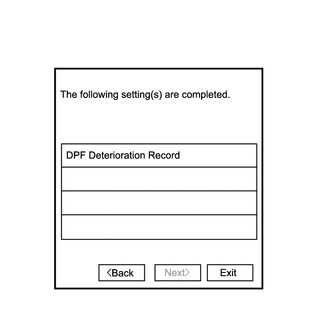
Confirm the displayed list of data settings that are completed.
-
Press "Next".
-
Confirm the displayed list of data settings that need manual initialization and/or registration.
Tech Tips
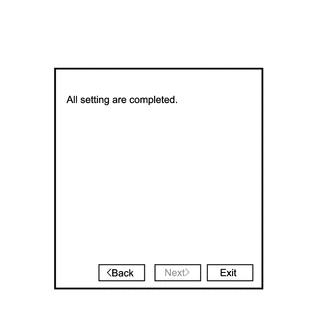
If the message of "All settings are completed." is displayed, press "Exit" to finish this operation.
-
-
INJECTOR COMPENSATION

Note
Injector compensation codes are 12-digit, alphanumeric values printed on the head of each injector assembly. If an incorrect injector compensation code is input into the ECM, the engine may rattle or engine idling may become rough. In addition, engine failure may occur and the life of the engine may be shortened.
Text in Illustration *a Example *b Injector Compensation Code 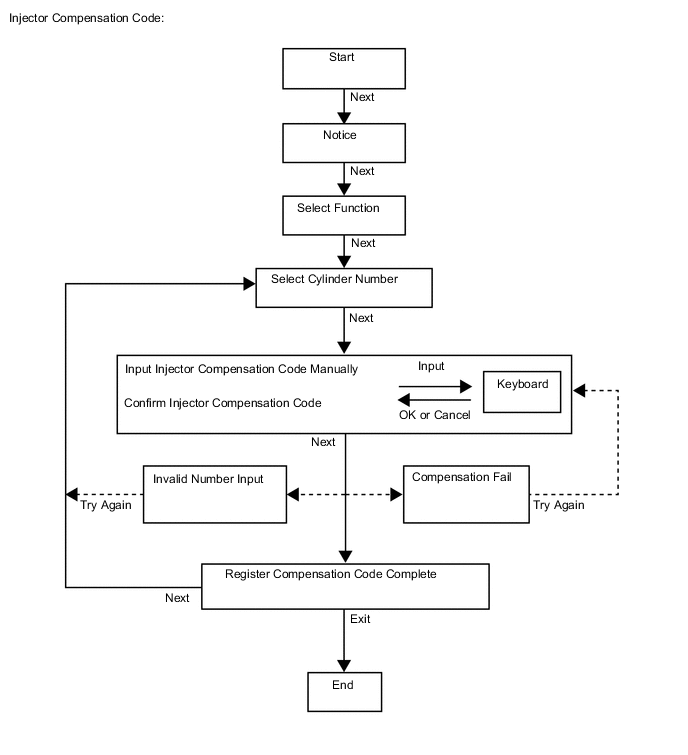
-
Connect the GTS to the DLC3.
-
Turn the ignition switch to ON and turn the GTS on.
Tech Tips
Confirm that the ignition switch is ON and the engine is stopped.
-
Enter the following menus: Powertrain / Engine and ECT / Utility / Injector Compensation.
-
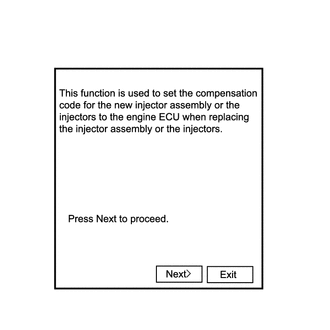
Press "Next".
-
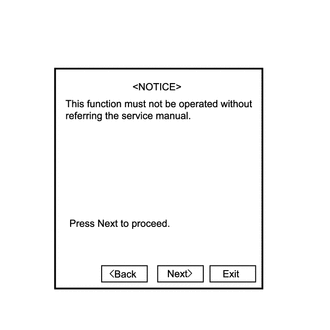
Press "Next".
-
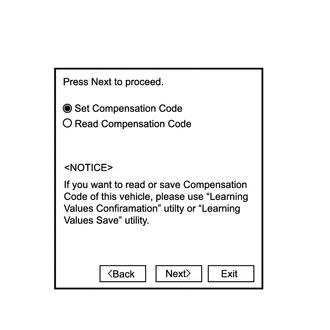
Press "Next".
-
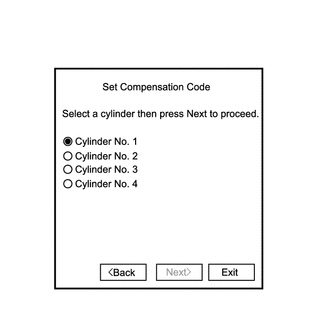
Select the number of the cylinder corresponding to the injector compensation code that you want to input, and press "Next".
-
Register the compensation code.
-
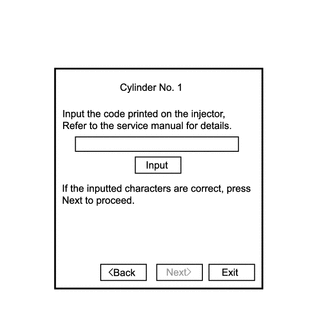
Press "Input".
-
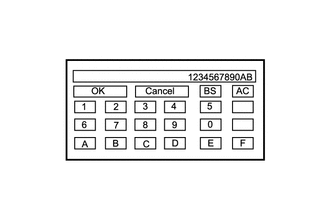
Manually input the cylinder compensation code using the keyboard on the GTS screen. The code is a 12-digit, alphanumeric value printed on the injector head.
Tech Tips
The compensation code for each selected cylinder must be input into the GTS correctly.
-
Confirm that the compensation code for the selected cylinder is correct, and then press OK.
-
-
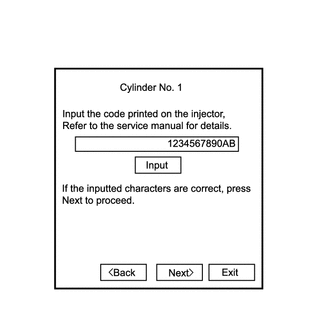
Check that the compensation code displayed on the screen is correct by comparing it with the 12-digit alphanumeric value on the head of the injector assembly.
Note
If an incorrect injector compensation code is input into the ECM, the engine may rattle or engine idling may become rough. In addition, engine failure may occur and the life of the engine may be shortened.
Tech Tips
-
If a wrong compensation code is input or read, return to the Input Value screen by pressing Input.
-
The saving process may fail due to a problem with the wire harness or a bad connection with the DLC3. Check the wire harness and DLC3 connection. If no problem is found with either, the ECM may be malfunctioning.
-
-
Press Next to register the compensation code in the ECM.
Tech Tips
-
If the registration process fails, the compensation code may be incorrect. Check the compensation code again.
-
If the input compensation code fails to register even though it is input correctly, there may be a problem with the wire harness or a bad connection with the DLC3. Check the wire harness and DLC3 connection. If no problem is found with either, the ECM may be malfunctioning. Check the ECM and restart this operation.
-
-

If you want to continue with other compensation code registrations, press "Next". To finish the registration, press "Exit".
-
Turn the ignition switch off and turn the GTS off.
-
Wait for at least 30 seconds.
-
Turn the ignition switch to ON and turn the GTS on.
-
Clear the DTC P0603 stored in the ECM using the GTS.
-
-
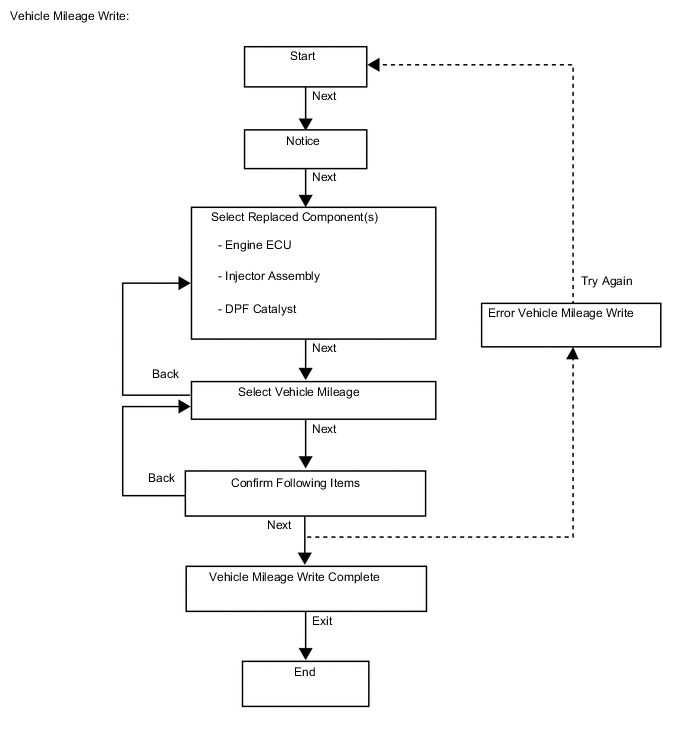
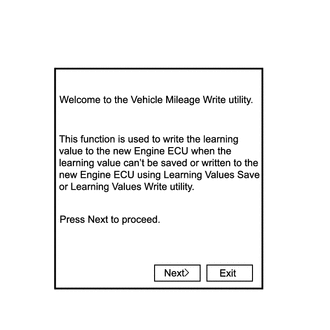
VEHICLE MILEAGE WRITE
Tech Tips
If Pilot Quantity Learning Values and DPF Deterioration Record cannot be saved or written using the GTS, the ECM estimates the Pilot Quantity Learning Values and DPF Deterioration Record based on the traveled distance using this function.
-
Connect the GTS to the DLC3.
-
Turn the ignition switch to ON.
-
Turn the GTS on.
-
Enter the following menus: Powertrain / Engine and ECT / Utility / Vehicle Mileage Write.
-
Press "Next".
-
Press "Next".
Tech Tips
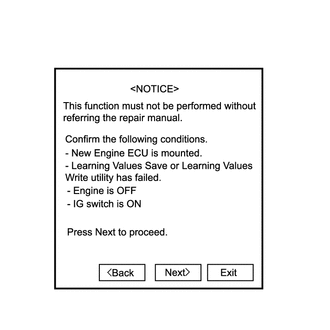
Confirm that the ignition switch is ON and the engine is stopped.
-
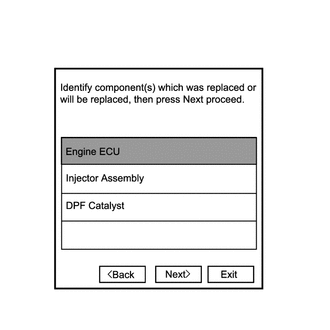
Select item(s) for the replaced parts and press "Next".
Tech Tips
Multiple items can be selected. However the "Engine ECU" is always in the selected state and cannot be unselected.
-
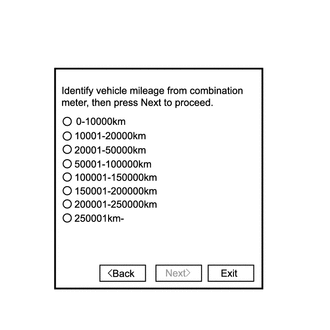
Check the actual vehicle mileage and select the adequate range, and press "Next".
-
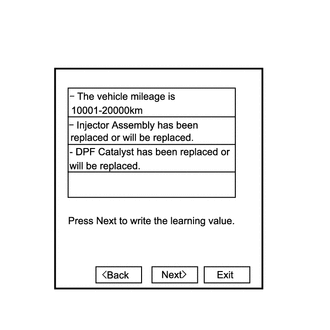
Confirm the display and press "Next".
-
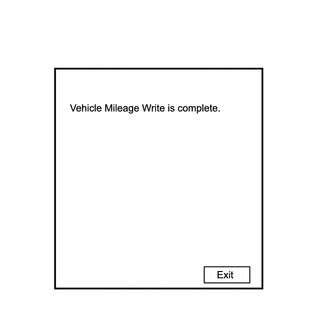
Press "Exit" to finish this operation.
-