CAUTION / NOTICE / HINT
-
Use the same procedure for the RH and LH side.
-
The following procedure is for the LH side.
PROCEDURE
- Click here
INSTALL NO. 5 ROCKER PANEL MOULDING PROTECTOR
Tip:When installing the No. 5 rocker panel moulding protector, heat the body rocker panel moulding assembly LH.
Standard Item Temperature Body Rocker Panel Moulding Assembly LH 20 to 30°C (68 to 86°F) CAUTION: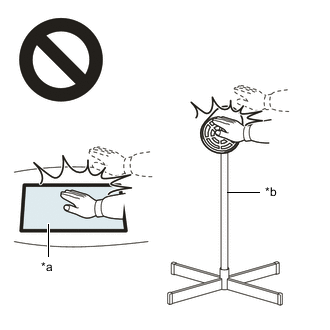
*a Heated Part *b Heat Light
-
Do not touch the heat light and heated parts.
-
Touching the heat light may result in burns.
-
Touching heated parts for a long time may result in burns.
-
Clean the body rocker panel moulding assembly LH surface.
-
Using a heat light, heat the body rocker panel moulding assembly LH surface.
-
Remove the double-sided tape from the body rocker panel moulding assembly LH.
-
Wipe off any tape adhesive residue with cleaner.
Note:
-
Installing the body rocker panel moulding assembly LH with some double-sided tape remaining may cause poor adhesion. Perform this procedure until sufficiently removed it.
-
Make sure to use a cloth when removing. Using a screwdriver, etc., may cause damage and poor adhesion.
-
-
-

Primer Apply primer to body rocker panel moulding assembly LH on the installation area of the No. 5 rocker panel moulding protector using a brush or felt.
Note:
-
Replace the brush or felt if it is dirty or has become hardened.
-
Keep any painted surface free from primer.
-
If the primer contacts a painted surface, it may leave light primer marks. Therefore, use protective tape when using liquid primer.
-
Do not touch surfaces to which primer has been applied until the No. 5 rocker panel moulding protector has been attached.
-
-
Let the primer dry sufficiently.
Note:Do not touch applied surfaces until the primer is dry.
Recommended drying time 10 minutes or more (at 23°C (73 °F)) -
Remove the peeling paper of the new No. 5 rocker panel moulding protector trying not to touch the adhesional surface.
-

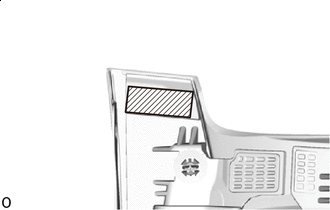
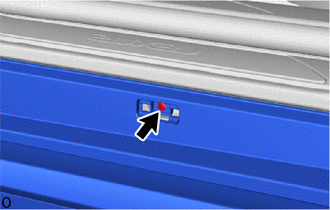
*a Mark-off Line Align the No. 5 rocker panel moulding protector with the mark-off line on the body rocker panel moulding assembly LH and install it as shown in the illustration.
Tip:Press the No. 5 rocker panel moulding protector firmly to install it.
-
- Click here
INSTALL NO. 4 ROCKER PANEL MOULDING PROTECTOR
Tip:When installing the No. 4 rocker panel moulding protector, heat the body rocker panel moulding assembly LH.
Standard Item Temperature Body Rocker Panel Moulding Assembly LH 20 to 30°C (68 to 86°F) CAUTION:
*a Heated Part *b Heat Light
-
Do not touch the heat light and heated parts.
-
Touching the heat light may result in burns.
-
Touching heated parts for a long time may result in burns.
-
Clean the body rocker panel moulding assembly LH surface.
-
Using a heat light, heat the body rocker panel moulding assembly LH surface.
-
Remove the double-sided tape from the body rocker panel moulding assembly LH.
-
Wipe off any tape adhesive residue with cleaner.
Note:
-
Installing the body rocker panel moulding assembly LH with some double-sided tape remaining may cause poor adhesion. Perform this procedure until sufficiently removed it.
-
Make sure to use a cloth when removing. Using a screwdriver, etc., may cause damage and poor adhesion.
-
-
-
Primer Apply primer to body rocker panel moulding assembly LH on the installation area of the No. 4 rocker panel moulding protector using a brush or felt.
Note:
-
Replace the brush or felt if it is dirty or has become hardened.
-
Keep any painted surface free from primer.
-
If the primer contacts a painted surface, it may leave light primer marks. Therefore, use protective tape when using liquid primer.
-
Do not touch surfaces to which primer has been applied until the No. 4 rocker panel moulding protector has been attached.
-
-
Let the primer dry sufficiently.
Note:Do not touch applied surfaces until the primer is dry.
Recommended drying time 10 minutes or more (at 23°C (73 °F)) -
Remove the peeling paper of the new No. 4 rocker panel moulding protector trying not to touch the adhesional surface.
-
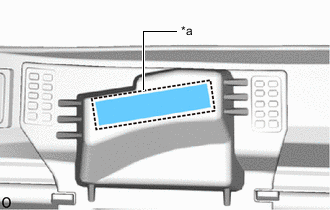
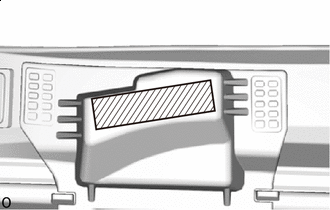
*a Mark-off Line Align the No. 4 rocker panel moulding protector with the mark-off line on the body rocker panel moulding assembly LH and install it as shown in the illustration.
Tip:Press the No. 4 rocker panel moulding protector firmly to install it.
-
- Click here
INSTALL BODY ROCKER PANEL MOULDING ASSEMBLY LH
Tip:When installing the body rocker panel moulding assembly LH, heat the vehicle body and body rocker panel moulding assembly LH using a heat light.
Standard Item Temperature Vehicle Body 40 to 60°C (104 to 140°F) Body Rocker Panel Moulding Assembly LH 20 to 30°C (68 to 86°F) CAUTION:
*a Heated Part *b Heat Light
-
Do not touch the heat light and heated parts.
-
Touching the heat light may result in burns.
-
Touching heated parts for a long time may result in burns.
-
Clean the body rocker panel moulding assembly LH surface.
-
Using a heat light, heat the body rocker panel moulding assembly LH surface.
-
Remove the double-sided tape from the body rocker panel moulding assembly LH.
-
Wipe off any tape adhesive residue with cleaner.
-
-
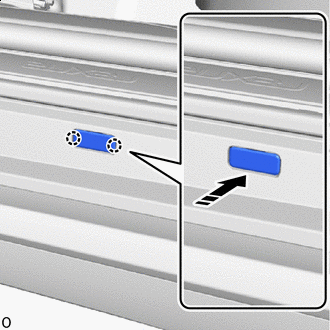
Remove the peeling paper of the double-sided tapes trying not to touch the adhesional surface.
-
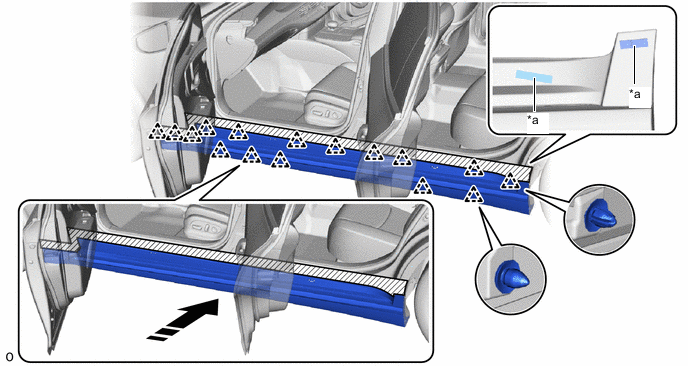
*a Double-sided Tape - - 
Install in this Direction - - Attach the clip to install the body rocker panel moulding assembly LH as shown in the illustration.
Tip:Press the body rocker panel moulding assembly LH firmly to install it.
-
Remove the protective tape.
-
Install the screw.
Tip:Use the same procedure for the other side.
-
Install the 2 screws.
-
Install the 3 screws.
-
Install the 8 clips labeled A.
-
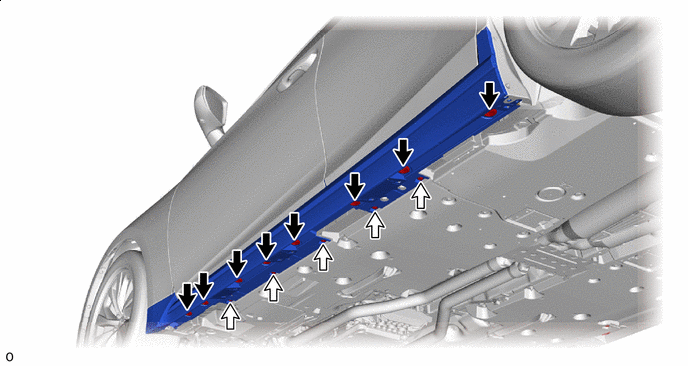

Clip A 
Clip B Install the 5 clips labeled B.
-
- Click here
INSTALL REAR ROCKER PANEL MOULDING END COVER LH
-
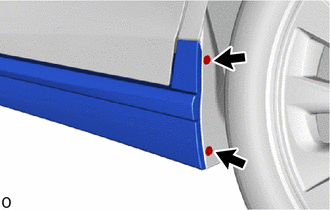
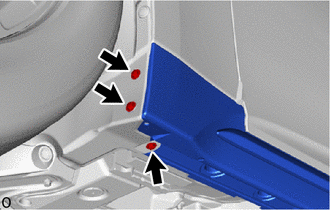
Install in this Direction Attach the claw to install the rear rocker panel moulding end cover LH as shown in the illustration.
Tip:Use the same procedure for the other side.
-
- Click here
INSTALL ROCKER PANEL MOULDING PROTECTOR LH