PROCEDURE
- Click here
REMOVE SYMBOL EMBLEM
Tip:When removing the symbol emblem, heat the luggage compartment door panel and symbol emblem using a heat light.
Standard Item Temperature Luggage Compartment Door Panel 40 to 60°C (104 to 140°F) Symbol Emblem 20 to 30°C (68 to 86°F) CAUTION: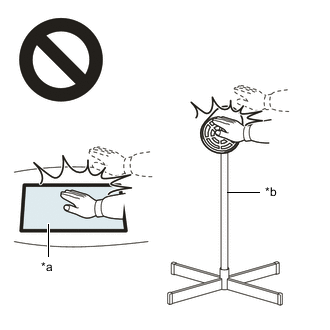
*a Heated Part *b Heat Light
-
Do not touch the heat light and heated parts.
-
Touching the heat light may result in burns.
-
Touching heated parts for a long time may result in burns.
-
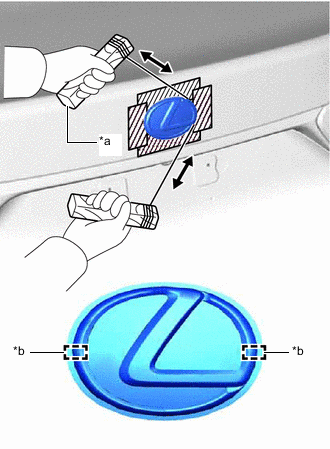
*a Wooden Block *b Boss Position 
Protective Tape Put protective tape around the symbol emblem.
-
Insert piano wire between the luggage compartment door panel and symbol emblem.
Tip:Be careful of the boss positions.
-
Tie objects that can serve as handles (for example, wooden blocks) to the piano wire ends.
-
Pull the piano wire and scrape off the double-sided tape that holds the symbol emblem to the luggage compartment door panel.
Note:Be careful not to damage the luggage compartment door panel.
-
Remove the symbol emblem.
-
- Click here
REMOVE NO. 1 LUGGAGE COMPARTMENT DOOR NAME PLATE
Tip:When removing the No. 1 luggage compartment door name plate, heat the luggage compartment door panel and No. 1 luggage compartment door name plate using a heat light.
Standard Item Temperature Luggage Compartment Door Panel 40 to 60°C (104 to 140°F) No. 1 Luggage Compartment Door Name Plate 20 to 30°C (68 to 86°F) CAUTION:
*a Heated Part *b Heat Light
-
Do not touch the heat light and heated parts.
-
Touching the heat light may result in burns.
-
Touching heated parts for a long time may result in burns.
-
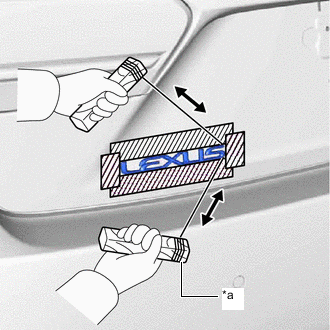
*a Wooden Block Protective Tape Put protective tape around the No. 1 luggage compartment door name plate.
-
Insert piano wire between the luggage compartment door panel and No. 1 luggage compartment door name plate.
-
Tie objects that can serve as handles (for example, wooden blocks) to the piano wire ends.
-
Pull the piano wire and scrape off the double-sided tape that holds the No. 1 luggage compartment door name plate to the luggage compartment door panel.
Note:Be careful not to damage the luggage compartment door panel.
-
Remove the No. 1 luggage compartment door name plate.
-
- Click here
REMOVE NO. 3 LUGGAGE COMPARTMENT DOOR PLATE
Tip:When removing the No. 3 luggage compartment door plate, heat the luggage compartment door panel and No. 3 luggage compartment door plate using a heat light.
Standard Item Temperature Luggage Compartment Door Panel 40 to 60°C (104 to 140°F) No. 3 Luggage Compartment Door Plate 20 to 30°C (68 to 86°F) CAUTION:
*a Heated Part *b Heat Light
-
Do not touch the heat light and heated parts.
-
Touching the heat light may result in burns.
-
Touching heated parts for a long time may result in burns.
-
for 2WD:
-
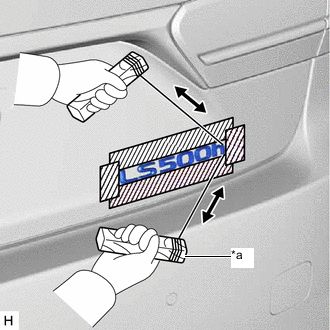
*a Wooden Block Protective Tape Put protective tape around the No. 3 luggage compartment door plate.
-
Insert piano wire between the luggage compartment door panel and No. 3 luggage compartment door plate.
-
Tie objects that can serve as handles (for example, wooden blocks) to the piano wire ends.
-
Pull the piano wire and scrape off the double-sided tape that holds the No. 3 luggage compartment door plate to the luggage compartment door panel.
Note:Be careful not to damage the luggage compartment door panel.
-
Remove the No. 3 luggage compartment door plate.
-
-
for AWD:
-
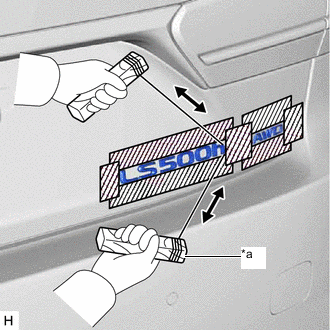
*a Wooden Block Protective Tape Put protective tape around the No. 3 luggage compartment door plate.
-
Insert piano wire between the luggage compartment door panel and No. 3 luggage compartment door plate.
-
Tie objects that can serve as handles (for example, wooden blocks) to the piano wire ends.
-
Pull the piano wire and scrape off the double-sided tape that holds the No. 3 luggage compartment door plate to the luggage compartment door panel.
Note:Be careful not to damage the luggage compartment door panel.
-
Remove the No. 3 luggage compartment door plate.
-
-
- Click here
REMOVE FRONT FENDER NO. 2 NAME PLATE (for Sport Package)
Tip:When removing the front fender No. 2 name plate, heat the front fender panel and front fender No. 2 name plate using a heat light.
Standard Item Temperature Front Fender Panel 40 to 60°C (104 to 140°F) Front Fender No. 2 Name Plate 20 to 30°C (68 to 86°F) CAUTION:
*a Heated Part *b Heat Light
-
Do not touch the heat light and heated parts.
-
Touching the heat light may result in burns.
-
Touching heated parts for a long time may result in burns.
-
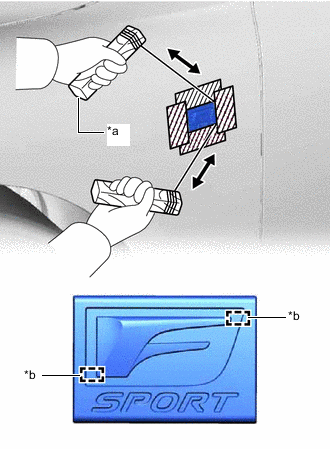
*a Wooden Block *b Boss Position Protective Tape Put protective tape around the front fender No. 2 name plate.
-
Insert piano wire between the front fender panel and front fender No. 2 name plate.
Tip:Be careful of the boss positions.
-
Tie objects that can serve as handles (for example, wooden blocks) to the piano wire ends.
-
Pull the piano wire and scrape off the double-sided tape that holds the front fender No. 2 name plate to the front fender panel.
Note:Be careful not to damage the front fender panel.
-
Remove the front fender No. 2 name plate.
-
- Click here
REMOVE FRONT FENDER NO. 1 NAME PLATE (for Sport Package)
Tip:When removing the front fender No. 1 name plate, heat the front fender panel and front fender No. 1 name plate using a heat light.
Standard Item Temperature Front Fender Panel 40 to 60°C (104 to 140°F) Front Fender No. 1 Name Plate 20 to 30°C (68 to 86°F) CAUTION:
*a Heated Part *b Heat Light
-
Do not touch the heat light and heated parts.
-
Touching the heat light may result in burns.
-
Touching heated parts for a long time may result in burns.
-
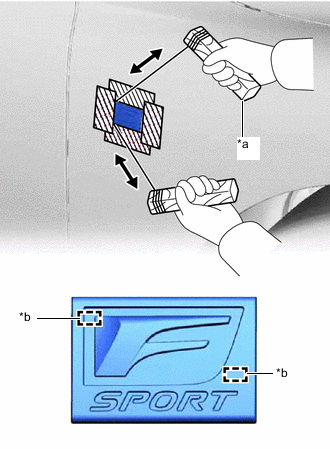
*a Wooden Block *b Boss Position Protective Tape Put protective tape around the front fender No. 1 name plate.
-
Insert piano wire between the front fender panel and front fender No. 1 name plate.
Tip:Be careful of the boss positions.
-
Tie objects that can serve as handles (for example, wooden blocks) to the piano wire ends.
-
Pull the piano wire and scrape off the double-sided tape that holds the front fender No. 1 name plate to the front fender panel.
Note:Be careful not to damage the front fender panel.
-
Remove the front fender No. 1 name plate.
-
- Click here
REMOVE BODY SIDE NAME PLATE (for LH Side)
Tip:When removing the body side name plate, heat the rear door panel and body side name plate using a heat light.
Standard Item Temperature Rear Door Panel 40 to 60°C (104 to 140°F) Body Side Name Plate 20 to 30°C (68 to 86°F) CAUTION:
*a Heated Part *b Heat Light
-
Do not touch the heat light and heated parts.
-
Touching the heat light may result in burns.
-
Touching heated parts for a long time may result in burns.
-
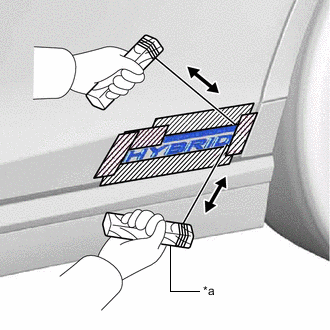
*a Wooden Block Protective Tape Put protective tape around the body side name plate.
-
Insert piano wire between the rear door panel and body side name plate.
-
Tie objects that can serve as handles (for example, wooden blocks) to the piano wire ends.
-
Pull the piano wire and scrape off the double-sided tape that holds the body side name plate to the rear door panel.
Note:Be careful not to damage the rear door panel.
-
Remove the body side name plate.
-
- Click here
REMOVE BODY SIDE NAME PLATE (for RH Side)
Tip:When removing the body side name plate, heat the rear door panel and body side name plate using a heat light.
Standard Item Temperature Rear Door Panel 40 to 60°C (104 to 140°F) Body Side Name Plate 20 to 30°C (68 to 86°F) CAUTION:
*a Heated Part *b Heat Light
-
Do not touch the heat light and heated parts.
-
Touching the heat light may result in burns.
-
Touching heated parts for a long time may result in burns.
-
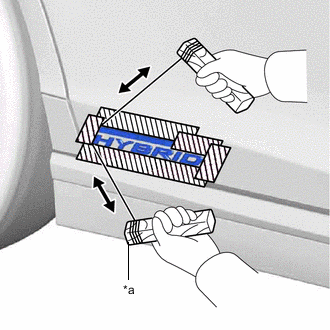
*a Wooden Block Protective Tape Put protective tape around the body side name plate.
-
Insert piano wire between the rear door panel and body side name plate.
-
Tie objects that can serve as handles (for example, wooden blocks) to the piano wire ends.
-
Pull the piano wire and scrape off the double-sided tape that holds the body side name plate to the rear door panel.
Note:Be careful not to damage the rear door panel.
-
Remove the body side name plate.
-