PROCEDURE
- Click here
INSTALL NO. 2 RADIATOR GRILLE SEAL
Tip:When installing the No. 2 radiator grille seal, heat the radiator grille shutter sub-assembly.
Standard Item Temperature Radiator Grille Shutter Sub-assembly 20 to 30°C (68 to 86°F) CAUTION: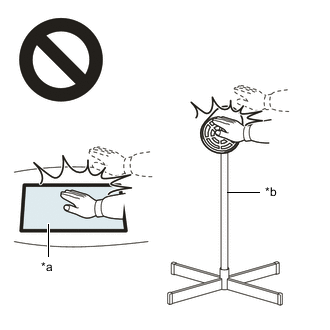
*a Heated Part *b Heat Light
-
Do not touch the heat light and heated parts.
-
Touching the heat light may result in burns.
-
Touching heated parts for a long time may result in burns.
-
Clean the radiator grille shutter sub-assembly surface.
-
Remove the double-sided tape from the radiator grille shutter sub-assembly.
-
Wipe off any tape adhesive residue with cleaner.
Note:
-
Installing the radiator grille shutter sub-assembly with some double-sided tape remaining may cause poor adhesion. Perform this procedure until sufficiently removed it.
-
Make sure to use a cloth when removing. Using a screwdriver, etc., may cause damage and poor adhesion.
-
-
-
Remove the peeling paper on a new No. 2 radiator grille seal while making sure not to touch the adhesional surface.
-
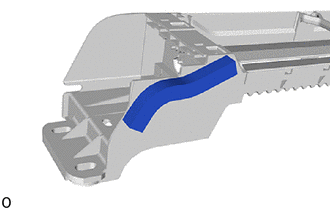
Install the No. 2 radiator grille seal in the position shown in the illustration.
Note:Press the No. 2 radiator grille seal firmly to install it.
-
- Click here
INSTALL NO. 1 RADIATOR GRILLE SEAL
Tip:
-
When installing the No. 1 radiator grille seal, heat the radiator grille shutter sub-assembly.
-
Use the same procedure for all No. 1 radiator grille seals.
Standard Item Temperature Radiator Grille Shutter Sub-assembly 20 to 30°C (68 to 86°F) CAUTION:
*a Heated Part *b Heat Light
-
Do not touch the heat light and heated parts.
-
Touching the heat light may result in burns.
-
Touching heated parts for a long time may result in burns.
-
Clean the radiator grille shutter sub-assembly surface.
-
Remove the double-sided tape from the radiator grille shutter sub-assembly.
-
Wipe off any tape adhesive residue with cleaner.
Note:
-
Installing the radiator grille shutter sub-assembly with some double-sided tape remaining may cause poor adhesion. Perform this procedure until sufficiently removed it.
-
Make sure to use a cloth when removing. Using a screwdriver, etc., may cause damage and poor adhesion.
-
-
-
Remove the peeling paper on a new No. 1 radiator grille seal while making sure not to touch the adhesional surface.
-
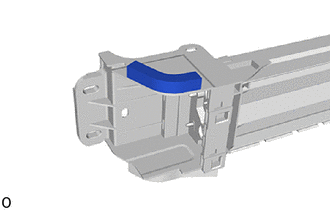
Install the No. 1 radiator grille seal in the position shown in the illustration.
Note:Press the No. 1 radiator grille seal firmly to install it.
-
- Click here
INSTALL SWING GRILLE ACTUATOR ASSEMBLY
-
When installing a new swing grille actuator assembly:
-
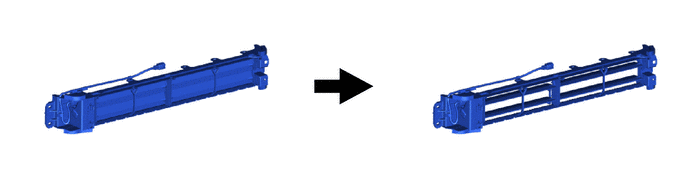
Open the grille shutter fin as shown in the illustration.
-
-
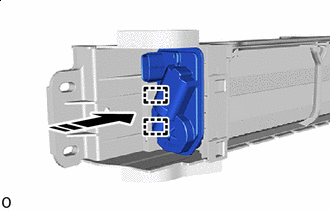

Install in this Direction Attach the guide to install the swing grille actuator assembly as shown in the illustration.
-
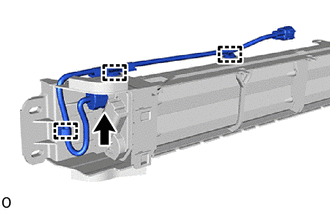
Attach the clamp to install the wire harness.
-
Connect the connector.
-
- Click here
INSTALL MOTOR COVER
-
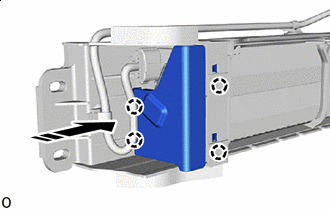
Install in this Direction Attach the claw to install the motor cover as shown in the illustration.
-
- Click here
INSTALL NO. 2 WIRING AIR INDICATOR HARNESS SUB-ASSEMBLY
- Click here
INSTALL THERMISTOR ASSEMBLY