| DTC Code | DTC Name |
|---|---|
| High Beam Headlight Circuit |
CAUTION / NOTICE / HINT
If the headlight ECU sub-assembly LH has been replaced, it is necessary to synchronize the vehicle information and initialize the headlight ECU sub-assembly LH.
PROCEDURE
- Click here
CHECK LIGHTS
-
Check the illumination of each high beam lights.
Result Result Proceed to LH side high beam light does not illuminate. A RH side high beam light does not illuminate. B
-
- Click here
PERFORM ACTIVE TEST USING GTS
-
Using the GTS, perform the Active Test.
- Body Electrical > AFS > Active Test
Tester Display Measurement Item Control Range Diagnostic Note Headlight High Beam High beam headlights OFF or ON - -
-
- Body Electrical > AFS > Active Test
Tester Display Headlight High Beam -
-
-
-
OK High beam headlights turns on. Result Proceed to OK NG - Body Electrical > AFS > Active Test
- OK
PROCEED TO NEXT SUSPECTED AREA SHOWN IN PROBLEM SYMPTOMS TABLEClick here
- NGClick here
-
- Click here
CHECK HEADLIGHT UNIT ASSEMBLY LH
-
Interchange the headlight unit assembly LH with RH and connect the connectors to them.
-
Check that the high beam light LH operate normally.
Result Result Proceed to LH side high beam light does not illuminate. A RH side high beam light does not illuminate. B
- A
REPLACE HEADLIGHT ECU SUB-ASSEMBLY LHClick here
- BClick here
-
- Click here
CHECK HEADLIGHT ECU SUB-ASSEMBLY LH
-
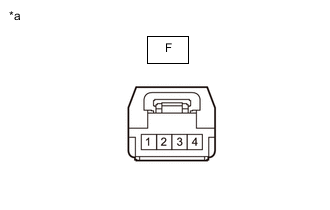
*a Component without harness connected
(Headlight Unit LH)
Remove the headlight unit LH.
-
Reconnect the except headlight unit LH connectors.
-
Measure the voltage according to the value(s) in the table below.
Standard Voltage Tester Connection Wiring Color Switch Condition Specified Condition F-3 - F-4 BR - B-W High beam headlights illuminated 11 to 14 V Result Proceed to OK NG
- OK
REPLACE HEADLIGHT UNIT LHClick here
- NG
REPLACE HEADLIGHT HOUSING SUB-ASSEMBLY LH (WIRE HARNESS AND HEADLIGHT UNIT INTERIOR CIRCUIT BOARD)Click here
-
- Click here
PERFORM ACTIVE TEST USING GTS
-
Using the GTS, perform the Active Test.
- Body Electrical > AFS (Sub) > Active Test
Tester Display Measurement Item Control Range Diagnostic Note Headlight High Beam High beam headlights OFF or ON - -
-
- Body Electrical > AFS (Sub) > Active Test
Tester Display Headlight High Beam -
-
-
-
OK High beam headlights turns on. Result Proceed to OK NG - Body Electrical > AFS (Sub) > Active Test
- OK
PROCEED TO NEXT SUSPECTED AREA SHOWN IN PROBLEM SYMPTOMS TABLEClick here
- NGClick here
-
- Click here
CHECK HEADLIGHT UNIT ASSEMBLY RH
-
Interchange the headlight unit assembly RH with LH and connect the connectors to them.
-
Check that the high beam light RH operate normally.
Result Result Proceed to RH side high beam light does not illuminate. A LH side high beam light does not illuminate. B
- A
REPLACE HEADLIGHT ECU SUB-ASSEMBLY RHClick here
- BClick here
-
- Click here
CHECK HEADLIGHT ECU SUB-ASSEMBLY RH
-
*a Component without harness connected
(Headlight Unit RH)
Remove the headlight unit RH.
-
Reconnect the except headlight unit RH connectors.
-
Measure the voltage according to the value(s) in the table below.
Standard Voltage Tester Connection Wiring Color Switch Condition Specified Condition F-3 - F-4 BR - B-W High beam headlights illuminated 11 to 14 V Result Proceed to OK NG
- OK
REPLACE HEADLIGHT UNIT RHClick here
- NG
REPLACE HEADLIGHT HOUSING SUB-ASSEMBLY RH (WIRE HARNESS AND HEADLIGHT UNIT INTERIOR CIRCUIT BOARD)Click here
-