FRONT WIPER MOTOR INSTALLATION
CAUTION / NOTICE / HINT
Tech Tips
-
Use the same procedure for RHD and LHD vehicles.
-
The procedure listed below is for LHD vehicles.
PROCEDURE
-
INSTALL WINDSHIELD WIPER MOTOR ASSEMBLY
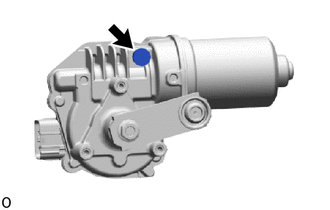
Note
Do not touch the filter of waterproof cap.
-
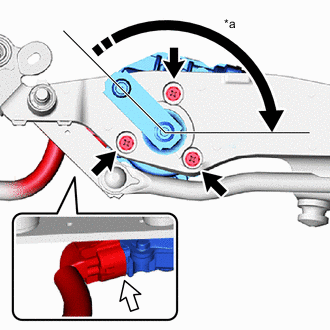
*a 135° 
Rotate in this Direction 
Bolt 
Connector for LHD:
-
Install the windshield wiper motor assembly to the wiper link assembly with the 3 bolts.
- Torque:
- 5.4 N*m { 55 kgf*cm, 48 in.*lbf }
-
Rotate the wiper crank arm of the windshield wiper motor assembly 135° in the clockwise direction (automatic stop position).
-
Connect the connector.
-
-
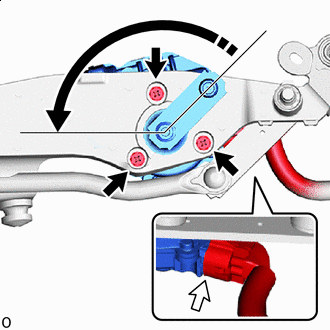
*a 135° Rotate in this Direction Bolt Connector for RHD:
-
Install the windshield wiper motor assembly to the wiper link assembly with the 3 bolts.
- Torque:
- 5.4 N*m { 55 kgf*cm, 48 in.*lbf }
-
Rotate the wiper crank arm of the windshield wiper motor assembly 135° in the counterclockwise direction (automatic stop position).
-
Connect the connector.
-
-


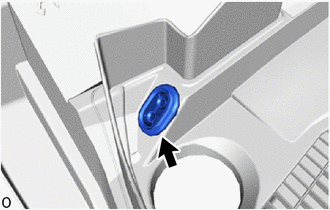
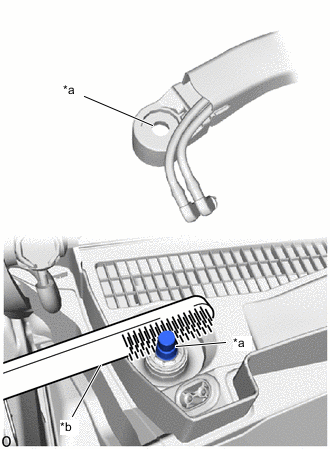
Apply MP Grease Apply MP grease to the wiper motor pivot.
-
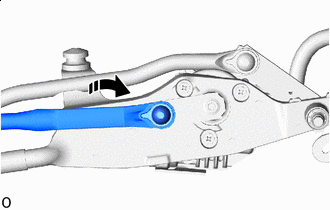
Install in this Direction Connect the No. 1 wiper link rod to the wiper motor pivot.
-
-
INSTALL FRONT WIPER MOTOR AND LINK
-

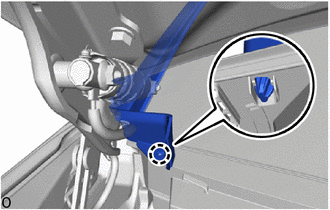
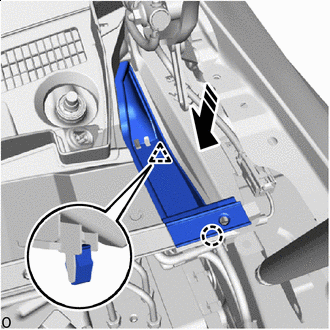
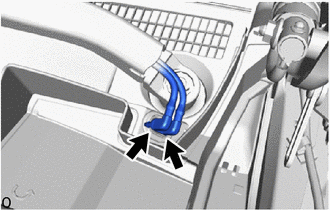
*1 Grommet Attach the grommet and temporarily install the front wiper motor and link as shown in the illustration.
Note
Do not damage the vehicle with the front wiper motor and link.
-
Connect the wire harness clamp and connector.
-
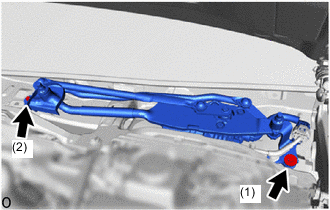
Install the front wiper motor and link with the 2 bolts in the order shown in the illustration.
- Torque:
- 5.5 N*m { 56 kgf*cm, 49 in.*lbf }
-
-
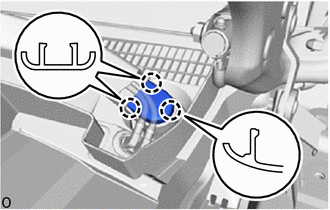
INSTALL WIPER MOTOR COVER
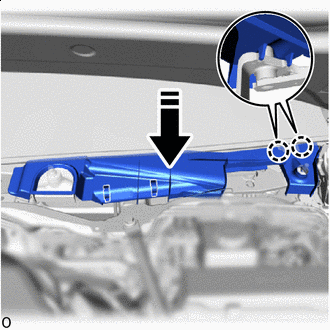
Install in this Direction
-
Attach the claw and clamp and install the wiper motor cover as shown in the illustration.
-
-
INSTALL NO. 1 WASHER GROMMET SUB-ASSEMBLY
-
Install the No. 1 washer grommet sub-assembly to the cowl top ventilator louver sub-assembly.
-
-
INSTALL NO. 2 WASHER GROMMET SUB-ASSEMBLY
Tech Tips
Use the same procedure for the No. 1 washer grommet sub-assembly.
-
INSTALL WINDSHIELD WASHER HOSE ASSEMBLY (for LHD)
-
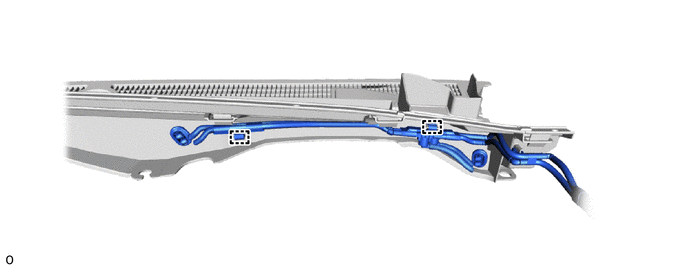
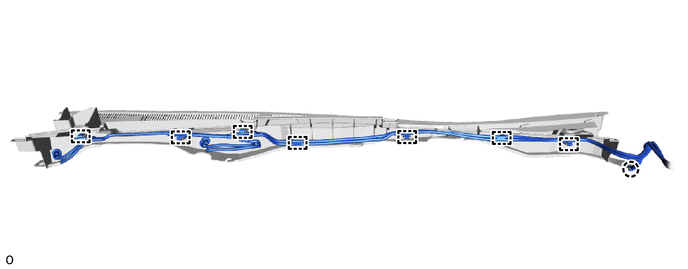
Attach the clamp to install the windshield washer hose assembly.
-
RH Side:
-
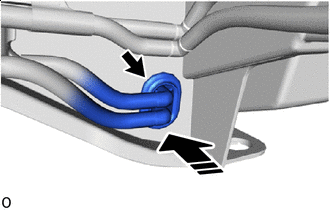
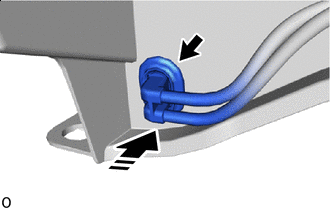
Install in this Direction Pass the windshield washer hose assembly through the cowl top ventilator louver sub-assembly and connect the grommet.
-
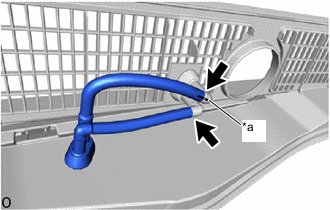
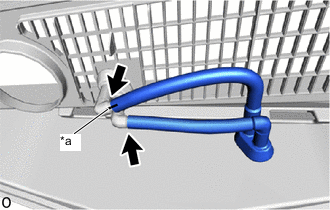
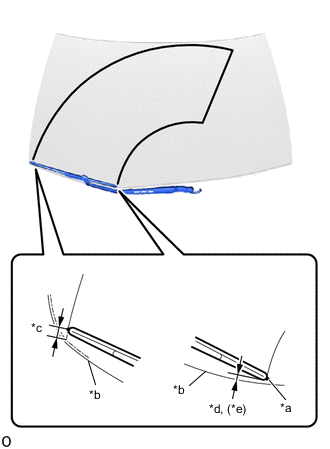
*a Matchmark When reusing windshield washer hose assembly:
Align the matchmarks that were applied during removal and connect the 2 windshield washer hose assemblies to the No. 2 washer grommet sub-assembly.
-
When a new windshield washer hose assembly:
Connect the 2 windshield washer hose assemblies to the No. 2 washer grommet sub-assembly as shown in the illustration.
-
-
LH Side:
-
Install in this Direction Pass the windshield washer hose assembly through the cowl top ventilator louver sub-assembly and connect the grommet.
-

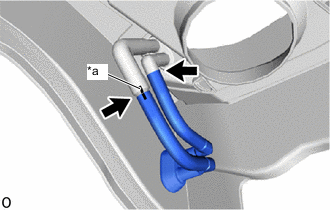
*a Matchmark When reusing windshield washer hose assembly:
Align the matchmarks that were applied during removal and connect the 2 windshield washer hose assemblies to the No. 1 washer grommet sub-assembly.
-
When a new windshield washer hose assembly:
Connect the 2 windshield washer hose assemblies to the No. 1 washer grommet sub-assembly as shown in the illustration.
-
-
-
INSTALL WINDSHIELD WASHER HOSE ASSEMBLY (for RHD)
-
Attach the clamp and claw to install the windshield washer hose assembly.
-
LH Side:
-

Install in this Direction Pass the windshield washer hose assembly through the cowl top ventilator louver sub-assembly and connect the grommet.
-
*a Matchmark When reusing windshield washer hose assembly:
Align the matchmarks that were applied during removal and connect the 2 windshield washer hose assemblies to the No. 2 washer grommet sub-assembly.
-
When a new windshield washer hose assembly:
Connect the 2 windshield washer hose assemblies to the No. 2 washer grommet sub-assembly as shown in the illustration.
-
-
RH Side:
-
Install in this Direction Pass the windshield washer hose assembly through the cowl top ventilator louver sub-assembly and connect the grommet.
-
*a Matchmark When reusing windshield washer hose assembly:
Align the matchmarks that were applied during removal and connect the 2 windshield washer hose assemblies to the No. 1 washer grommet sub-assembly.
-
When a new windshield washer hose assembly:
Connect the 2 windshield washer hose assemblies to the No. 1 washer grommet sub-assembly as shown in the illustration.
-
-
-
INSTALL COWL TOP VENTILATOR LOUVER SUB-ASSEMBLY
-
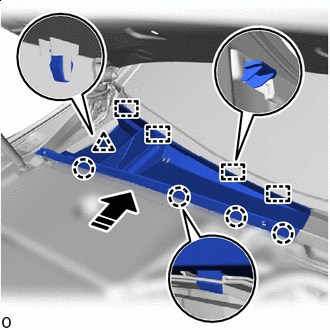
Rotate the front of the cowl top ventilator louver sub-assembly and temporarily install the cowl top ventilator louver sub-assembly as shown in the illustration.
-
Align the positioning guide of the cowl top ventilator louver sub-assembly to the front window inner center moulding cutout
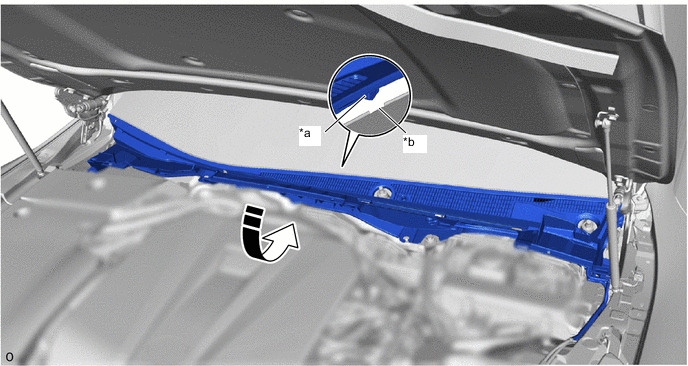
*a Guide *b Notch Install in this Direction - - -
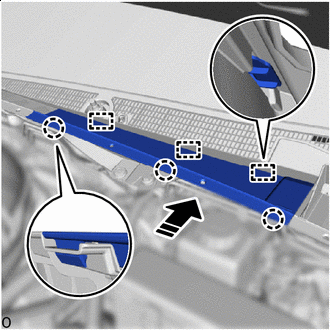
Hold the rear of the cowl top ventilator louver sub-assembly down and attach the cowl top ventilator louver sub-assembly to the front window inner center moulding.

Install in this Direction - - Tech Tips
-
Check that the cowl top ventilator louver sub-assembly does not lift up.
-
Check that the positioning guide is not pinched by the front window inner center moulding.
-
-
Install the 4 clips.
-
Attach the claw and install the lower windshield outside moulding RH.
Tech Tips
Use the same procedure for the RH and LH sides.
-
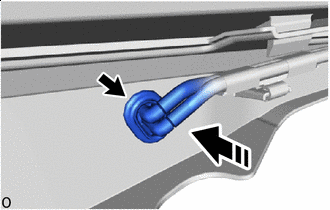
Connect the clamp.
-
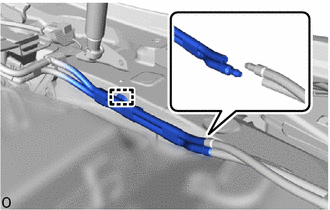
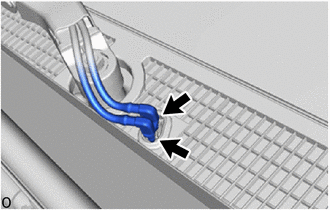
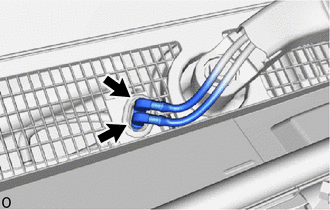
Connect the 2 windshield washer hose assemblies as shown in the illustration.
-
-
INSTALL CENTER COWL TOP VENTILATOR LOUVER
-
Install in this Direction Insert the guide in the direction of the arrow shown in the illustration and attach the claw and clip to install the center cowl top ventilator louver.
-
-
INSTALL CENTER NO. 2 COWL TOP VENTILATOR LOUVER
-
Install in this Direction Insert the guide in the direction of the arrow shown in the illustration and attach the claw to install the No. 2 center cowl top ventilator louver.
-
-
INSTALL COWL TOP VENTILATOR LOUVER REINFORCEMENT
-
Install in this Direction Attach the claw and clip and install the cowl top ventilator louver reinforcement as shown in the illustration.
-
-
INSTALL HOOD TO COWL TOP SEAL
-
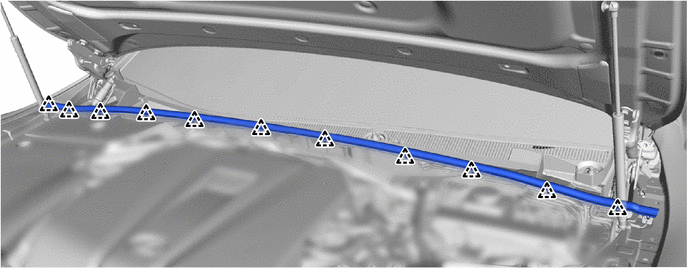
Attach the clip and install the hood to cowl top seal.
-
-
INSTALL FRONT FENDER REINFORCEMENT SUB-ASSEMBLY TOP LH
-
INSTALL FRONT WIPER ARM AND BLADE ASSEMBLY RH (for LHD)
-
When reinstalling:
-

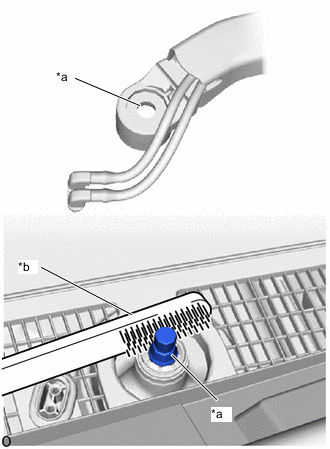
*a Serrations *b Wire Brush Clean the wiper arm serrations.
Note
Do not grind the wiper arm serrations.
-
-
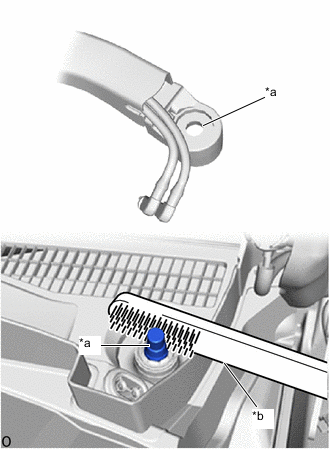
Using a wire brush, clean the serrations of the windshield wiper motor assembly.
-
Turn the power switch on (IG).
-
Operate the windshield wiper motor assembly to stop it at the automatic stop position.
-
Turn the power switch off.
-
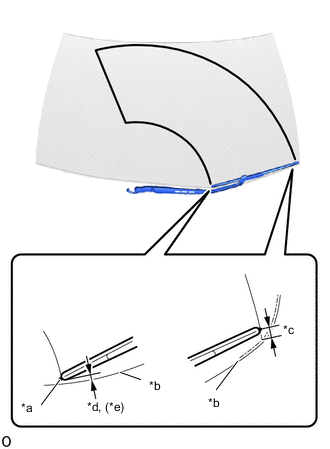
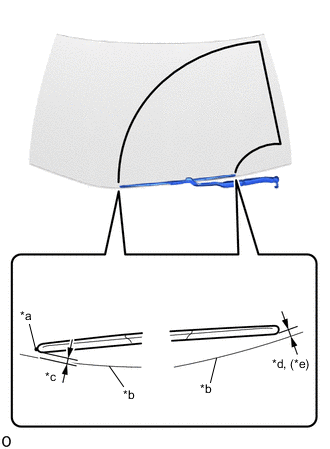
*a Ceramic Dot *b Windshield Glass Edge *c 3.6 to 18.6 mm (0.142 to 0.732 in.) *d 11.5 mm (0.453 in.) *e Reference value Install the front wiper arm and blade assembly RH with the nut to the position shown in the illustration.
- Torque:
- 22 N*m { 224 kgf*cm, 16 ft.*lbf }
Tech Tips
Hold the arm hinge by hand when tightening the nut.
-
Connect the 2 windshield washer hose assemblies.
-
-
INSTALL FRONT WIPER ARM AND BLADE ASSEMBLY LH (for RHD)
-
When reinstalling:
-
*a Serrations *b Wire Brush Clean the wiper arm serrations.
Note
Do not grind the wiper arm serrations.
-
-
Using a wire brush, clean the serrations of the windshield wiper motor assembly.
-
Turn the power switch on (IG).
Operate the windshield wiper motor assembly to stop it at the automatic stop position.
-
Turn the power switch off.
-
*a Ceramic Dot *b Windshield Glass Edge *c 3.6 to 18.6 mm (0.142 to 0.732 in.) *d 11.5 mm (0.453 in.) *e Reference value Install the front wiper arm and blade assembly LH with the nut to the position shown in the illustration.
- Torque:
- 22 N*m { 224 kgf*cm, 16 ft.*lbf }
Tech Tips
Hold the arm hinge by hand when tightening the nut.
-
Connect the 2 windshield washer hose assemblies.
-
-
INSTALL FRONT WIPER ARM AND BLADE ASSEMBLY LH (for LHD)
-
When reinstalling:
-
*a Serrations *b Wire Brush Clean the wiper arm serrations.
Note
Do not grind the wiper arm serrations.
-
-
Using a wire brush, clean the serrations of the windshield wiper motor assembly.
-
Turn the power switch on (IG).
Operate the windshield wiper motor assembly to stop it at the automatic stop position.
-
Turn the power switch off.
-
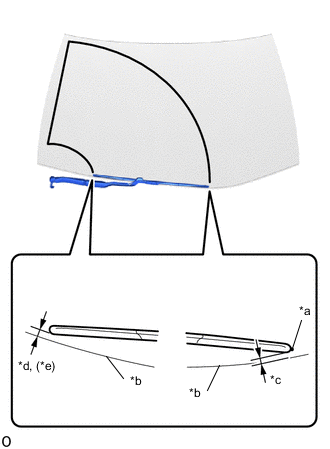
*a Ceramic Dot *b Windshield Glass Edge *c 3.4 to 18.4 mm (0.134 to 0.724 in.) *d 12.7 mm (0.500 in.) *e Reference value Install the front wiper arm and blade assembly LH with the nut to the position shown in the illustration.
- Torque:
- 22 N*m { 224 kgf*cm, 16 ft.*lbf }
Tech Tips
Hold the arm hinge by hand when tightening the nut.
-
Connect the 2 windshield washer hose assemblies.
-
-
INSTALL FRONT WIPER ARM AND BLADE ASSEMBLY RH (for RHD)
-
When reinstalling:
-
*a Serrations *b Wire Brush Clean the wiper arm serrations.
Note
Do not grind the wiper arm serrations.
-
-
Using a wire brush, clean the serrations of the windshield wiper motor assembly.
-
Turn the power switch on (IG).
-
Operate the windshield wiper motor assembly to stop it at the automatic stop position.
-
Turn the power switch off.
-
*a Ceramic Dot *b Windshield Glass Edge *c 3.4 to 18.4 mm (0.134 to 0.724 in.) *d 12.7 mm (0.500 in.) *e Reference value Install the front wiper arm and blade assembly RH with the nut to the position shown in the illustration.
- Torque:
- 22 N*m { 224 kgf*cm, 16 ft.*lbf }
Tech Tips
Hold the arm hinge by hand when tightening the nut.
-
Connect the 2 windshield washer hose assemblies.
-
-
INSTALL FRONT WIPER ARM HEAD CAP
-
Attach the claw and install the front wiper arm head cap.
Tech Tips
Use the same procedure for the RH and LH sides.
-
-
INSTALL INVERTER COVER ASSEMBLY LH (for RHD)
-
INSTALL UPPER RADIATOR SUPPORT SEAL
-
INSPECT WASHER NOZZLE
-
Check the position that the washer fluid hits the windshield.
-
Check that there are no washer spray fluid leaks from any of the connectors of the washer hoses.
-