CAUTION / NOTICE / HINT
-
Use the same procedure for RHD and LHD vehicles.
-
The procedure listed below is for LHD vehicles.
-
Use the same procedure for the RH side and LH side.
-
The following procedure is for the LH side.
PROCEDURE
- Click here
INSTALL FRONT SHOULDER BELT ANCHOR ADJUSTER ASSEMBLY
-
Attach the guide.
-
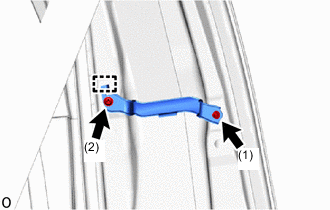
Temporarily install the front shoulder belt anchor adjuster assembly with the 2 bolts.
-
Tighten the 2 bolts in the order shown in the illustration.
42 N*m 428 kgf*cm 31 ft.*lbf
-
- Click here
INSTALL FRONT SEAT BELT RETRACTOR COVER LH
-
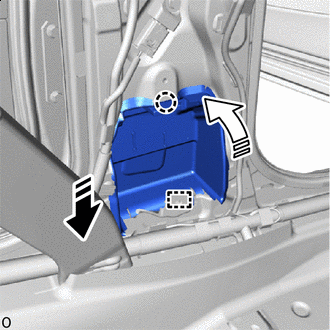

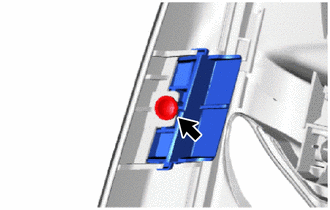
Install in this Direction (1) 
Install in this Direction (2) Slide in the installation direction (1) shown in the illustration to attach the guide.
-
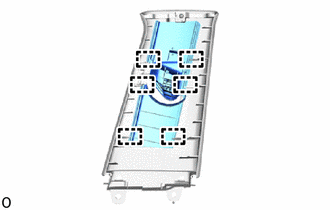
Push in the installation direction (2) shown in the illustration to attach the claw and install the front seat belt retractor cover LH.
-
- Click here
INSPECT FRONT SEAT OUTER BELT ASSEMBLY LH
- Click here
INSTALL FRONT SEAT OUTER BELT ASSEMBLY LH
-
w/o Pre-collision Seat Belt:
-
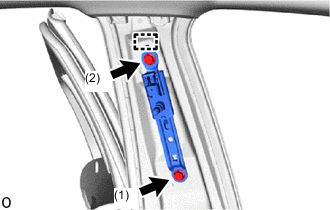
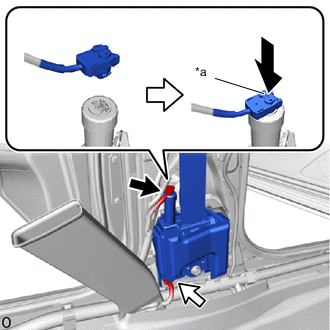
Attach the guide and temporarily install the front seat outer belt assembly LH.
-
Install the 2 bolts in the order shown in the illustration.
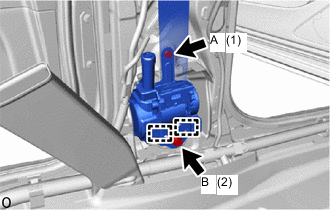
Bolt A 12.5 N*m 127 kgf*cm 9 ft.*lbf Bolt B 42 N*m 428 kgf*cm 31 ft.*lbf -

*a Locking Button 
Pretensioner Connector 
Tension Reducer Connector Connect the pretensioner connector and lock the locking button as shown in the illustration.
Note:
-
When handling the pretensioner connector, take care not to damage the pretensioner wire harness.
-
Securely lock the locking button.
-
-
Connect the tension reducer connector.
-
-
w/ Pre-collision Seat Belt:
-
Attach the guide and temporarily install the front seat outer belt assembly LH.
-
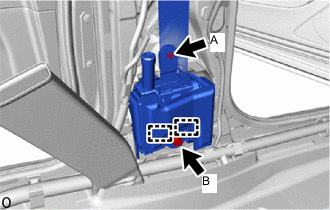
Tighten the bolt A.
12.5 N*m 127 kgf*cm 9 ft.*lbf -
Install the bolt B.
42 N*m 428 kgf*cm 31 ft.*lbf -
*a Locking Button Pretensioner Connector Motor Connector Connect the pretensioner connector and lock the locking button as shown in the illustration.
Note:
-
When handling the pretensioner connector, take care not to damage the pretensioner wire harness.
-
Securely lock the locking button.
-
-
Connect the motor connector.
-
-
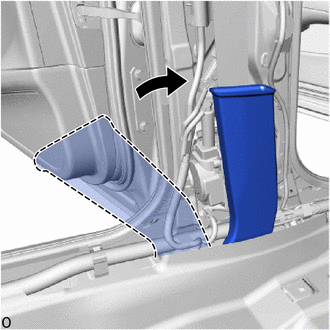
Return the No. 2 floor heater air duct LH as shown in the illustration.
-
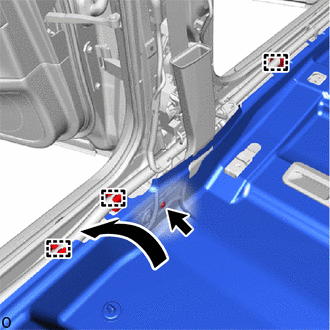
Install the clip.
-
Return the floor carpet and attach the 3 clamps as shown in the illustration.
-
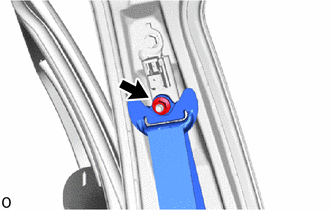
Install the shoulder anchor of the front seat outer belt assembly LH with the nut.
42 N*m 428 kgf*cm 31 ft.*lbf
-
- Click here
INSTALL FRONT SEAT SHOULDER BELT GUIDE
-
Attach the guide and temporarily install the front seat shoulder belt guide.
-
Install the 2 screws in the order shown in the illustration.
-
- Click here
INSTALL FRONT SHOULDER BELT ANCHOR PLATE SUB-ASSEMBLY LH
Tip:Perform this procedure when replacing the front shoulder belt anchor plate sub-assembly LH.
-
Attach the guide and install the front shoulder belt anchor plate sub-assembly LH.
-
Install the rib with the screw.
-
- Click here
INSTALL CENTER UPPER PILLAR GARNISH LH
- Click here
INSTALL CENTER LOWER PILLAR GARNISH LH
- Click here
INSTALL REAR DOOR SCUFF PLATE LH
- Click here
INSTALL FRONT DOOR SCUFF PLATE LH
- Click here
INSTALL FRONT SEAT ASSEMBLY LH
- Click here
INSTALL FRONT SEAT OUTER BELT ASSEMBLY LH (SEAT ANCHOR)
-

Install in this Direction Pass the seat anchor of the front seat outer belt assembly LH through the hole of the front seat cushion shield LH and attach the hook.
-
Install the seat anchor of the front seat outer belt assembly LH with the bolt.
42 N*m 428 kgf*cm 31 ft.*lbf -
Check that the ELR locks.
-
With the front seat outer belt assembly LH installed to the vehicle, check that the belt locks when it is pulled out quickly.
-
-
- Click here
INSTALL SEAT BELT ANCHOR COVER CAP LH
- Click here
INSTALL FRONT SEAT BELT HOLE COVER LH
- Click here
PERFORM ZERO POINT CALIBRATION AND SENSITIVITY CHECK (w/ Occupant Classification System)
- Click here
INSPECT SRS WARNING LIGHT
- Click here
INSPECT SEAT BELT WARNING SYSTEM
-
w/ Occupant Classification System:
-
w/o Occupant Classification System:
-
- Click here
INSPECT FRONT SEAT ASSEMBLY
- Click here
INSPECT SEAT HEATER SYSTEM (w/ Seat Heater System)
- Click here
INSPECT CLIMATE CONTROL SEAT SYSTEM (w/ Climate Control Seat System)
- Click here
INSPECT SEAT VIBRATION SYSTEM (w/ Refresh Seat)