OCCUPANT DETECTION SENSOR INSTALLATION
CAUTION / NOTICE / HINT
CAUTION:
-
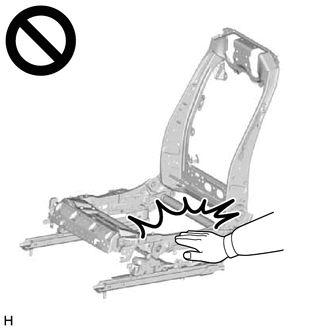
Wear protective gloves. Sharp areas on the parts may injure your hands.
-
There is risk of injury.
Tech Tips
-
Use the same procedure for RHD and LHD vehicles.
-
The procedure listed below is for LHD vehicles.
PROCEDURE
-
INSTALL SEAT CUSHION MAIN STRETCHER CUSHION ASSEMBLY (w/ Refresh Seat)
-
INSTALL SEAT CUSHION MAIN STRETCHER CUSHION ASSEMBLY (w/ Refresh Seat)
-
INSTALL FRONT SEAT CUSHION COVER MAIN PAD RH (w/ Refresh Seat)
-
INSTALL SEPARATE TYPE FRONT SEAT CUSHION PAD RH (OCCUPANT DETECTION SENSOR)
Tech Tips
When installing a separate type front seat cushion cover, refer to Precaution in order to prevent wrinkles from forming.
-
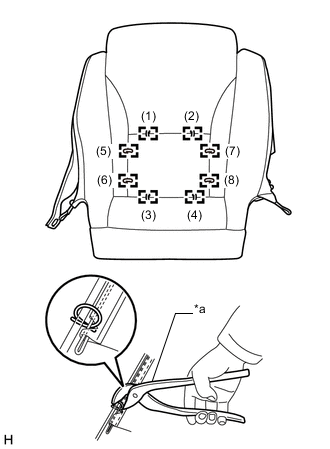
*a Hog Ring Pliers Using hog ring pliers, install the separate type front seat cushion pad RH (occupant detection sensor) to the separate type front seat cushion cover RH with 8 new hog rings in the order indicated in the illustration.
Note
-
Be careful not to damage the separate type front seat cushion cover RH.
-
Be sure to securely install the hog rings as shown in the illustration while preventing wrinkles from forming on the separate type front seat cushion cover RH.
-
-

*a Strap *b Band *c Hog Ring Pliers Pull out the straps from hole of the separate type front seat cushion pad RH.
-
Using hog ring pliers, install 4 new hog rings.
Note
-
Be careful not to damage the separate type front seat cushion cover RH.
-
Be sure to securely install the hog rings as shown in the illustration while preventing wrinkles from forming on the separate type front seat cushion cover RH.
-
-
Pass the band of the separate type front seat cushion cover RH from the separate type front seat cushion pad RH.
-
-
INSTALL SEPARATE TYPE FRONT SEAT CUSHION COVER WITH PAD
-
INSTALL SEAT CHECK VALVE WITH HOSE RH (w/ Refresh Seat)
-
INSTALL SEPARATE TYPE FRONT SEATBACK ASSEMBLY
-
INSTALL FRONT SEAT FRONT CUSHION SHIELD RH
-
INSTALL FRONT INNER SEAT CUSHION SHIELD RH
-
INSTALL FRONT SEAT CUSHION SHIELD RH
-
INSTALL FRONT SEATBACK BOARD SUB-ASSEMBLY RH
-
INSTALL FRONT POWER ADJUSTER SHIELD RH
-
INSTALL FRONT SEAT INNER BELT ASSEMBLY RH
-
INSTALL FRONT SEAT ASSEMBLY RH
-
INITIALIZATION OF SEAT ECU
-
INSPECT SRS WARNING LIGHT
-
INSPECT SEAT BELT WARNING SYSTEM
-
INSPECT FRONT SEAT ASSEMBLY
-
INSPECT SEAT HEATER SYSTEM (w/ Seat Heater System)
-
INSPECT CLIMATE CONTROL SEAT SYSTEM (w/ Climate Control Seat System)
-
INSPECT SEAT VIBRATION SYSTEM (w/ Refresh Seat)