SEAT HEATER CONTROL(for Front Seat) REMOVAL
CAUTION / NOTICE / HINT
The necessary procedures (adjustment, calibration, initialization or registration) that must be performed after parts are removed, installed or replaced during the seat heater control sub-assembly removal/installation are shown below.
| Replacement Part or Procedure | Necessary Procedures | Effects / Inoperative when not Performed | Link |
|---|---|---|---|
| Disconnect cable from negative (-) auxiliary battery terminal | Memorize steering angle neutral point | LKA/LDA system (for Mono camera type) | for Mono Camera type: Click here for Stereo Camera type: Click here |
| Lane control system (for Stereo camera type) | |||
| Parking support brake system* | |||
| Pre-collision system (for Mono camera type) | |||
| Pre-collision system (for Stereo camera type) | |||
| Adaptive high beam system | |||
Lighting system (EXT) |
|||
| Variable gear ratio steering system | |||
| Parking assist monitor system | |||
| Panoramic View Monitor System | |||
| Initialize rear door sunshade system | Rear door sunshade system | ||
| Initialize power trunk lid system | Power trunk lid system | ||
|
Initialize position control ECU | Front Power Seat Control System | |
| Front seat assembly RH (Only for removal and installation) | Zero point calibration (Occupant classification system) |
|
Click here Click here
CAUTION:
-
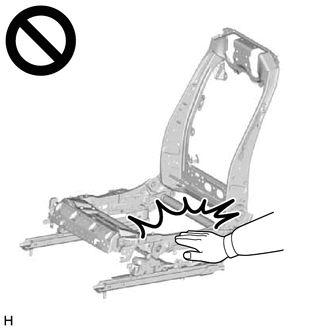
Wear protective gloves. Sharp areas on the parts may injure your hands.
-
There is risk of injury.
Tech Tips
-
Use the same procedure for RHD and LHD vehicles.
-
The procedure listed below is for LHD vehicles.
-
Use the same procedure for the RH side and LH side.
-
The following procedure is for the LH side.
PROCEDURE
-
REMOVE FRONT SEAT ASSEMBLY
-
REMOVE FRONT SEAT INNER BELT ASSEMBLY LH (for Driver Seat)
-
REMOVE FRONT SEAT INNER BELT ASSEMBLY RH (for Front Passenger Seat)
-
REMOVE FRONT POWER ADJUSTER SHIELD LH
-
REMOVE FRONT SEAT CUSHION SHIELD LH
-
REMOVE FRONT SEAT FRONT CUSHION SHIELD LH
-
REMOVE SEAT CHECK VALVE WITH HOSE LH (w/ Refresh Seat)
-
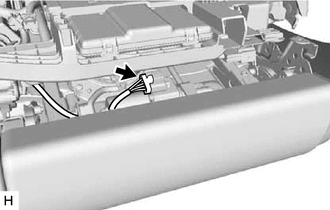
REMOVE SEAT HEATER CONTROL SUB-ASSEMBLY LH
-
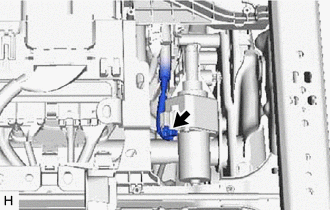
Disconnect the connector of the front vertical motor.
-
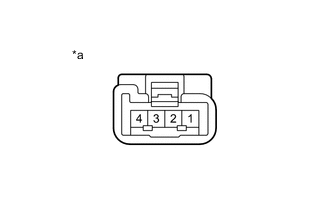
*a Component without harness connected
(Front Vertical Motor (Front Seat Adjuster Assembly LH))
Connect the No. 1 terminal of the front vertical motor to the positive (+) auxiliary battery terminal, and the No. 4 terminal to the negative (-) auxiliary battery terminal and then raise the cushion height to the uppermost position.
-
Disconnect the connector of the rear lifter motor.
-

*a Component without harness connected
(Rear Lifter Motor (Front Seat Adjuster Assembly))
Connect the No. 1 terminal of the rear lifter motor to the positive (+) auxiliary battery terminal, and the No. 4 terminal to the negative (-) auxiliary battery terminal and then raise the cushion height to the uppermost position.
-
w/ Ottoman:
-
Disconnect the connector of the ottoman motor.
-
*a Component without harness connected
(Ottoman Motor (Front Seat Adjuster Assembly))
Connect the No. 1 terminal of the ottoman motor to the positive (+) auxiliary battery terminal, and the No. 4 terminal to the negative (-) auxiliary battery terminal and then adjust the length of the cushion to the frontmost position.
-
-
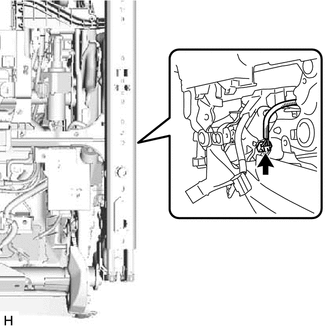
Disconnect the connector.
-
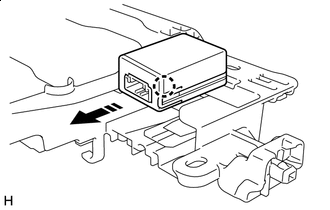

Remove in this Direction Detach the claw and remove the seat heater control sub-assembly LH.
-