REAR SEAT ASSEMBLY(for Power Seat) REASSEMBLY
CAUTION / NOTICE / HINT
CAUTION:
-
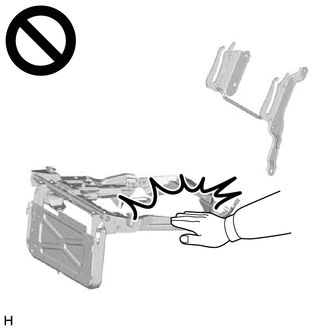
Wear protective gloves. Sharp areas on the parts may injure your hands.
-
This may result in injury.
Tech Tips
-
Use the same procedure for RHD and LHD vehicles.
-
The procedure listed below is for LHD vehicles.
PROCEDURE
-
INSTALL CENTER ARMREST HINGE COVER LH
-

Install in this Direction Attach the guides and claw and install the center armrest hinge cover LH.
-
-
INSTALL CENTER ARMREST HINGE COVER
Tech Tips
Use the same procedure described for the center armrest hinge cover LH.
-
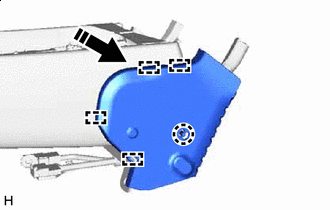
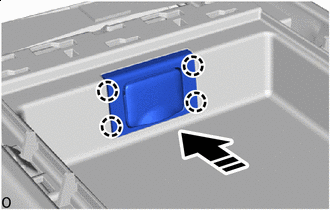
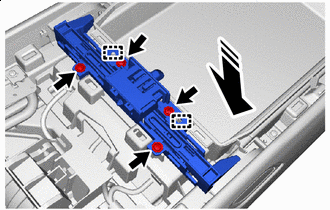
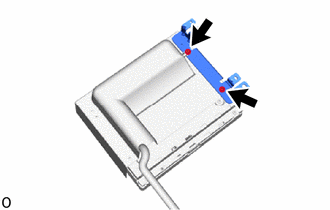
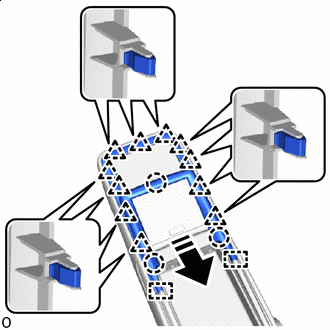
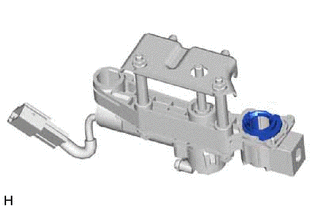
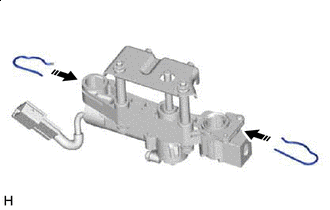
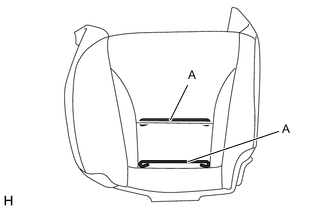
INSTALL CENTER ARMREST LOCK SUB-ASSEMBLY
-
Align the guide and install the center armrest lock with the 4 screws.
-
Install in this Direction Attach the cable clamp and connect the cable.
-
-
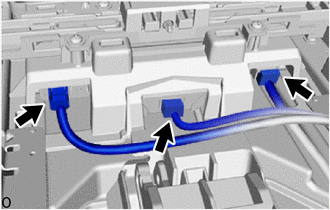
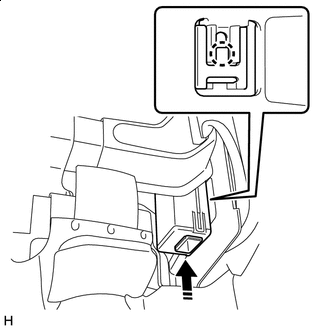
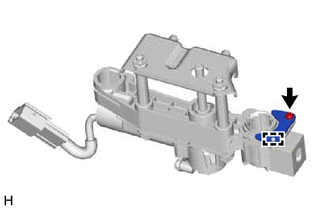
INSTALL USB CHARGER SOCKET
-
INSTALL HEADPHONE TERMINAL
-
for LH Side:
-
for RH Side:
-
-
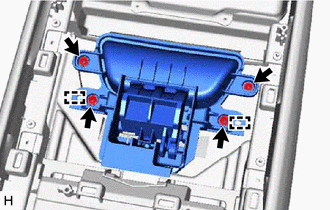
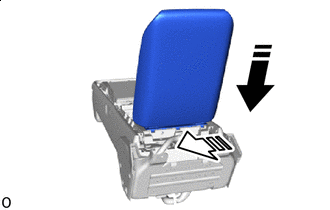
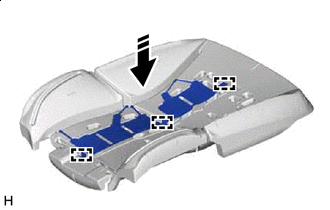
INSTALL REAR CENTER NO. 2 SEAT ARMREST BOX
-
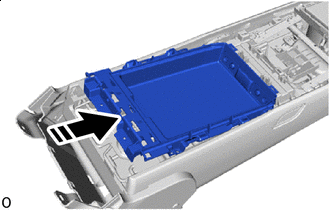
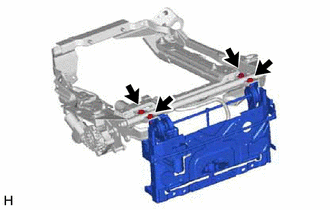
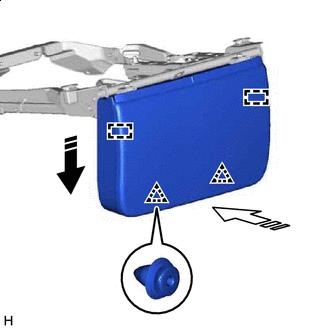
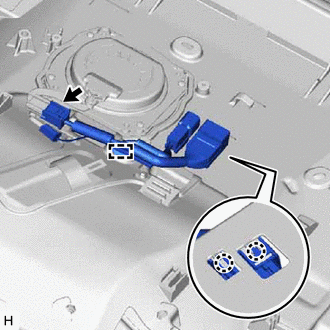
Install in this Direction Temporarily install the rear center No. 2 seat armrest box as shown in the illustration.
-
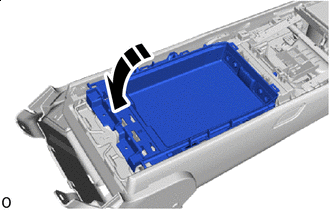
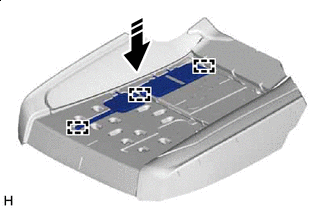
Install in this Direction Install the rear center No. 2 seat armrest box as shown in the illustration.
-
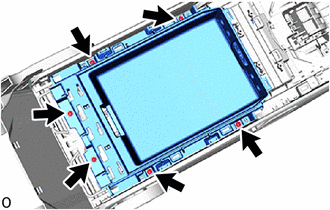
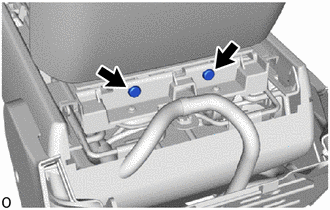
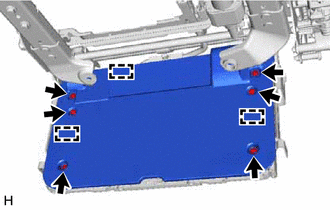
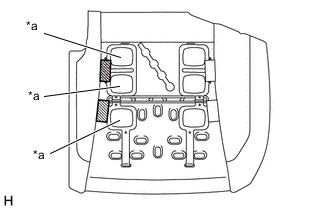
Install the 6 screws.
-
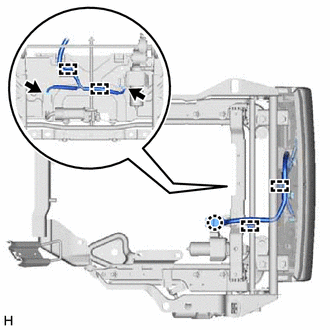
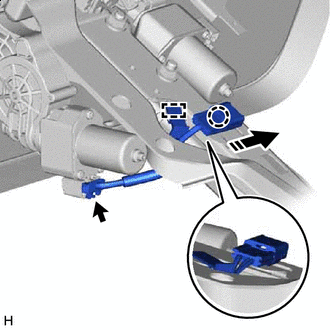
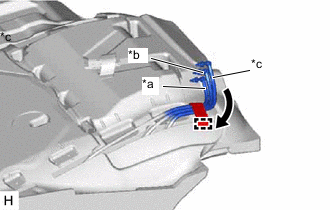
Attach the claw and connect the HDMI cable cover to the wire harness.
-
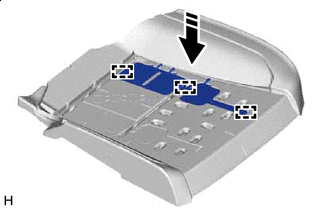
Install in this Direction Attach the claw and install the HDMI cable cover to the rear center No. 2 seat armrest box.
-
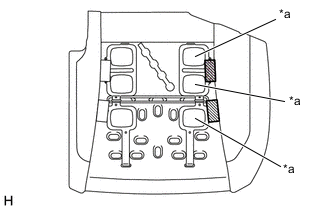
Connect the 3 connectors.
-
-
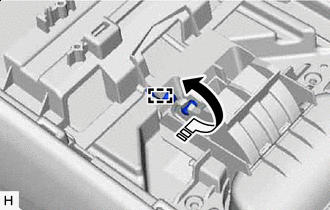
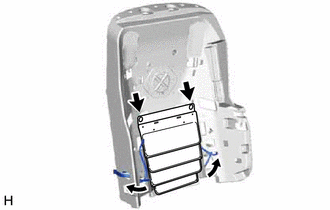
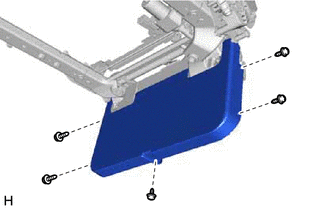
INSTALL REAR CENTER SEAT ARMREST DOOR SUB-ASSEMBLY
-
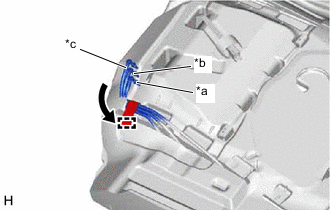
Install in this Direction (1) 
Install in this Direction (2) Set the rear center seat armrest door sub-assembly in the installation direction (1) shown in the illustration.
-
Slide in the installation direction (2) shown in the illustration to attach the hinge and install the rear center seat armrest door sub-assembly.
-
Install the 2 console compartment door hinge shafts.
-
-
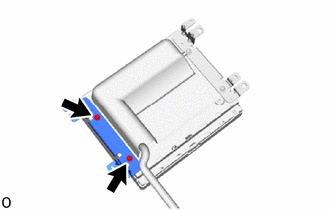
INSTALL CENTER ARMREST LOCK SUB-ASSEMBLY
-
Install in this Direction 
Screw Align the guide.
-
Install the center armrest lock with the 4 screws.
-
-
INSTALL REAR CENTER SEAT ARMREST CUP HOLDER SUB-ASSEMBLY
-
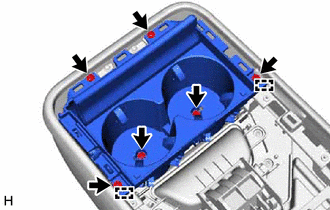
Align the guide and install the rear center seat armrest cup holder sub-assembly with the 6 screws.
-
-
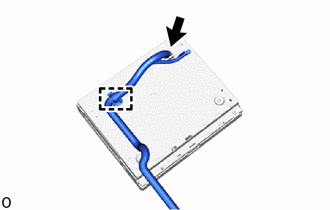
INSTALL REAR CENTER SEAT CUP HOLDER TRAY
-

Attach the claw and install the rear center seat cup holder tray.
-
-
INSTALL REAR POWER SEAT SWITCH
-
Attach the clamp and connect the connector.
-
-
INSTALL REAR CENTER SEAT ARMREST COVER
-
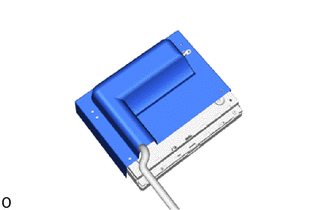
Install the rear center seat armrest cover.
-
-
INSTALL REAR CENTER SEAT ARMREST BRACKET LH
-
Install the rear center seat armrest bracket RH with the 2 screws.
-
-
INSTALL REAR CENTER SEAT ARMREST BRACKET RH
-
Install the rear center seat armrest bracket LH with the 2 screws.
-
-
INSTALL REAR POWER SEAT SWITCH WITH BRACKET
-
Install the rear power seat switch with bracket with the 4 screws.
-
-
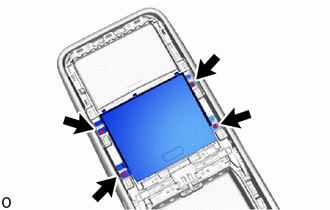
INSTALL REAR CENTER NO. 2 SEAT ARMREST PANEL
-
Install in this Direction While moving the rear center No. 2 seat armrest panel in the direction indicated by the arrow shown in the illustration, insert the guide.
-
Attach the clip and claw and install the rear center No. 2 seat armrest panel.
-
-
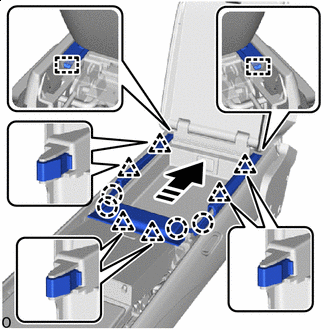
INSTALL REAR CENTER NO. 2 SEAT ARMREST PANEL SUB-ASSEMBLY
-
Install in this Direction While moving the rear center No. 2 seat armrest panel sub-assembly in the direction indicated by the arrow shown in the illustration, insert the guide.
-
Attach the clip and claw and install the rear center No. 2 seat armrest panel sub-assembly.
-
-
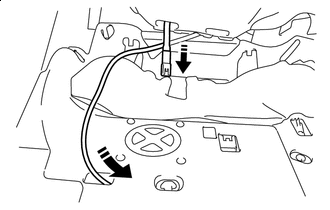
INSTALL REAR SEATBACK SUPPORT LH
-

Attach the clip and install the rear seatback support LH.
-
Pass the tube through the hole of the rear seat sub panel sub-assembly LH.
-
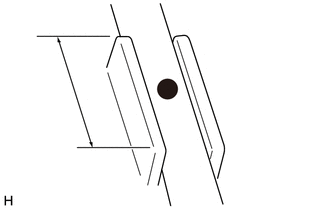
Install the tube to the clamp.
Note
Check that the tube marking is within the specified range of the clamp.
-
-
INSTALL REAR SEATBACK SUPPORT RH
Tech Tips
Use the same procedure described for the LH side.
-
INSTALL LUMBAR SUPPORT ADJUSTER ASSEMBLY LH
-
Attach the clip and install the lumbar support adjuster assembly LH.
-
Pass the tube through the hole of the rear seat sub panel sub-assembly LH.
-
-
INSTALL LUMBAR SUPPORT ADJUSTER ASSEMBLY RH
Tech Tips
Use the same procedure described for the LH side.
-
INSTALL REAR SEAT AIRBAG ASSEMBLY LH
-
INSTALL REAR SEAT AIRBAG ASSEMBLY RH
Tech Tips
Use the same procedure described for the LH side.
-
INSTALL SEATBACK MAIN STRETCHER CUSHION ASSEMBLY (w/ Refresh Seat)
-
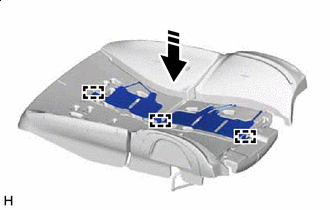
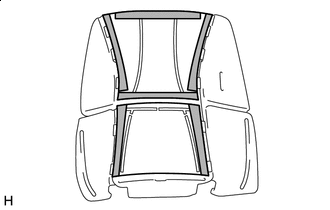
Install in this Direction Attach the hook and install the seatback main stretcher cushion assembly.
-

*a Orange Tube Color *b Yellow Tube Color *c Blue Tube Color *d Green Tube Color Pass the tube of the seatback main stretcher cushion assembly through the hole of the separate type rear seatback pad LH.
-
Clean the felt installation surface.
-
When reusing the separate type rear seatback pad LH, remove any felt remaining on the installation surface.
-
-
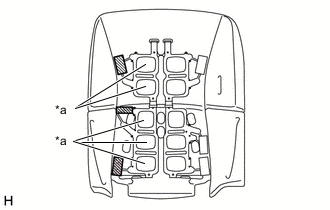
*a 2nd Step of The Bladder Install 3 new pieces of felt in the positions shown in the illustration.
Note
-
The L-shaped joint must not stick out.
-
Do not block the seat climate ventilation duct.
-
Do not cover the 2nd step of the bladder.
-
-
-
INSTALL SEATBACK MAIN STRETCHER CUSHION ASSEMBLY (w/ Refresh Seat)
Tech Tips
Use the same procedure described for the LH side.
-
INSTALL SEATBACK MAIN STRETCHER CUSHION ASSEMBLY (w/ Refresh Seat)
-
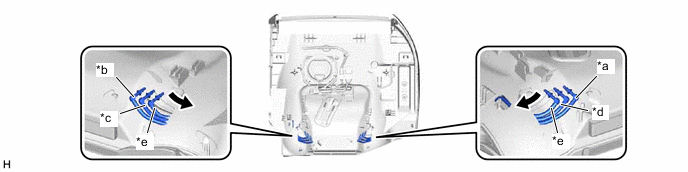
Install in this Direction Attach the hook and install the seatback main stretcher cushion assembly.
-
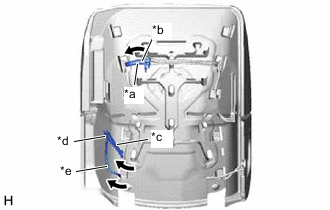
*a Orange Tube Color *b Yellow Tube Color *c Blue Tube Color *d Green Tube Color *e Clear Tube Color Pass the tube of the seatback main stretcher cushion assembly through the hole of the separate type rear seatback pad LH.
-
Clean the felt installation surface.
-
When reusing the separate type rear seatback pad LH, remove any felt remaining on the installation surface.
-
-
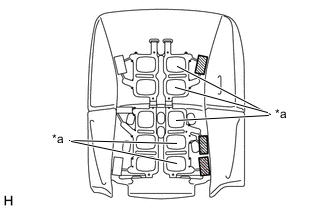
*a 2nd Step of The Bladder Install 3 new pieces of felt in the positions shown in the illustration.
Note
-
The L-shaped joint must not stick out.
-
Do not block the seat climate ventilation duct.
-
Do not cover the 2nd step of the bladder.
-
-
-
INSTALL SEATBACK MAIN STRETCHER CUSHION ASSEMBLY (w/ Refresh Seat)
Tech Tips
Use the same procedure described for the LH side.
-
INSTALL REAR UPPER SEATBACK PAD B (w/ Refresh Seat)
-
Clean double-sided tape installation surface
-
When reusing the separate type rear seatback pad LH, remove the double-sided tape remaining on the installation surface.
-
-
Remove the peeling paper from the face of the rear upper seatback pad B.
Tech Tips
After removing the peeling paper, keep the exposed adhesive free from foreign matter.
-

Double-sided Tape Install rear upper seatback pad B in the position shown in the illustration.
-
-
INSTALL REAR UPPER SEATBACK PAD A (w/ Refresh Seat)
Tech Tips
Use the same procedure described for rear upper seatback pad B.
-
INSTALL SEAT COVER WIRE
-
Install the seat cover wire and strap.
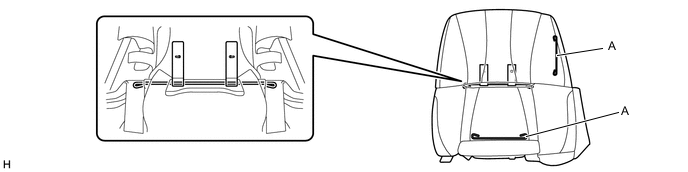
Dimension A 250 mm (9.84 in.) - - Tech Tips
-
Wire 1000 mm (3.28 ft.) or longer and shaped wire are available as supplied parts.
-
For wire 1000 mm (3.28 ft.) or less in length, cut or shape 1000 mm (3.28 ft.) wire into the dimensions shown in the illustration.
-
Make sure to read the precautions before preparing the wire.
Tech Tips
The dimensions shown in the illustration are the length.

-
-
-
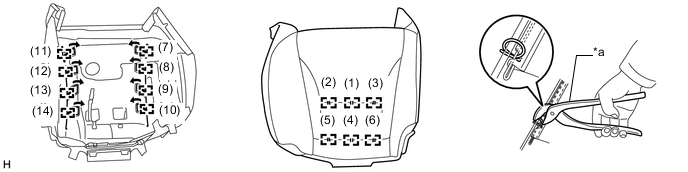
INSTALL SEPARATE TYPE REAR SEATBACK COVER LH
Tech Tips
When installing a separate type front seatback cover, refer to Precaution in order to prevent wrinkles from forming.
-
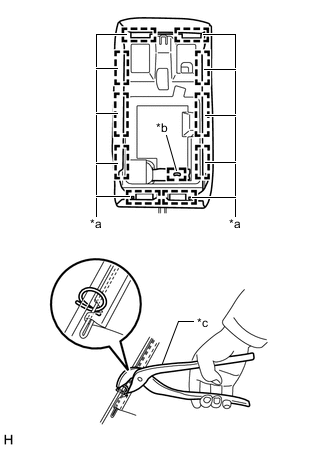
Set the separate type rear seatback cover LH to the separate type rear seatback pad LH.
-
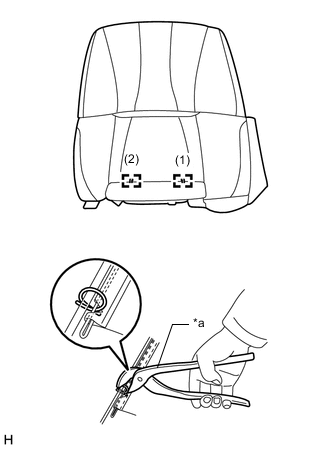
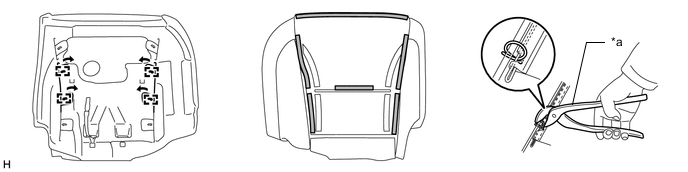
*a Hog Ring Pliers Using hog ring pliers, install the separate type rear seatback cover LH to the separate type rear seatback pad LH with 10 new hog rings in the order indicated in the illustration.
Note
-
Be careful not to damage the separate type rear seatback cover LH.
-
Be sure to securely install the hog rings as shown in the illustration while preventing wrinkles from forming on the separate type rear seatback cover LH.
-
-
Pass the strap and bracket of the separate type rear seatback cover LH through the hole of the separate type rear seatback pad LH.
-
-
INSTALL SEPARATE TYPE REAR SEATBACK COVER RH
Tech Tips
Use the same procedure described for the LH side.
-
INSTALL SEPARATE TYPE REAR SEATBACK COVER WITH PAD LH
-
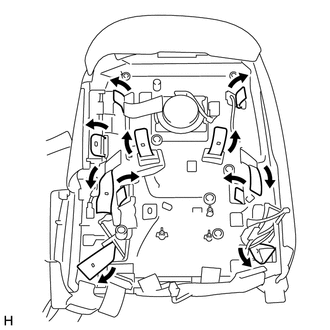
Set the separate type rear seatback cover with pad LH to the rear seat sub panel sub-assembly LH.
-
w/ Refresh Seat:
-
Pass the tube through the hole of the rear seat sub panel sub-assembly LH.
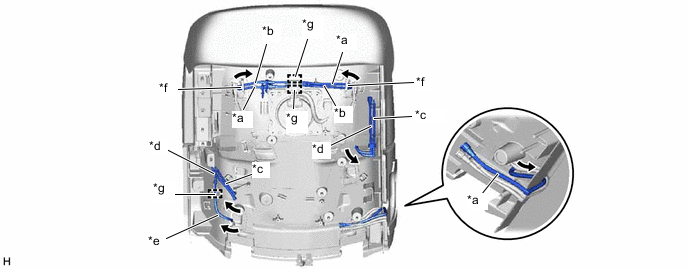
*a Orange Tube Color *b Yellow Tube Color *c Blue Tube Color *d Green Tube Color *e Clear Tube Color *f Hook *g Clamp - - -
Hang the tube on the hook.
-
Install the tube to the clamp.
Note
Check that the tube marking is within the specified range of the clamp.
-
-
Pass the strap and bracket of the separate type rear seatback cover LH through the hole of the rear seat sub panel sub-assembly LH.
-
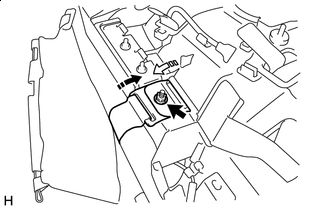
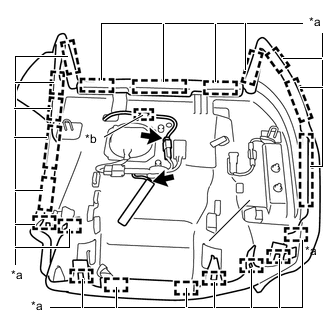
Install in this Direction (1) Install in this Direction (2) Install the 2 brackets of the separate type rear seatback cover LH with a new nut.
- Torque:
- 5.5 N*m { 56 kgf*cm, 49 in.*lbf }
-
Install the wire harness clamp.
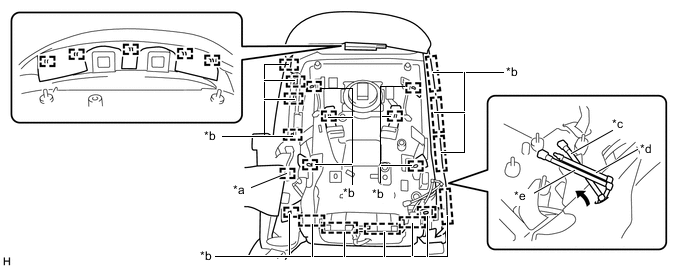
*a Wire Harness Clamp *b Hook *c Orange Tube Color *d Blue Tube Color *e Green Tube Color - - -
Pass the tube through the separate type rear seatback cover LH.
-
Attach the hook and install the separate type rear seatback cover with pad LH.
-
-
INSTALL SEPARATE TYPE REAR SEATBACK COVER WITH PAD RH
Tech Tips
Use the same procedure described for the LH side.
-
INSTALL SEAT HEATER CONTROL SUB-ASSEMBLY LH
-
Install in this Direction Attach the claw and install the seat heater control sub-assembly LH.
-
-
INSTALL SEAT HEATER CONTROL SUB-ASSEMBLY RH
Tech Tips
Use the same procedure described for the LH side.
-
INSTALL REAR NO. 2 SEAT HEADREST ADJUSTER SUB-ASSEMBLY
-
Install the connector holder to the rear No. 2 seat headrest adjuster sub-assembly.
-
Align the guide and install the plate with the screw.
-
Install in this Direction Install the 2 pins.
-
Install the rear No. 2 seat headrest adjuster with the 2 nuts.
- Torque:
- 5.5 N*m { 56 kgf*cm, 49 in.*lbf }
-
-
INSTALL REAR NO. 1 SEAT HEADREST ADJUSTER SUB-ASSEMBLY
Tech Tips
Use the same procedure described for the rear No. 2 seat headrest adjuster sub-assembly.
-
INSTALL REAR SEATBACK MAIN FRAME SUB-ASSEMBLY LH
-
*A w/ Refresh Seat Install the rear seatback main frame sub-assembly LH with the 4 nuts.
- Torque:
- 5.5 N*m { 56 kgf*cm, 49 in.*lbf }
-
w/ Refresh Seat:
-
Install the tube clamp and tube.
-
-
-
INSTALL REAR SEATBACK MAIN FRAME SUB-ASSEMBLY RH
Tech Tips
Use the same procedure described for the LH side.
-
INSTALL POSITION CONTROL ECU ASSEMBLY LH
-
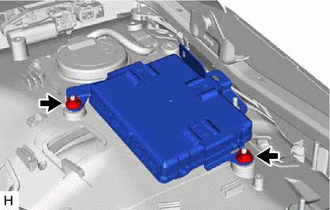
Install the position control ECU assembly LH with the 2 nuts.
- Torque:
- 5.5 N*m { 56 kgf*cm, 49 in.*lbf }
-
-
INSTALL POSITION CONTROL ECU ASSEMBLY RH
Tech Tips
Use the same procedure described for the LH side.
-
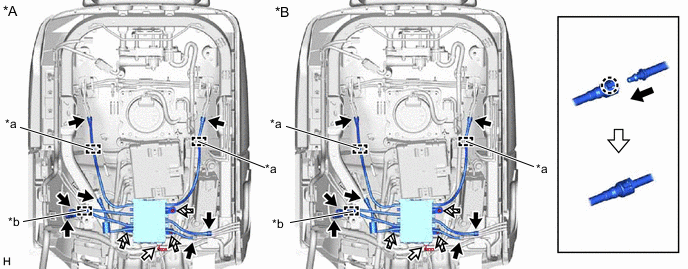
INSTALL LUMBER SUPPORT PUMP SUB-ASSEMBLY LH
-
Install the lumbar support pump sub-assembly LH with the 2 nuts.
- Torque:
- 5.5 N*m { 56 kgf*cm, 49 in.*lbf }
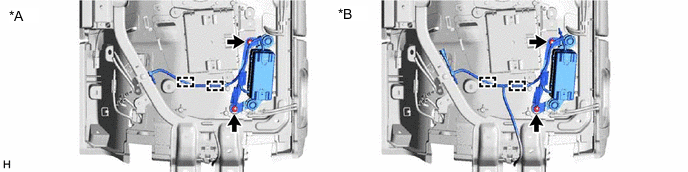
*A w/o Refresh Seat *B w/ Refresh Seat -
Install the tube to the clamps.
Note
Check that the tube marking is within the specified range of the clamp.
-
-
INSTALL LUMBER SUPPORT PUMP SUB-ASSEMBLY RH
Tech Tips
Use the same procedure described for the LH side.
-
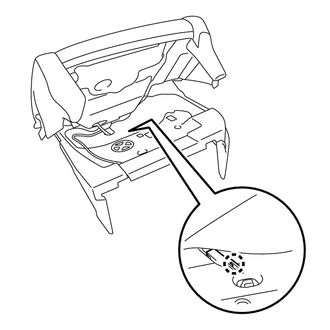
INSTALL REAR SEAT WIRE LH
-
Install in this Direction Insert the connector into the rear No. 1 seat headrest adjuster sub-assembly and attach the claw.
-

Attach the hook.
-
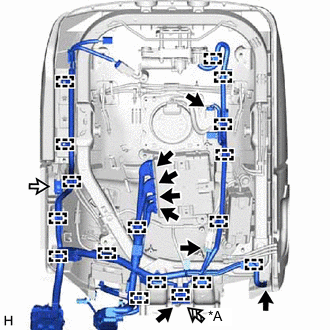
*A w/ Refresh Seat 
Rear Seat Airbag Assembly LH Connector Install the wire harness clamp.
-
w/o Refresh Seat:
-
Connect the 8 connectors.
-
-
w/ Refresh Seat:
-
Connect the 9 connectors.
-
-
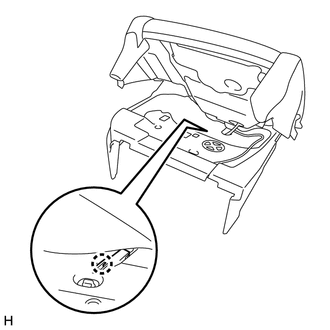
Connect the connector of the rear seat airbag assembly LH.
-
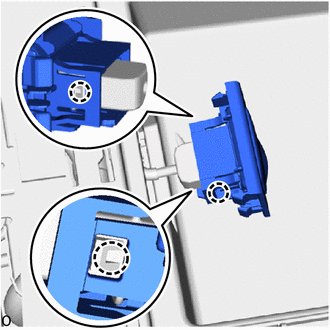
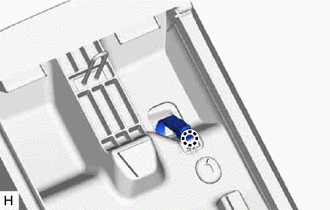
Before connecting the rear seat airbag assembly LH, check that the CPA is positioned as shown in the illustration.
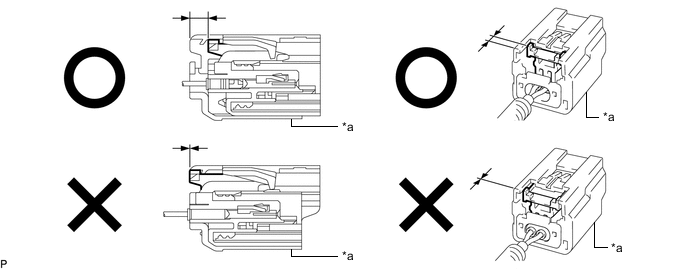
*a CPA - - -
Holding the sides of the CPA of the rear seat airbag assembly LH connector, connect the connector by engaging it until a "click" sound is heard.
Note
-
Be careful not to damage the rear seat airbag connector and wire harness.
-
When connecting the connector, push the connector straight in.
-
Do not connect the connector while holding components other than the CPA.
-
If the top of the CPA is held down when connecting the connector, the half connection prevention mechanism will not function due to deformation of the CPA. Therefore, hold the sides of the CPA.
-
-
-
-
INSTALL REAR SEAT WIRE RH
Tech Tips
Use the same procedure described for the LH side.
-
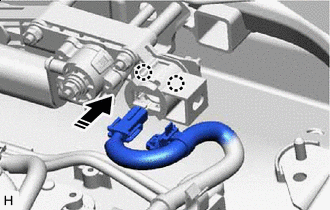
INSTALL SEATBACK CHECK VALVE WITH BRACKET LH
-
Install the seatback check valve with bracket LH with the 3 screws.
*A w/o Refresh Seat *B w/ Refresh Seat *a Clamp *b Tube Clamp Joint Connector 
Screw - - -
Connect the connector.
-
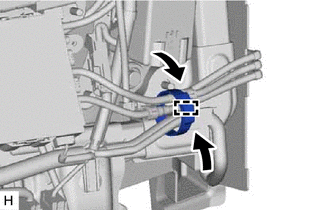
Install the tube clamp and tube.
-
Install the tube to the clamps.
Note
Check that the tube marking is within the specified range of the clamp.
-
Attach the claw and connect the joint.
-
Attach the claw and install the clamp.
-
-
INSTALL SEATBACK CHECK VALVE WITH BRACKET RH
Tech Tips
Use the same procedure described for the LH side.
-
INSTALL REAR SEAT HEADREST SUPPORT
Tech Tips
Use the same procedure for the LH and RH sides.
-
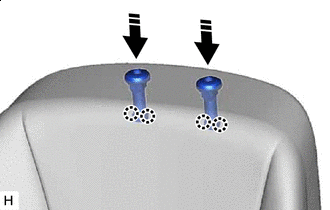
Install in this Direction Attach the claw and install the 2 rear seat headrest supports.
-
-
INSTALL REAR SEAT HEADREST ASSEMBLY LH
-
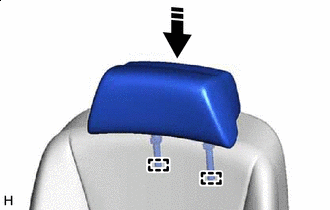
Install in this Direction Attach the pin and install the rear seat headrest assembly LH.
-
Lift the rear seat headrest assembly LH and check that it is locked.
-
-
INSTALL REAR SEAT HEADREST ASSEMBLY RH
Tech Tips
Use the same procedure described for the LH side.
-
INSTALL NO. 2 SEATBACK CHECK VALVE WITH HOSE LH (w/ Refresh Seat)
-
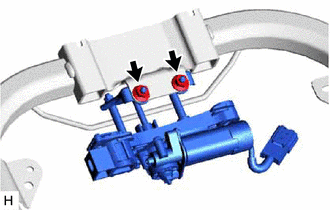
*a Clamp *b Tube Clamp Joint Connector Screw Install the No. 2 seatback check valve with hose LH with the 2 screws.
-
Connect the connector.
-
Install the tube clamps and tube.
-
Install the tube to the clamp.
Note
Check that the tube marking is within the specified range of the clamp.
-
Attach the claw and connect the joint.
Note
Connect the tubes of the same color.
-
-
INSTALL NO. 2 SEATBACK CHECK VALVE WITH HOSE RH (w/ Refresh Seat)
Tech Tips
Use the same procedure described for the LH side.
-
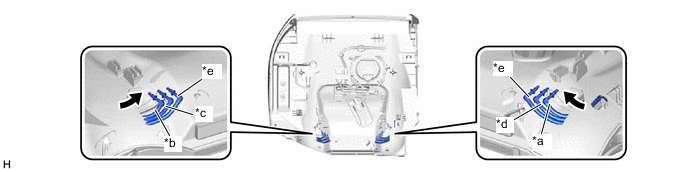
INSTALL NO. 1 SEATBACK CHECK VALVE WITH HOSE LH (w/ Refresh Seat)
-
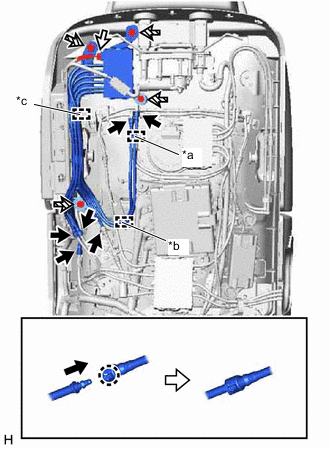
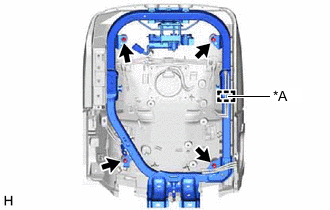
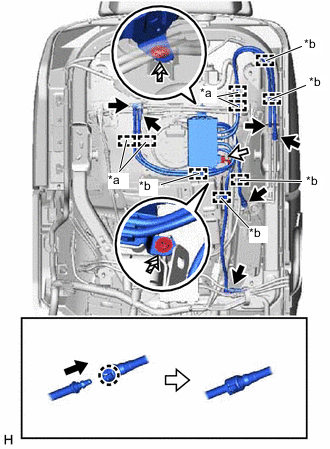
*a Clamp *b Hook *c Tube Clamp Joint Connector Clip Install the tube clamp and No. 1 seatback check valve with hose LH.
-
Install the 4 clips.
-
Connect the connector.
-
Hang the tube on the hook.
-
Install the tube to the clamp.
Note
Check that the tube marking is within the specified range of the clamp.
-
Attach the claw and connect the joint.
Note
Connect the tubes of the same color.
-
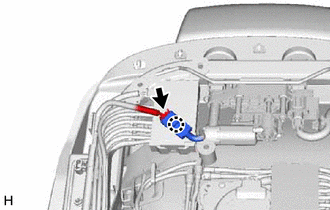
Attach the claw and connect the connector.
-
Connect the connector.
-
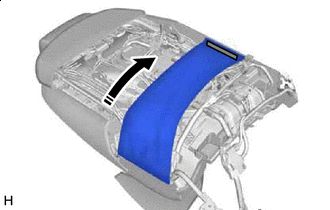
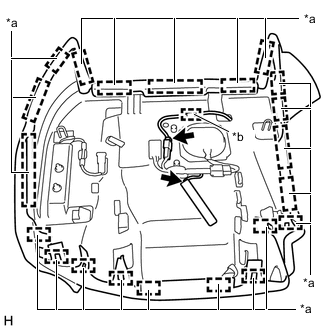
Install in this Direction 
Fastening Tape Return the separate type rear seatback cover LH and attach the fastening tape.
-
-
INSTALL NO. 1 SEATBACK CHECK VALVE WITH HOSE RH (w/ Refresh Seat)
Tech Tips
Use the same procedure described for the LH side.
-
INSTALL REAR SEAT LEGREST ARM SUB-ASSEMBLY LH
-
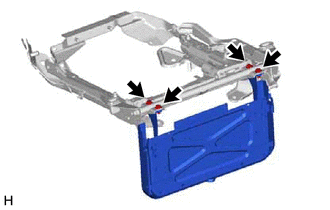
Install the rear seat legrest arm sub-assembly LH with the 4 bolts.
- Torque:
- 19.1 N*m { 195 kgf*cm, 14 ft.*lbf }
-
-
INSTALL REAR SEAT LEGREST ARM SUB-ASSEMBLY RH
-
w/o Ottoman:
-
Use the same procedure described for the LH side.
-
-
w/ Ottoman:
-
Install the rear seat legrest arm sub-assembly RH with the 4 bolts.
- Torque:
- 19.1 N*m { 195 kgf*cm, 14 ft.*lbf }
-
-
-
INSTALL REAR NO. 2 SEAT WIRE RH (w/ Ottoman)
-
Attach the claw and connect the connector.
-
Install the wire harness clamp.
-
Connect the 2 connectors and install the rear No. 2 seat wire RH.
-
-
INSTALL REAR SEAT LEGREST COVER (w/ Ottoman)
-

Install the rear seat legrest cover with the 6 screws.
-
-
INSTALL REAR SEAT LEGREST COVER RH (w/ Ottoman)
-
Align the guide and install the rear seat legrest cover RH with the 5 screws.
-
-
INSTALL REAR SEAT LEGREST COVER
Tech Tips
Use the same procedure for the LH and RH sides.
-
Install the rear seat legrest cover with the 5 screws.
-
-
INSTALL REAR SEAT LEGREST ASSEMBLY
Tech Tips
Use the same procedure for the LH and RH sides.
-
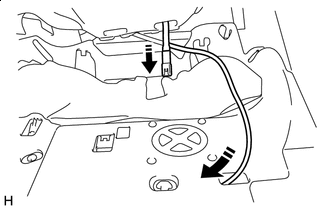
Install in this Direction (1) Install in this Direction (2) Push down in the removal direction (1) shown in the illustration and insert the guide.
-
Push in the removal direction (2) shown in the illustration and attach the clip to install the rear seat legrest assembly.
-
-
INSTALL REAR NO. 2 SEAT WIRE LH
Tech Tips
Use the same procedure for the LH and RH sides.
-
Install in this Direction Attach the claw and connect the connector.
-
Install the wire harness clamp.
-
Connect the connector and install the rear No. 2 seat wire LH.
-
-
INSTALL REAR SEAT INNER BELT ASSEMBLY LH
-
INSTALL REAR SEAT INNER BELT ASSEMBLY RH
-
INSTALL REAR SEAT CENTER LAP TYPE BELT ASSEMBLY RH
-
INSTALL REAR CENTER SEAT CUSHION PAD
-
Install the rear center seat cushion pad to the center seat cushion frame sub-assembly.
-
Attach the claw and connect the connector of the occupant detection sensor.
-
-
INSTALL REAR CENTER SEAT CUSHION COVER SUB-ASSEMBLY
-
*a Hook *b Hog Ring *c Hog Ring Pliers Attach the hook and install the rear center seat cushion cover sub-assembly.
-
Using hog ring pliers, install with a new hog ring securely.
-
-
INSTALL REAR NO. 2 SEAT WIRE LH
-
Attach the claw and install the 2 connectors.
-
Install the wire harness clamp and rear No. 2 seat wire LH.
-
Connect the connector.
-
-
INSTALL REAR NO. 2 SEAT WIRE RH
Tech Tips
Use the same procedure described for the LH side.
-
INSTALL REAR SEAT CUSHION AIRBAG ASSEMBLY LH
-
INSTALL REAR SEAT CUSHION AIRBAG ASSEMBLY RH
Tech Tips
Use the same procedure described for the LH side.
-
INSTALL SEAT CUSHION MAIN STRETCHER CUSHION ASSEMBLY (w/ Refresh Seat)
-
Install in this Direction Attach the hook and install the seat cushion main stretcher cushion assembly.
-
Clean the felt installation surface.
-
When reusing the rear seat cushion pad LH, remove the felt remaining on the installation surface.
-
-
*a 2nd Step of The Bladder Install 2 new pieces of felt in the positions shown in the illustration.
Note
-
The L-shaped joint must not stick out.
-
Do not cover the 2nd step of the bladder.
-
-
*a Orange Tube Color *b Green Tube Color *c Clear Tube Color Place the tube as shown in the illustration and using a tacker, install the strap with new tack pin.
-
-
INSTALL SEAT CUSHION MAIN STRETCHER CUSHION ASSEMBLY (w/ Refresh Seat)
Tech Tips
Use the same procedure described for the LH side.
-
INSTALL SEAT CUSHION MAIN STRETCHER CUSHION ASSEMBLY (w/ Refresh Seat)
-
Install in this Direction Attach the hook and install the seat cushion main stretcher cushion assembly.
-
Clean the felt installation surface.
-
When reusing the rear seat cushion pad LH, remove the felt remaining on the installation surface.
-
-
*a 2nd Step of The Bladder Install 2 new pieces of felt in the positions shown in the illustration.
Note
-
The L-shaped joint must not stick out.
-
Do not cover the 2nd step of the bladder.
-
-
*a Yellow Tube Color *b Blue Tube Color *c Clear Tube Color Place the tube as shown in the illustration and using a tacker, install the strap with new tack pin.
-
-
INSTALL SEAT CUSHION MAIN STRETCHER CUSHION ASSEMBLY (w/ Refresh Seat)
Tech Tips
Use the same procedure described for the LH side.
-
INSTALL REAR SEAT CUSHION PAD (w/ Refresh Seat)
-
Clean double-sided tape installation surface.
-
When reusing the rear seat cushion pad, remove the double-sided tape remaining on the installation surface.
-
-
Remove the peeling paper from the face of the rear seat cushion pad.
Tech Tips
After removing the peeling paper, keep the exposed adhesive free from foreign matter.
-
Install the rear seat cushion pad in the position shown in the illustration.
-
Pull out the strap from the hole of the rear seat cushion pad LH.
*a Hog Ring Pliers - - Double-sided Tape - - -
Using hog ring pliers, install the rear seat cushion pad with 4 new hog rings.
-
-
INSTALL SEAT COVER WIRE
-
Install the seat cover wire.
Tech Tips
-
Wire 1000 mm (3.28 ft.) or longer and shaped wire are available as supplied parts.
-
For wire 1000 mm (3.28 ft.) or less in length, cut or shape 1000 mm (3.28 ft.) wire into the dimensions shown in the illustration.
-
Make sure to read the precautions before preparing the wire.
Dimension A 250 mm (9.84 in.) Tech Tips
The dimension shown in the illustration is the length.
-
-
-
INSTALL SEPARATE TYPE REAR SEAT CUSHION COVER LH
Tech Tips
When installing a separate type rear seat cushion cover LH, refer to Precaution in order to prevent wrinkles from forming.
-
Install the separate type rear seat cushion cover LH to the rear seat cushion pad LH.
-
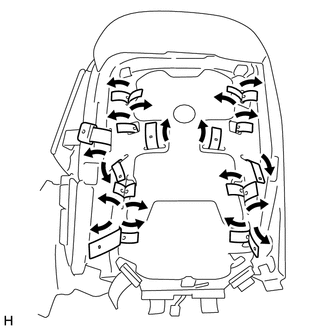
Using hog ring pliers, install the separate type rear seat cushion cover LH to the separate type rear seat cushion pad LH with 14 new hog rings in the order indicated in the illustration.
*a Hog Ring Pliers - - Note
-
Be careful not to damage the separate type rear seat cushion cover LH.
-
Be sure to securely install the hog rings as shown in the illustration while preventing wrinkles from forming on the separate type rear seat cushion cover LH.
-
-
-
INSTALL SEPARATE TYPE REAR SEAT CUSHION COVER RH
Tech Tips
Use the same procedure described for the LH side.
-
INSTALL SEPARATE TYPE REAR SEAT CUSHION COVER WITH PAD LH
-
Install in this Direction Pass the connector of the occupant detection sensor and wire harness through the hole of the rear seat cushion panel LH.
-
Attach the claw and connect the occupant detection sensor connector.
-
w/ Refresh Seat:
-
Pass the tube through the hole of the rear seat cushion panel LH.
*a Orange Tube Color *b Yellow Tube Color *c Blue Tube Color *d Green Tube Color *e Clear Tube Color - - -
Place the tube as shown in the illustration.
-
-
*a Hook *b Wire Harness Clamp Attach the hook.
-
Install the wire harness clamp.
-
Connect the 2 connectors.
-
-
INSTALL SEPARATE TYPE REAR SEAT CUSHION COVER WITH PAD RH
-
Install in this Direction Pass the connector of the occupant detection sensor and wire harness through the hole of the rear seat cushion panel RH.
-
Attach the claw and connect the occupant detection sensor connector.
-
w/ Refresh Seat:
-
Pass the tube through the hole of the rear seat cushion panel RH.
*a Orange Tube Color *b Yellow Tube Color *c Blue Tube Color *d Green Tube Color *e Clear Tube Color - - -
Place the tube as shown in the illustration.
-
-
*a Hook *b Wire Harness Clamp Attach the hook.
-
Install the wire harness clamp.
-
Connect the 2 connectors.
-
-
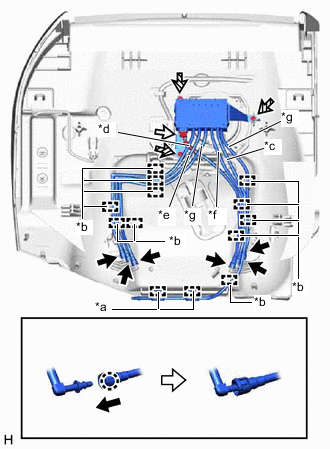
INSTALL SEAT CUSHION CHECK VALVE WITH HOSE LH (w/ Refresh Seat)
-
*a Tube Clamp *b Clamp *c Orange Tube Color *d Yellow Tube Color *e Blue Tube Color *f Green Tube Color *g Clear Tube Color Joint Connector Screw Install the seat cushion check valve with hose LH with the 3 screws.
-
Connect the connector.
-
Install the tube to the clamps.
Note
Check that the tube marking is within the specified range of the clamp.
-
Install the tube clamp and tube.
-
Attach the claw and connect the joint.
Note
Connect the tubes of the same color.
-
-
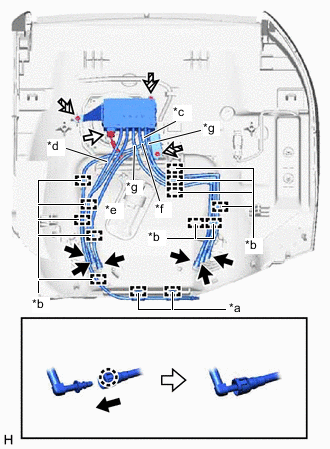
INSTALL SEAT CUSHION CHECK VALVE WITH HOSE RH (w/ Refresh Seat)
-
*a Tube Clamp *b Clamp *c Orange Tube Color *d Yellow Tube Color *e Blue Tube Color *f Green Tube Color *g Clear Tube Color Joint Connector Screw Install the seat cushion check valve with hose RH with the 3 screws.
-
Connect the connector.
-
Install the tube to the clamps.
Note
Check that the tube marking is within the specified range of the clamp.
-
Install the tube clamp and tube.
-
Attach the claw and connect the joint.
Note
Connect the tubes of the same color.
-