REAR SEAT ASSEMBLY(for Power Seat) DISASSEMBLY
CAUTION / NOTICE / HINT
CAUTION:
-
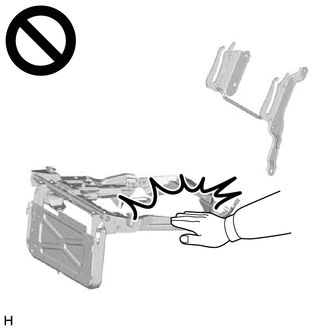
Wear protective gloves. Sharp areas on the parts may injure your hands.
-
This may result in injury.
Tech Tips
-
Use the same procedure for RHD and LHD vehicles.
-
The procedure listed below is for LHD vehicles.
PROCEDURE
-
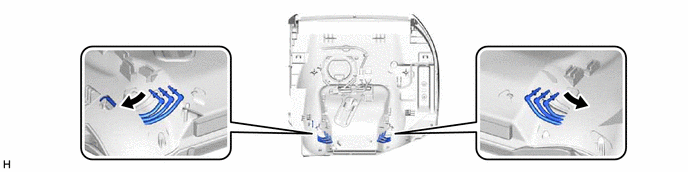
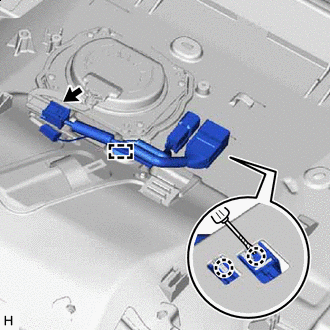
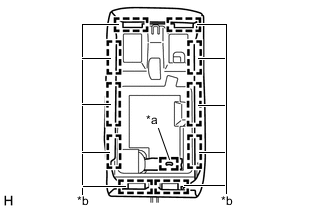
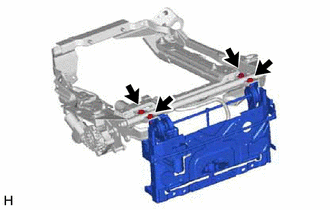
REMOVE SEAT CUSHION CHECK VALVE WITH HOSE LH (w/ Refresh Seat)
-
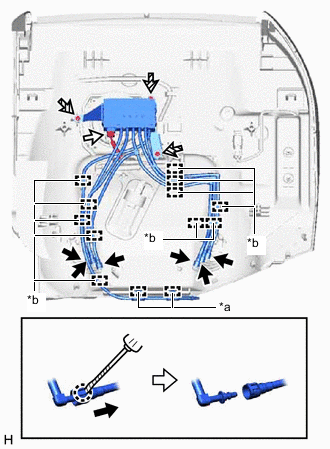
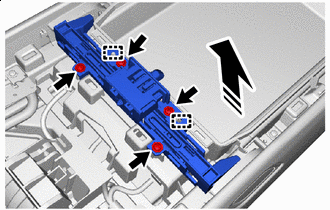
*a Tube Clamp *b Tube 
Joint 
Connector 
Screw 
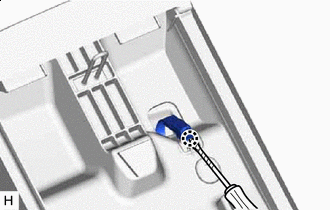
Protective Tape Using a thin-bladed screwdriver with its tip wrapped with protective tape, detach the claw and disconnect the joint.
-
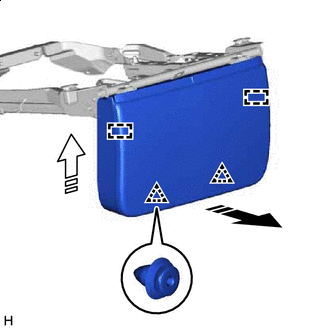
Detach the tube clamp and remove the tube.
-
Remove the tube from the clamp.
-
Disconnect the connector.
-
Remove the 3 screws and seat cushion check valve with hose LH.
-
-
REMOVE SEAT CUSHION CHECK VALVE WITH HOSE RH (w/ Refresh Seat)
-
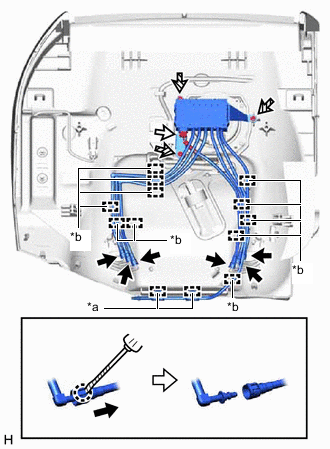
*a Tube Clamp *b Tube Joint Connector Screw Protective Tape Using a thin-bladed screwdriver with its tip wrapped with protective tape, detach the claw and disconnect the joint.
-
Detach the tube clamp and remove the tube.
-
Remove the tube from the clamp.
-
Disconnect the connector.
-
Remove the 3 screws and seat cushion check valve with hose RH.
-
-
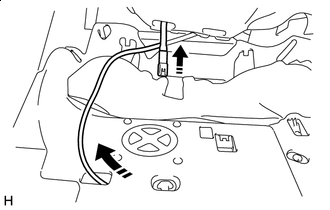
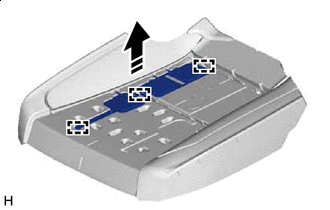
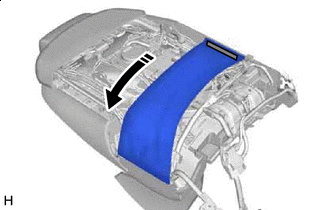
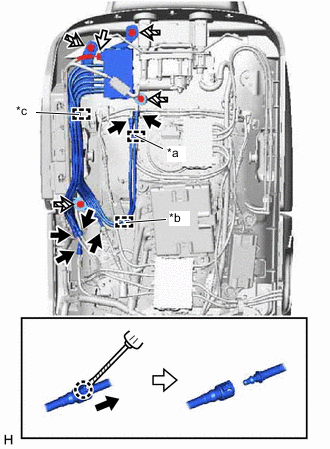
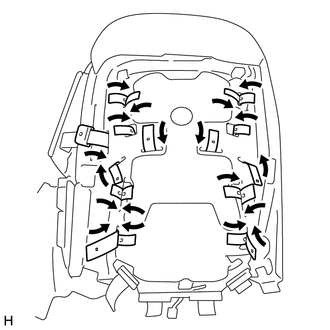
REMOVE SEPARATE TYPE REAR SEAT CUSHION COVER WITH PAD LH
-
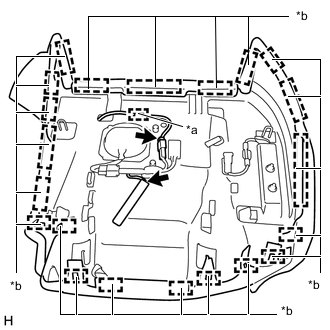
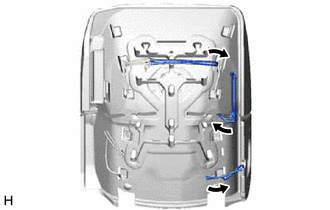
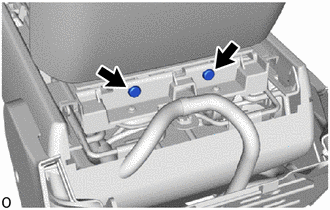
*a Wire Harness Clamp *b Hook Disconnect the 2 connectors.
-
Detach the wire harness clamp.
-
Detach the hook.
-
w/ Refresh Seat:
-
Pull out the tube from the hole of the rear seat cushion panel LH.
-
-
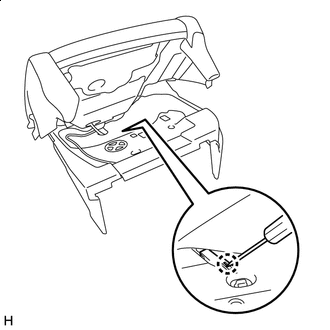
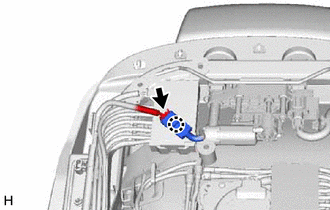
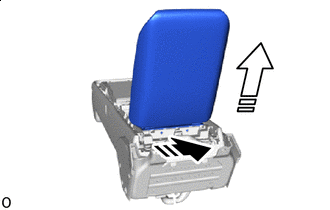
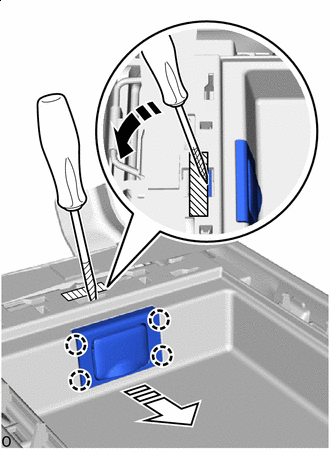
Protective Tape Using a thin-bladed screwdriver wrapped with protective tape, detach the claw and disconnect the connector of the occupant detection sensor.
-

Remove in this Direction Pull out the connector of the occupant detection sensor and wire harness from the hole of the rear seat cushion panel LH and remove the separate type rear seat cushion cover with pad LH.
-
-
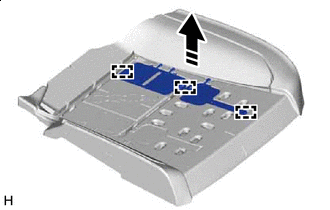
REMOVE SEPARATE TYPE REAR SEAT CUSHION COVER WITH PAD RH
Tech Tips
Use the same procedure described for the LH side.
-
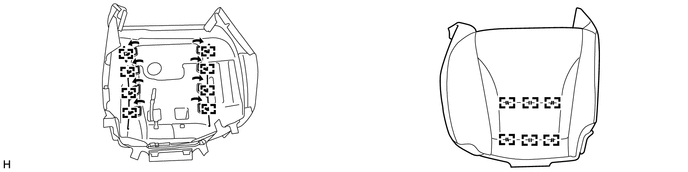
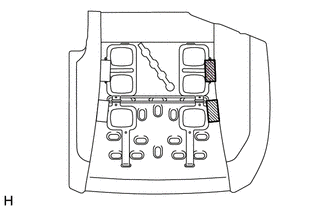
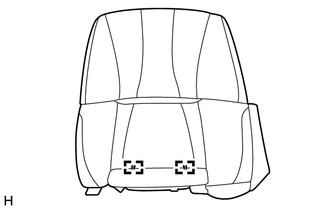
REMOVE SEPARATE TYPE REAR SEAT CUSHION COVER LH
-
Remove the 8 hog rings and pull out the strap from the hole of the rear seat cushion pad LH.
-
Remove the 6 hog rings and separate type rear seat cushion cover LH.
-
-
REMOVE SEPARATE TYPE REAR SEAT CUSHION COVER RH
Tech Tips
Use the same procedure described for the LH side.
-
REMOVE SEAT COVER WIRE
-
Remove the seat cover wire.
-
-
REMOVE REAR SEAT CUSHION PAD (w/ Refresh Seat)
-
Remove the 4 hog rings and pull out the strap from the hole of the rear seat cushion pad.

Double-sided Tape - - -
Remove the double-sided tape and rear seat cushion pad.
-
-
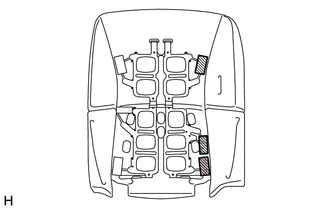
REMOVE SEAT CUSHION MAIN STRETCHER CUSHION ASSEMBLY (w/ Refresh Seat)
-
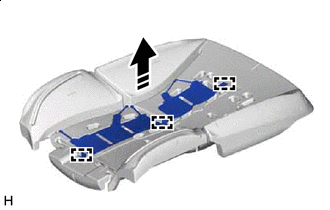
Cut the tack pin and fold back the strap.
-
Remove the 2 pieces of felt.
-
Remove in this Direction Detach the hook and remove the seat cushion main stretcher cushion assembly.
-
-
REMOVE SEAT CUSHION MAIN STRETCHER CUSHION ASSEMBLY (w/ Refresh Seat)
Tech Tips
Use the same procedure described for the LH side.
-
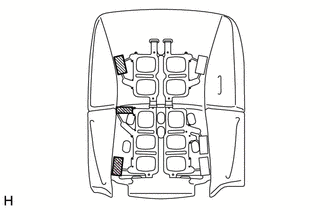
REMOVE SEAT CUSHION MAIN STRETCHER CUSHION ASSEMBLY (w/ Refresh Seat)
-
Cut the tack pin and fold back the strap.
-
Remove the 2 pieces of felt.
-
Remove in this Direction Detach the hook and remove the seat cushion main stretcher cushion assembly.
-
-
REMOVE SEAT CUSHION MAIN STRETCHER CUSHION ASSEMBLY (w/ Refresh Seat)
Tech Tips
Use the same procedure described for the LH side.
-
REMOVE REAR SEAT CUSHION AIRBAG ASSEMBLY LH
-
REMOVE REAR SEAT CUSHION AIRBAG ASSEMBLY RH
Tech Tips
Use the same procedure described for the LH side.
-
REMOVE REAR NO. 2 SEAT WIRE LH
-
Double-sided Tape Disconnect the connector.
-
Detach the wire harness clamp.
-
Using a thin-bladed screwdriver with its tip wrapped with protective tape, detach the claw and remove the rear No. 2 seat wire LH.
-
-
REMOVE REAR NO. 2 SEAT WIRE RH
Tech Tips
Use the same procedure described for the LH side.
-
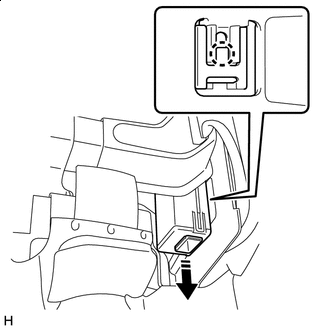
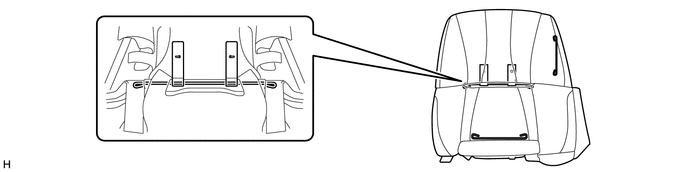
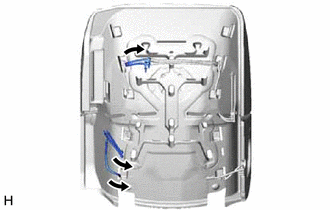
REMOVE REAR CENTER SEAT CUSHION COVER SUB-ASSEMBLY
-
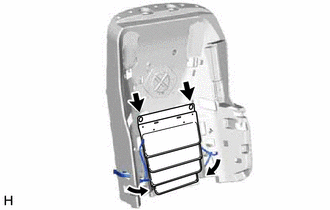
*a Hog Ring *b Hook Remove the hog ring.
-
Detach the hook and remove the rear center seat cushion cover sub-assembly.
-
-
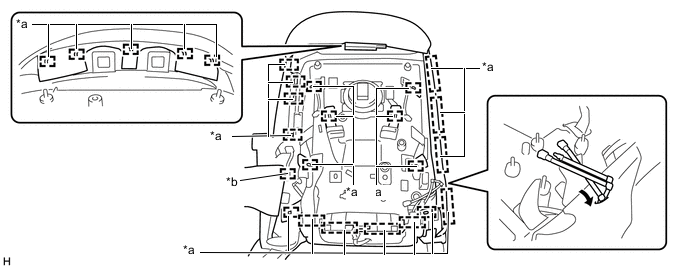
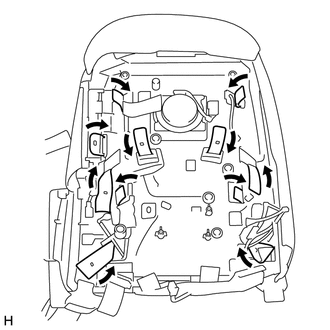
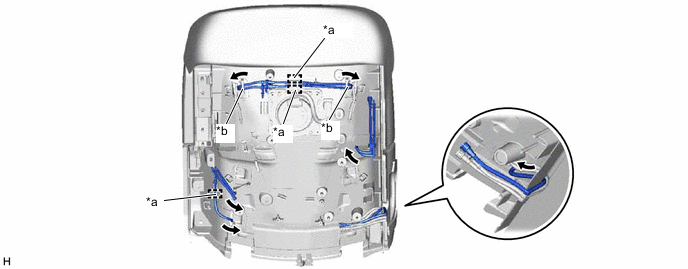
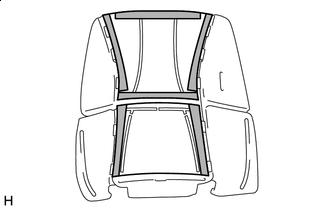
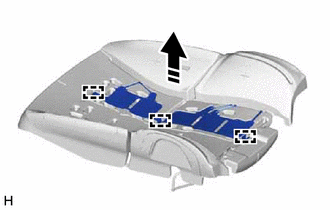
REMOVE REAR CENTER SEAT CUSHION PAD
-
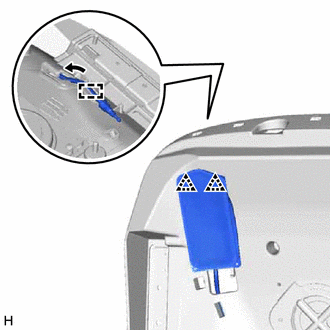
Double-sided Tape w/ Occupant Detection Sensor:
-
Using a thin-bladed screwdriver wrapped with protective tape, detach the claw and disconnect the connector of the occupant detection sensor.
-
-
Remove the rear center seat cushion pad from the center seat cushion frame sub-assembly.
-
-
REMOVE REAR SEAT INNER BELT ASSEMBLY LH
-
REMOVE REAR SEAT INNER BELT ASSEMBLY RH
-
REMOVE REAR SEAT CENTER LAP TYPE BELT ASSEMBLY RH
-
REMOVE REAR NO. 2 SEAT WIRE LH
Tech Tips
Use the same procedure for the LH and RH sides.
-

Remove in this Direction Protective Tape Disconnect the connector.
-
Detach the wire harness clamp.
-
Using a thin-bladed screwdriver with its tip wrapped with protective tape, detach the claw and remove the rear No. 2 seat wire LH.
-
-
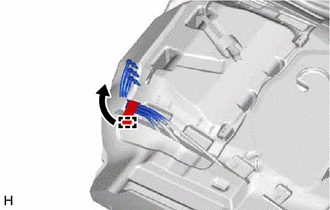
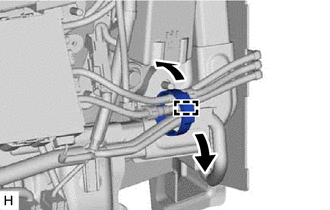
REMOVE REAR SEAT LEGREST ASSEMBLY
Tech Tips
Use the same procedure for the LH and RH sides.
-
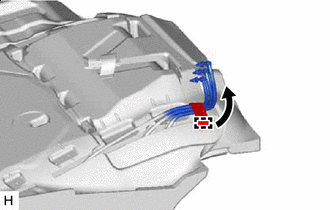
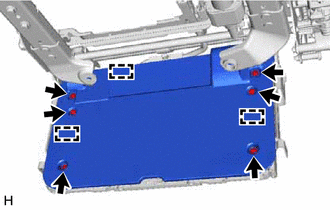
Remove in this Direction (1) 
Remove in this Direction (2) Pull in the removal direction (1) shown in the illustration to detach the clip.
-
Lift in the removal direction (2) shown in the illustration, detach the guide and remove the rear seat legrest assembly.
-
-
REMOVE REAR SEAT LEGREST COVER
Tech Tips
Use the same procedure for the LH and RH sides.
-
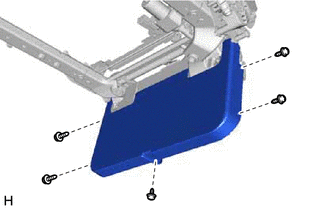
Remove the 5 screws and rear seat legrest cover.
-
-
REMOVE REAR SEAT LEGREST COVER RH (w/ Ottoman)
-
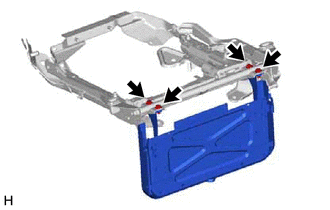
Remove the 6 screws.
-
Detach the guide and remove the rear seat legrest cover RH.
-
-
REMOVE REAR SEAT LEGREST COVER (w/ Ottoman)
-

Remove the 6 screws and rear seat legrest cover.
-
-
REMOVE REAR NO. 2 SEAT WIRE RH (w/ Ottoman)
-
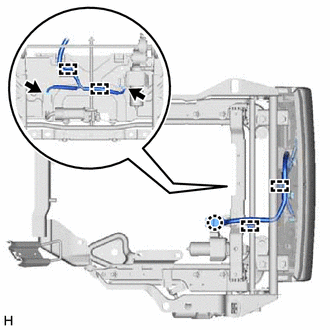
Disconnect the 2 connectors.
-
Detach the wire harness clamp.
-
Detach the claw and remove the rear No. 2 seat wire RH.
-
-
REMOVE REAR SEAT LEGREST ARM SUB-ASSEMBLY LH
-
Remove the 4 bolts and rear seat legrest arm sub-assembly LH.
-
-
REMOVE REAR SEAT LEGREST ARM SUB-ASSEMBLY RH
-
w/o Ottoman:
-
Use the same procedure described for the LH side.
-
-
w/ Ottoman:
-
Remove the 4 bolts and rear seat legrest arm sub-assembly RH.
-
-
-
REMOVE NO. 1 SEATBACK CHECK VALVE WITH HOSE LH (w/ Refresh Seat)
-
Fastening Tape Detach the fastening tape and fold back the separate type rear seatback cover LH.
-
Disconnect the connector.
-
Detach the claw and connect the connector.
-
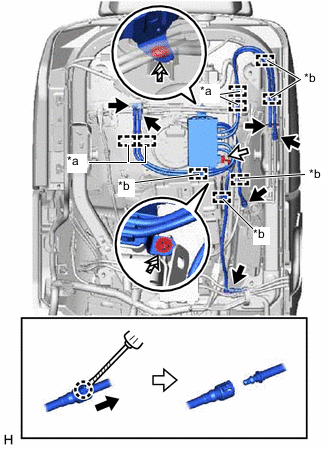
*a Clamp *b Hook *c Tube Clamp Joint Connector Clip Protective Tape Using a thin-bladed screwdriver with its tip wrapped with protective tape, detach the claw and disconnect the joint.
-
Remove the tube from the clamp.
-
Remove the tube from the hook.
-
Disconnect the connector.
-
Remove the 4 clips.
-
Detach the tube clamp and remove the No. 1 seatback check valve with hose LH.
-
-
REMOVE NO. 1 SEATBACK CHECK VALVE WITH HOSE RH (w/ Refresh Seat)
Tech Tips
Use the same procedure described for the LH side.
-
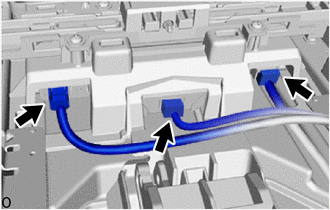
REMOVE NO. 2 SEATBACK CHECK VALVE WITH HOSE LH (w/ Refresh Seat)
-
*a Clamp *b Tube Clamp Joint Connector Clip Protective Tape Using a thin-bladed screwdriver with its tip wrapped with protective tape, detach the claws and disconnect the joint.
-
Remove the tube from the clamp.
-
Detach the tube clamp and remove the tube.
-
Disconnect the connector.
-
Remove the 2 screws and No. 2 seatback check valve with hose LH.
-
-
REMOVE NO. 2 SEATBACK CHECK VALVE WITH HOSE RH (w/ Refresh Seat)
Tech Tips
Use the same procedure described for the LH side.
-
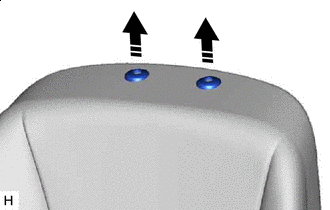
REMOVE REAR SEAT HEADREST ASSEMBLY LH
-
Remove in this Direction Remove the 2 pins.
-
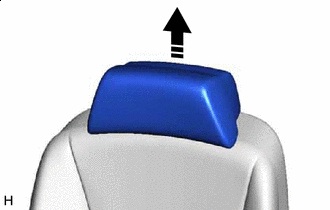
Remove in this Direction Remove the rear seat headrest assembly LH.
-
-
REMOVE REAR SEAT HEADREST ASSEMBLY RH
Tech Tips
Use the same procedure described for the LH side.
-
REMOVE REAR SEAT HEADREST SUPPORT
Tech Tips
Use the same procedure for the LH and RH sides.
-
Detach the claw.
-
Remove in this Direction Remove the 2 rear seat headrest supports.
-
-
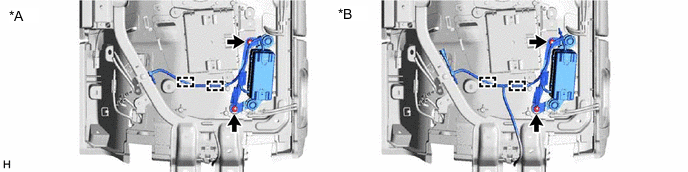
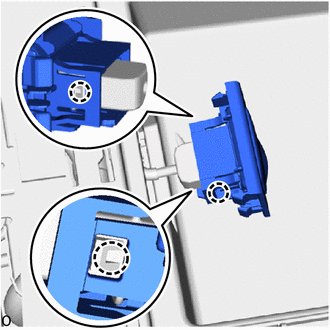
REMOVE SEATBACK CHECK VALVE WITH BRACKET LH
-
Detach the claw and remove the clamp.
-
Using a thin-bladed screwdriver with its tip wrapped with protective tape, detach the claw and disconnect the joint.
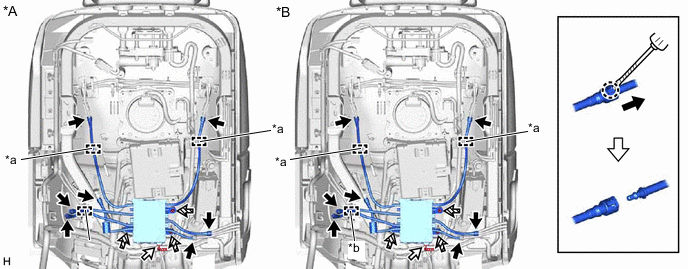
*A w/o Refresh Seat *B w/ Refresh Seat *a Clamp *b Tube Clamp Joint Connector Screw - - -
Remove the tube from the clamp.
-
Detach the tube clamp and remove the tube.
-
Disconnect the connector.
-
Remove the 3 screws and seatback check valve with bracket LH.
-
-
REMOVE SEATBACK CHECK VALVE WITH BRACKET RH
Tech Tips
Use the same procedure described for the LH side.
-
REMOVE REAR SEAT WIRE LH
-
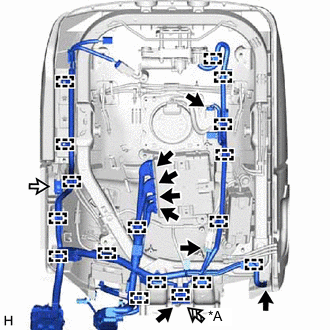
*A w/ Refresh Seat Rear Seat Airbag Assembly LH Connector w/o Refresh Seat:
-
Disconnect the 8 connectors.
-
-
w/ Refresh Seat:
-
Disconnect the 9 connectors.
-
-
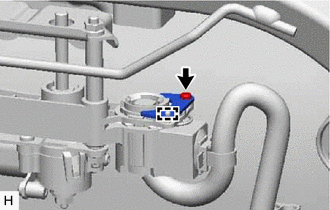
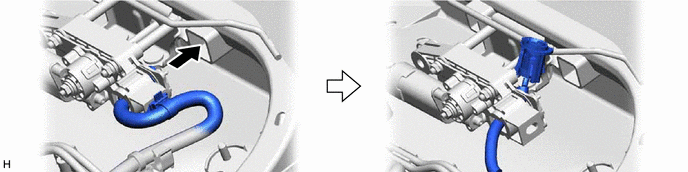
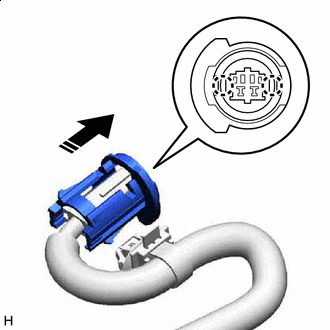
Disconnect the connector of the rear seat airbag assembly LH.
-
Push down the white housing lock and slide the yellow CPA.
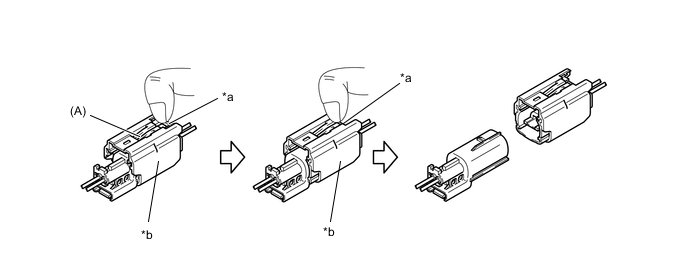
*a Housing Lock *b CPA Note
-
Do not pull while holding the wire harness.
-
Do not try to release the lock while holding down the top of the CPA (A in the illustration), as this prevents the lock from being released.
-
-
Slide the yellow CPA while pushing down the white housing lock again, and disconnect the connector.
-
-
Detach the wire harness clamp.
-

Detach the hook.
-
Remove the screw.
-
Detach the guide and remove the plate.
-
Pull out the connector holder from the rear No. 2 seat headrest adjuster.
-
Remove in this Direction Detach the claw and remove the connector holder.
-

Remove in this Direction Pull out the connector from the No. 2 rear seat headrest adjuster and remove the rear seat wire LH.
-
-
REMOVE REAR SEAT WIRE RH
Tech Tips
Use the same procedure described for the LH side.
-
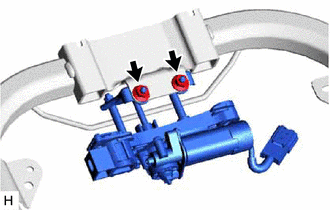
REMOVE LUMBER SUPPORT PUMP SUB-ASSEMBLY LH
-
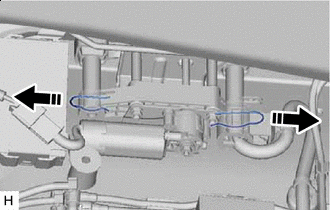
Remove the tube from the clamp.
*A w/o Refresh Seat *B w/ Refresh Seat -
Remove the 2 nuts and lumbar support pump sub-assembly LH.
-
-
REMOVE LUMBER SUPPORT PUMP SUB-ASSEMBLY RH
Tech Tips
Use the same procedure described for the LH side.
-
REMOVE POSITION CONTROL ECU ASSEMBLY LH
-
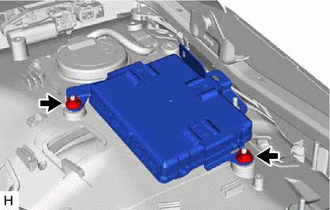
Remove the 2 nuts and position control ECU assembly LH.
-
-
REMOVE POSITION CONTROL ECU ASSEMBLY RH
Tech Tips
Use the same procedure described for the LH side.
-
REMOVE REAR SEATBACK MAIN FRAME SUB-ASSEMBLY LH
-
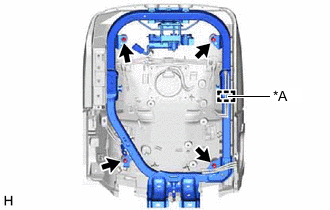
*A w/ Refresh Seat w/ Refresh Seat:
-
Detach the tube clamp and remove the tube.
-
-
Remove the 4 nuts and rear seatback main frame sub-assembly LH.
-
-
REMOVE REAR SEATBACK MAIN FRAME SUB-ASSEMBLY RH
Tech Tips
Use the same procedure described for the LH side.
-
REMOVE REAR NO. 2 SEAT HEADREST ADJUSTER SUB-ASSEMBLY
-
Remove the 2 nuts and rear No. 2 seat headrest adjuster sub-assembly.
-
-
REMOVE REAR NO. 1 SEAT HEADREST ADJUSTER SUB-ASSEMBLY
Tech Tips
Use the same procedure described for the rear No. 2 seat headrest adjuster sub-assembly.
-
REMOVE SEAT HEATER CONTROL SUB-ASSEMBLY LH
-
Remove in this Direction Detach the claw and disconnect the seat heater control sub-assembly LH.
-
-
REMOVE SEAT HEATER CONTROL SUB-ASSEMBLY RH
Tech Tips
Use the same procedure described for the LH side.
-
REMOVE SEPARATE TYPE REAR SEATBACK COVER WITH PAD LH
-
Detach the hook.
*a Hook *b Wire Harness Clamp -
Pull out the tube from the separate type rear seatback cover LH.
-
Detach the wire harness clamp.
-

Remove in this Direction (1) Remove in this Direction (2) Remove the nut and the 2 brackets of the separate type rear seatback cover LH.
-
Pull out the strap and bracket of the separate type rear seatback cover LH from the hole of the rear seat sub panel sub-assembly LH.
-
w/ Refresh Seat:
-
Remove the tube from the clamp.
*a Clamp *b Hook -
Remove the tube from the hook.
-
-
Remove the separate type rear seatback cover with pad LH from the rear seat sub panel sub-assembly LH.
-
-
REMOVE SEPARATE TYPE REAR SEATBACK COVER WITH PAD RH
Tech Tips
Use the same procedure described for the LH side.
-
REMOVE SEPARATE TYPE REAR SEATBACK COVER LH
-
Pull out the strap and bracket of the separate type rear seatback cover LH from the hole of the separate type rear seatback pad LH.
-
Remove the 2 hog rings and separate type rear seatback cover LH.
-
-
REMOVE SEPARATE TYPE REAR SEATBACK COVER RH
Tech Tips
Use the same procedure described for the LH side.
-
REMOVE SEAT COVER WIRE
-
Remove the seat cover wire and strap.
-
-
REMOVE REAR UPPER SEATBACK PAD B (w/ Refresh Seat)
-
Double-sided Tape Remove the double-sided tape and rear upper seatback pad B.
-
-
REMOVE REAR UPPER SEATBACK PAD A (w/ Refresh Seat)
Tech Tips
Use the same procedure described for rear upper seatback pad B.
-
REMOVE SEATBACK MAIN STRETCHER CUSHION ASSEMBLY (w/ Refresh Seat)
-
Remove the 3 pieces of felt.
-
Pull out the tube of the seatback main stretcher cushion assembly from the hole of the separate type rear seatback pad LH.
-
Detach the hook and remove the seatback main stretcher cushion assembly.
-
-
REMOVE SEATBACK MAIN STRETCHER CUSHION ASSEMBLY (w/ Refresh Seat)
Tech Tips
Use the same procedure described for the LH side.
-
REMOVE SEATBACK MAIN STRETCHER CUSHION ASSEMBLY (w/ Refresh Seat)
-
Remove the 3 pieces of felt.
-
Pull out the tube of the seatback main stretcher cushion assembly from the hole of the separate type rear seatback pad LH.
-
Remove in this Direction Detach the hook and remove the seatback main stretcher cushion assembly.
-
-
REMOVE SEATBACK MAIN STRETCHER CUSHION ASSEMBLY (w/ Refresh Seat)
Tech Tips
Use the same procedure described for the LH side.
-
REMOVE REAR SEAT AIRBAG ASSEMBLY LH
-
REMOVE REAR SEAT AIRBAG ASSEMBLY RH
Tech Tips
Use the same procedure described for the LH side.
-
REMOVE LUMBAR SUPPORT ADJUSTER ASSEMBLY LH
-
Pull out the tube from the hole of the rear seat sub panel sub-assembly LH.
-
Using a clip remover, detach the clip and remove the lumbar support adjuster assembly LH.
-
-
REMOVE LUMBAR SUPPORT ADJUSTER ASSEMBLY RH
Tech Tips
Use the same procedure described for the LH side.
-
REMOVE REAR SEATBACK SUPPORT LH
-
Remove the tube from the clamp.
-
Pull out the tube from the hole of the rear seat sub panel sub-assembly LH.
-
Using a clip remover, detach the clip and remove the rear seatback support LH.
-
-
REMOVE REAR SEATBACK SUPPORT RH
Tech Tips
Use the same procedure described for the LH side.
-
REMOVE REAR CENTER NO. 2 SEAT ARMREST PANEL SUB-ASSEMBLY
-
Remove in this Direction Detach the clip and claws.
-
While moving the rear center No. 2 seat armrest panel sub-assembly in the direction indicated by the arrow shown in the illustration, detach the guide to remove it.
-
-
REMOVE REAR CENTER NO. 2 SEAT ARMREST PANEL
-
Remove in this Direction Detach the clip and claw.
-
While moving the rear center No. 2 seat armrest panel in the direction indicated by the arrow shown in the illustration, detach the guide to remove it.
-
-
REMOVE REAR POWER SEAT SWITH WITH BRACKET
-
Remove the 4 screws and disconnect the rear power seat switch with bracket from the rear center seat armrest assembly.
-
-
REMOVE REAR CENTER SEAT ARMREST BRACKET LH
-
Remove the 2 screws and rear center seat armrest bracket LH.
-
-
REMOVE REAR CENTER SEAT ARMREST BRACKET RH
-
Remove the 2 screws and rear center seat armrest bracket RH.
-
-
REMOVE REAR CENTER SEAT ARMREST COVER
-
Remove the rear center seat armrest cover.
-
-
REMOVE REAR POWER SEAT SWITCH
-
Disconnect the connector, detach the clamp and remove the rear power seat switch.
-
-
REMOVE REAR CENTER SEAT CUP HOLDER TRAY
-

Detach the claw and remove the rear center seat cup holder tray.
-
-
REMOVE REAR CENTER SEAT ARMREST CUP HOLDER SUB-ASSEMBLY
-
Remove the 6 screws, detach the guide and remove the rear center seat armrest cup holder sub-assembly.
-
-
REMOVE CENTER ARMREST LOCK SUB-ASSEMBLY
-
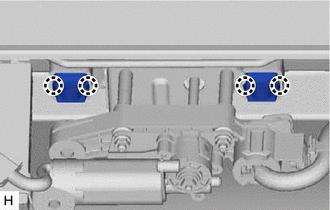
Remove in this Direction Screw Remove the 4 screws.
-
Detach the guide and remove the center armrest lock sub-assembly in the direction indicated by the arrow shown in the illustration.
-
-
REMOVE REAR CENTER SEAT ARMREST DOOR SUB-ASSEMBLY
-
Using a clip remover, remove the 2 console compartment door hinge shafts.
-
Remove in this Direction (1) Remove in this Direction (2) Slide the rear center seat armrest door sub-assembly in the removal direction (1) shown in the illustration and detach the hinge.
-
Remove the rear center seat armrest door sub-assembly in the removal direction (2) shown in the illustration.
-
-
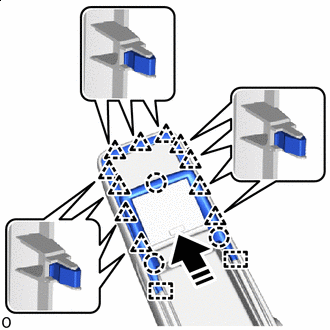
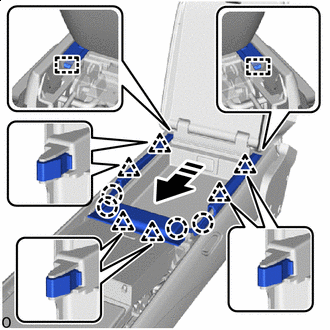
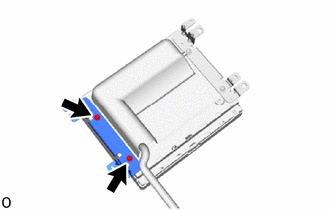
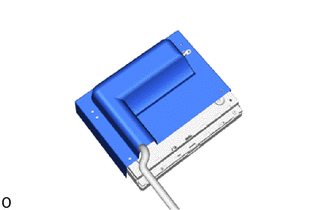
REMOVE REAR CENTER NO. 2 SEAT ARMREST BOX
-
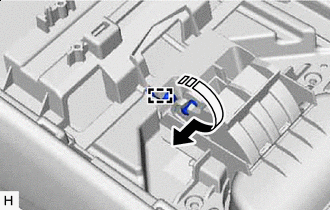
Incline in this Direction Remove in this Direction Protective tape Apply protective tape to the rear center No. 2 seat armrest box to prevent damage.
-
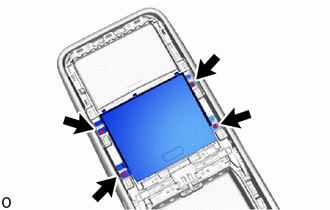
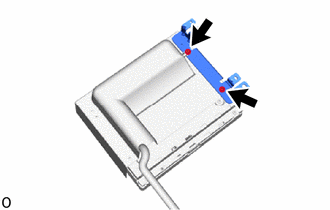
Insert a thin-bladed screwdriver with its tip wrapped with protective tape and push the HDMI cable cover toward the front of the vehicle.
-
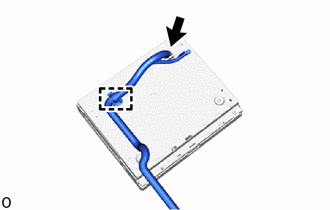
Detach the claw and disconnect the wire harness from the HDMI cable cover.
-
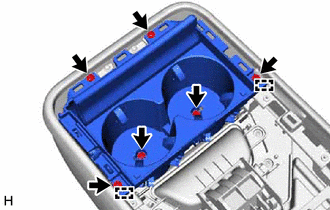
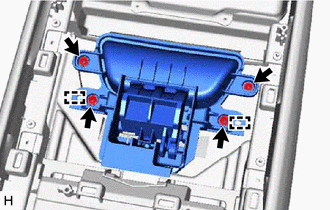
Disconnect the 3 connectors.
-
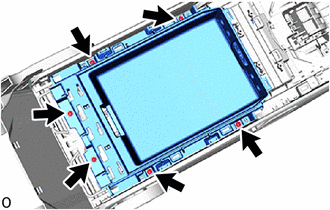
Remove the 6 screws.
-
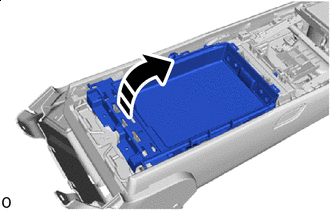
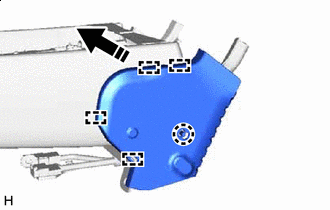
Remove in this Direction Tilt the rear center No. 2 seat armrest box in the direction indicated by the arrow shown in the illustration.
-
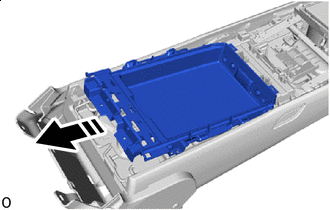
Remove in this Direction Remove the rear center No. 2 seat armrest box as shown in the illustration.
-
-
REMOVE HEADPHONE TERMINAL
-
for LH Side:
-
for RH Side:
-
-
REMOVE USB CHARGER SOCKET
-
REMOVE CENTER ARMREST LOCK SUB-ASSEMBLY
-
Remove in this Direction Detach the cable clamp and disconnect the cable.
-
Remove the 4 screws, detach the guide and remove the center armrest lock sub-assembly.
-
-
REMOVE CENTER ARMREST HINGE COVER LH
-
Remove in this Direction Detach the claw and guides and remove the center armrest hinge cover.
-
-
REMOVE CENTER ARMREST HINGE COVER
Tech Tips
Use the same procedure described for the center armrest hinge cover LH.