PROCEDURE
- Click here
INSPECT PEDESTRIAN DETECTION CHAMBER WITH PEDESTRIAN PROTECTION SENSOR
-
If B16A6 is output, any deformation caused by a hit-and-run accident, any signs of damage from hitting something lightly when parking, any airbags deployed or any defects as mentioned below, replace the front bumper energy absorber.
Standard Front bumper energy absorber has bends or cracks -
Perform an airtightness check on the pedestrian detection chamber assembly.
-
- Click here
AIR TIGHTNESS CHECK
Note:Do not remove the pedestrian detection chamber and pedestrian protection sensor.
-
Remove the pedestrian detection chamber assembly.
-
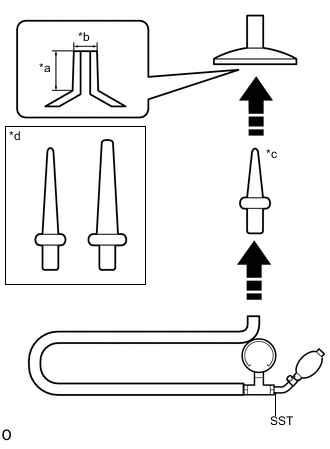
*a 12 mm (0.472 in.) *b 7 mm (0.276 in.) *c Use *d Not Use Connect the attachment to SST.
Note:Using attachment shown in the illustration.
-
Using the supplied attachment, connect SST to the breathing hole on the other side of the sensor.
Note:Check that the securely connect SST.
-
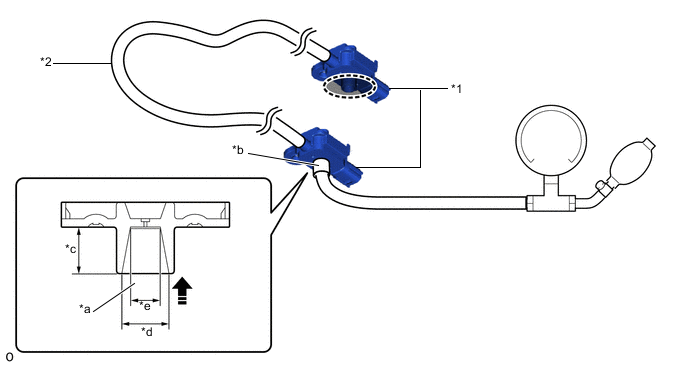
*1 Pedestrian Protection Sensor *2 Pedestrian Detection Chamber *a Attachment *b Breathing Hole *c 8.5 mm (0.335 in.) *d 8.6 mm (0.339 in.) *e 5.5 mm (0.217 in.) - - 
Cover with Hand 
Connect in this Direction Use your hand to cover one of the breathing holes on the pedestrian protection sensor.
-
Increase the pressure until the needle on the vacuum pump reaches 20 kPa (150 mmHg).
Tip:Approximately 2 pumps are needed to increase the pressure to 20 kPa (150 mmHg).
-
Wait 10 Seconds, and check that the needle has not moved.
Tip:If the needle changes, replace the pedestrian detection chamber assembly with a new one.
-