PROCEDURE
- Click here
INSPECT REAR SPEAKER ASSEMBLY (for LH Side)
-
With the speaker in the installed condition, check there are no abnormalities such looseness or rattling.
-
Check that there is no foreign matter inside the speaker.
-
Check that the speaker cone is not damaged.
-
for 12 Speakers:
-
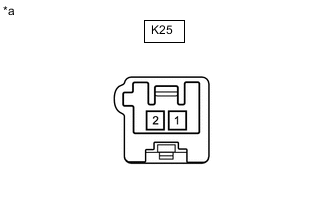
*a Component without harness connected
(Rear Speaker Assembly)
Measure the resistance according to the value(s) in the table below.
Standard Resistance Tester Connection Condition Specified Condition K25-1 - K25-2 Always 4 Ω If the result is not as specified, replace the rear speaker assembly.
-
-
for 24 Speakers:
-
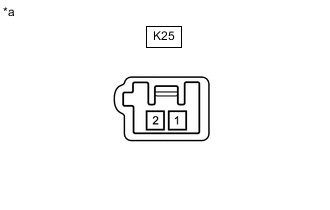
*a Component without harness connected
(Rear Speaker Assembly)
Measure the resistance according to the value(s) in the table below.
Standard Resistance Tester Connection Condition Specified Condition K25-1 - K25-2 Always 4 Ω If the result is not as specified, replace the rear speaker assembly.
-
-
- Click here
INSPECT REAR SPEAKER ASSEMBLY (for RH Side)
-
With the speaker in the installed condition, check there are no abnormalities such looseness or rattling.
-
Check that there is no foreign matter inside the speaker.
-
Check that the speaker cone is not damaged.
-
for 12 Speakers:
-
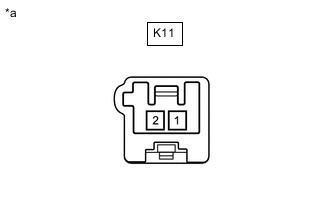
*a Component without harness connected
(Rear Speaker Assembly)
Measure the resistance according to the value(s) in the table below.
Standard Resistance Tester Connection Condition Specified Condition K11-1 - K11-2 Always 4 Ω If the result is not as specified, replace the rear speaker assembly.
-
-
for 24 Speakers:
-
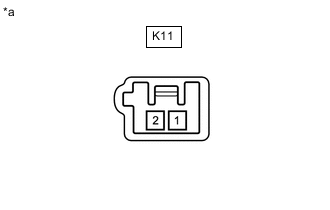
*a Component without harness connected
(Rear Speaker Assembly)
Measure the resistance according to the value(s) in the table below.
Standard Resistance Tester Connection Condition Specified Condition K11-1 - K11-2 Always 4 Ω If the result is not as specified, replace the rear speaker assembly.
-
-
- Click here
INSPECT REAR NO. 2 SPEAKER ASSEMBLY
-
With the speaker in the installed condition, check there are no abnormalities such looseness or rattling.
-
Check that there is no foreign matter inside the speaker.
-
Check that the speaker cone is not damaged.
-
When there is a malfunction such as noise from a speaker or no sound at all, replace the speaker with a new one and check that the malfunction disappears.
OK Malfunction disappears. Tip:
-
When there is a possibility that either the right or left rear No. 2 speaker assembly is defective, inspect by interchanging the right one with the left one.
-
Perform the inspection above on both the LH and RH sides.
-
-